Introduction
A garage door opener is an essential component that ensures smooth and secure operation of your garage door. However, if the door doesn’t open or close completely, it might be time to adjust the travel settings. Knowing how to adjust the travel on a garage door opener is crucial for preventing unnecessary strain on the motor and ensuring proper door alignment.
In this guide, we’ll walk you through the process of adjusting your garage door opener’s travel, troubleshooting common issues, and maintaining optimal functionality. Whether you’re a DIY enthusiast or a homeowner looking to fine-tune your system, this article will help you achieve a perfect garage door operation.
Read too: How to Perform a Chamberlain Garage Door Opener Code Change? Mastering Security
Understanding Garage Door Travel Limits
Before making any adjustments, it’s important to understand what travel limits are and how they affect your garage door opener’s performance.
What Are Travel Limits?
Travel limits control how far the garage door opens and closes. If these settings are incorrect, the door may:
- Stop too soon before reaching the ground or the fully open position.
- Travel too far, causing unnecessary strain on the opener.
- Reopen after closing due to a misalignment or safety sensor issue.
Why You Need to Adjust Travel on a Garage Door Opener
- Ensures smooth operation: Prevents sudden stops or partial openings.
- Reduces motor strain: Avoids excessive force that can damage the system.
- Enhances safety: Prevents accidents caused by improper door alignment.
- Extends opener lifespan: Proper settings reduce wear and tear on mechanical parts.
Tools You’ll Need
Before you begin adjusting your garage door travel settings, gather the following tools:
- Stepladder: To safely reach the motor unit.
- Screwdriver: Depending on the model, you may need a flathead or Phillips screwdriver.
- Owner’s manual: Each opener model has specific instructions for adjusting travel.
- Measuring tape: To check door alignment before and after adjustments.
How To Adjust The Travel On A Garage Door Opener
Step 1: Identify Your Garage Door Opener Type
There are different types of garage door openers, and travel adjustments may vary slightly depending on the brand and model. Most modern openers, such as Chamberlain, LiftMaster, Genie, and Craftsman, have travel limit adjustment screws or electronic settings on the motor unit.
- Screw Drive & Chain Drive Openers: Use physical limit adjustment screws or dials.
- Belt Drive Openers: Often feature digital programming for travel limits.
- Smart Garage Door Openers: Adjustments can sometimes be made via an app or control panel.
Step 2: Locate the Travel Limit Adjustment Controls
- Find the motor unit: The main unit is mounted on the ceiling of your garage.
- Look for adjustment screws or buttons: These are typically labeled “Up Limit” and “Down Limit” or simply “Travel Adjustment”.
- Consult your owner’s manual: This will provide specific guidance on adjusting the travel settings for your opener model.
Step 3: Adjust the Up Travel (Opening Distance)
If your garage door stops before fully opening:
- Turn the “Up Limit” screw clockwise: This will extend the opening distance.
- Make small adjustments: Turn the screw in small increments (1/4 turn at a time).
- Test the door: Press the opener button and observe if it opens completely.
- Repeat if necessary: Continue adjusting until the door reaches the correct open position.
If the door opens too far:
- Turn the “Up Limit” screw counterclockwise to reduce travel distance.
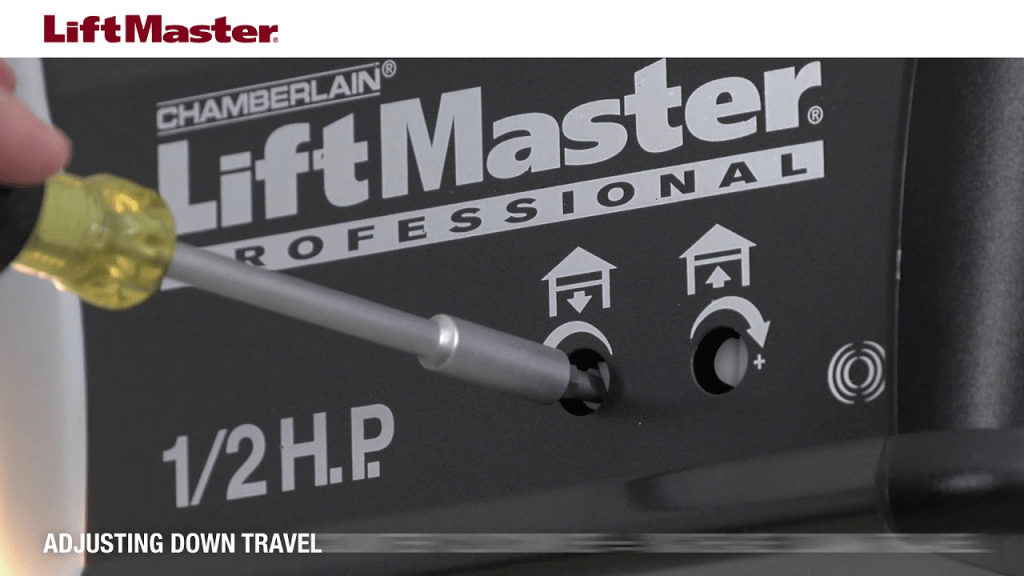
Step 4: Adjust the Down Travel (Closing Distance)
If your garage door stops before fully closing:
- Turn the “Down Limit” screw clockwise: This will extend the closing travel.
- Make gradual adjustments: Turn the screw slightly and test the door.
- Check alignment: Ensure the door reaches the ground without excessive force.
If the door closes too far or reverses after hitting the ground:
- Turn the “Down Limit” screw counterclockwise to shorten the closing travel.
Step 5: Test the Safety Reversal System
After adjusting the travel limits, it’s important to check the safety reversal system to ensure the garage door stops and reverses if it encounters an obstacle.
- Place an object (like a wood block) under the door.
- Close the door: It should stop and reverse when it touches the object.
- Adjust force settings if needed: If the door does not reverse properly, adjust the force settings according to the manual.
Common Troubleshooting Tips
1. Garage Door Won’t Close Completely
- Check the down travel limit setting.
- Inspect safety sensors: Make sure they are aligned and free of obstructions.
- Lubricate the tracks and rollers to ensure smooth movement.
2. Garage Door Stops and Reopens
- Adjust the down limit setting: The opener may think the door has hit an obstacle.
- Clean the photo-eye sensors to remove dirt or debris blocking the beam.
3. Garage Door Opens Too Far
- Reduce the up travel limit to prevent the motor from straining.
- Check the door springs and cables for signs of excessive tension.
4. Garage Door Slams Shut
- Adjust the down travel limit to slow down the closing speed.
- Inspect the torsion spring system for any signs of wear or damage.
Maintenance Tips for Optimal Performance
To keep your garage door opener in top shape and prevent frequent adjustments, follow these maintenance tips:
- Lubricate moving parts: Apply garage door lubricant to the chain, rollers, and hinges every six months.
- Inspect cables and springs: Look for fraying, rust, or signs of wear.
- Test the safety reversal system monthly: Place an object under the door and ensure it reverses upon contact.
- Tighten loose hardware: Check for loose screws, bolts, or brackets.
Conclusion
Adjusting the travel on a garage door opener is an essential task that ensures smooth operation, prevents damage, and extends the lifespan of your opener. By following these steps, you can fine-tune your opener to achieve the perfect open and close positions, enhancing both safety and efficiency.
Regular maintenance and testing will keep your garage door working optimally, saving you from costly repairs and unexpected malfunctions. Now that you know how to adjust the travel on a garage door opener, you can confidently make the necessary adjustments whenever needed!


Leave a Reply