Installing a garage door opener is one of the most useful upgrades a homeowner can do to improve daily convenience and home security. Among the top-rated choices is the Genie Belt Drive Garage Door Opener, known for its quiet operation, smart technology features, and reliable performance. If you’re ready to take on the task yourself, this guide will walk you through how to install a Genie belt drive garage door opener—step-by-step.
In this comprehensive tutorial, you’ll not only learn how to install a Genie belt drive garage door opener, but you’ll also pick up valuable tips, safety guidelines, and maintenance advice to keep your system running efficiently for years.
Read too: Door and Garage Door Companies: Choosing the Right Partner for Your Needs
Why Choose a Genie Belt Drive Garage Door Opener?
Before diving into installation, let’s look at why many homeowners prefer Genie belt drive openers over other types:
- Ultra-quiet operation – Ideal for attached garages or bedrooms above the garage.
- Smooth and efficient movement – Belt drives offer smoother starts and stops than chain drives.
- Smart home compatibility – Many models work with Alexa, Google Assistant, and smartphone apps.
- Maintenance-free design – Belt drives don’t need lubrication like chain drives do.
Genie has a reputation for quality, innovation, and ease of use, making their belt drive models a favorite for DIYers and professionals alike.
Tools and Materials Needed
Tools:
- Drill and bits
- Flathead and Phillips screwdrivers
- Adjustable wrench
- Socket wrench set
- Stepladder
- Tape measure
- Level
- Pliers
- Safety goggles
- Wire stripper/cutter (for wiring control panel and sensors)
Materials:
- Genie belt drive garage door opener kit
- Safety sensors (included)
- Mounting brackets and hardware
- Garage door arm and rail assembly
- Lag screws (included)
- Light bulb (check compatibility)
- Smartphone (for Wi-Fi setup, optional)
Unboxing and Preparing for Installation
Start by unpacking your Genie garage door opener kit. You should see:
- Motor head
- Rail sections
- Belt and pulley assembly
- Safety reversing sensors
- Mounting brackets
- Wall control panel
- Remote controls
- Instruction manual
Make sure all parts are accounted for using the checklist in the manual. Lay them out in an organized workspace.
How To Install A Genie Belt Drive Garage Door Opener – Step-by-Step Instructions
Step 1: Assemble the Rail and Belt System
- Connect the rail sections together securely.
- Slide the trolley carriage onto the rail before finishing the assembly.
- Install the idler pulley at the door end of the rail.
- Thread the belt around the pulleys, attaching both ends to the trolley.
- Adjust the belt tensioner to provide firm but not overtight tension.
Check that the belt has around ¼ inch of give when pressed at the midpoint.
Step 2: Attach Rail to Motor Unit
Secure the rail to the motor head using the bracket and bolts included. Lay it flat to ensure everything is aligned.
This is a good time to insert a compatible LED or halogen bulb into the light socket if your model includes a lighting feature.
Step 3: Install Header Bracket
- Find the center point above your garage door.
- Secure the header bracket to the wall framing above the door with lag screws.
- Connect the door end of the rail to this bracket using a clevis pin and cotter pin.
Ensure the rail is perfectly centered and level above the door.
Step 4: Mount the Motor to the Ceiling
- Use angle iron or hanging straps to suspend the motor head from ceiling joists.
- Ensure it’s level and not hanging at an angle.
- Attach using lag bolts or screws into the ceiling joists or anchors.
Avoid drywall-only support—it must be anchored into framing for stability.
Step 5: Connect the Door Arm to the Trolley
- Close the garage door manually.
- Attach the straight and curved door arms together and connect them from the trolley to the door.
- Use the provided hardware to secure the arms to the top door bracket.
Test the movement by opening and closing the door manually to ensure smooth operation.
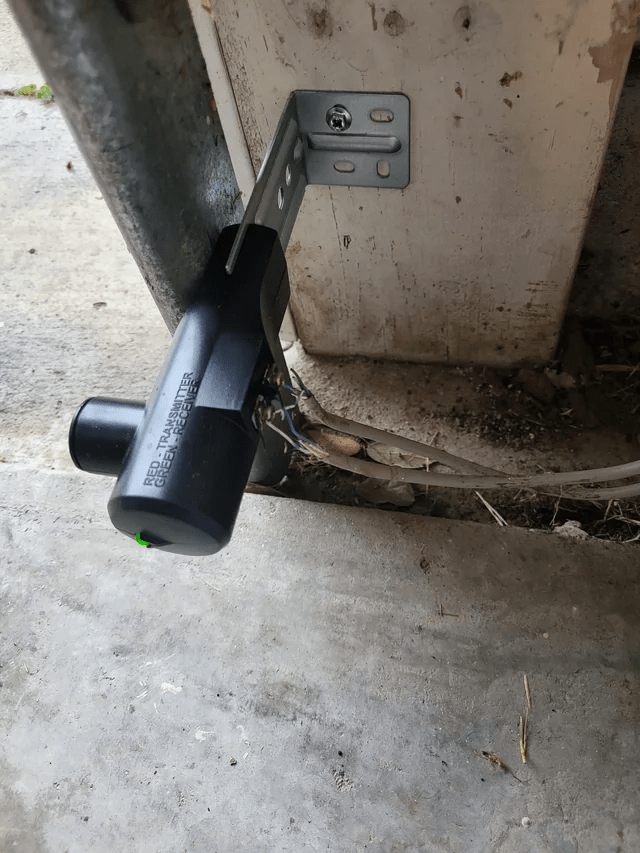
Step 6: Install Safety Sensors
Safety sensors are required by law and are vital for preventing injury or property damage.
- Mount each sensor 6 inches above the floor on either side of the garage door.
- Use the brackets to align them directly across from each other.
- Connect the wires to the appropriate terminals on the opener motor unit.
- Use insulated staples to secure the wires along the wall and ceiling.
Check that the indicator lights on both sensors are solid (not blinking), which confirms alignment.
Step 7: Mount the Wall Console
- Choose a location inside the garage near the entry door.
- Mount the control panel using screws or anchors.
- Run the low-voltage wire to the motor unit and connect to the proper terminals.
- Test for power by pressing the open/close button.
Some models also include a Wi-Fi-enabled control panel—follow app instructions to connect to your home network.
Step 8: Plug in and Power On
- Plug the opener into a nearby grounded outlet.
- The motor unit should light up and beep to confirm it’s powered.
- Test the wall control and remotes.
If your model includes smartphone functionality, download the Genie app and follow pairing instructions.
Step 9: Program the Remotes
- Press and release the “Learn” button on the motor unit.
- Within 30 seconds, press the button on the remote.
- The opener light will flash, indicating a successful connection.
Repeat for additional remotes or wireless keypad entries.
Step 10: Adjust Travel Limits and Force Settings
Most Genie models come with digital or screw-type limit adjustment dials.
- Open the door and observe the stop position.
- Use the limit dials to adjust how far the door opens and closes.
- Set the force settings to ensure the door reverses properly if an object is detected.
Test the auto-reverse feature by placing a board under the door—it should reverse on contact.
Maintenance Tips for Genie Belt Drive Garage Door Openers
Once you’ve mastered how to install a Genie belt drive garage door opener, make sure to keep it operating smoothly with regular care:
- Inspect the belt for signs of wear every 6 months.
- Tighten loose hardware annually.
- Clean the photo eyes regularly to prevent false safety sensor triggers.
- Check door balance – an unbalanced door can stress the opener.
- Replace remote batteries every 1–2 years.
Unlike chain drives, belt drive systems are low-maintenance and don’t require lubrication.
Genie Belt Drive Installation FAQs
Q: How long does installation take?
A: Expect 4 to 6 hours, depending on your skill level and tools.
Q: Can I use this opener on a double garage door?
A: Yes, as long as it’s within the opener’s rated weight and size capacity.
Q: Is Wi-Fi setup necessary?
A: It’s optional, but highly recommended if you want smartphone control and real-time alerts.
Q: Do I need professional help?
A: Most homeowners with basic DIY skills can do this, but if you’re uncomfortable with electrical work or ceiling mounting, consider hiring help.
Final Thoughts on How To Install A Genie Belt Drive Garage Door Opener
Learning how to install a Genie belt drive garage door opener not only saves you money but also gives you the satisfaction of completing a valuable home improvement. These systems offer powerful performance, smart features, and whisper-quiet operation—perfect for modern households.
By following each step outlined in this guide, you’ll be able to install your opener confidently and safely. And once installed, enjoy the peace of mind and convenience every time you pull into your garage.


Leave a Reply