When dealing with a malfunctioning garage door opener, one common issue homeowners encounter is the movement of the chain. Whether the chain is too loose or too tight, understanding how to move the chain on a garage door opener is crucial for maintaining the proper functioning of your garage door. In this comprehensive guide, we will walk you through the necessary steps to move the chain on your garage door opener and ensure it runs smoothly. From understanding the components of your system to troubleshooting common problems, you’ll be equipped with the knowledge you need to take care of your garage door.
Understanding Your Garage Door Opener System
Before diving into how to move the chain, it’s important to first understand the essential components of a typical garage door opener. A garage door opener operates through a chain, belt, or screw drive mechanism. The chain is one of the most common types, especially in older models, and serves as a means to move the trolley that opens and closes the door.
Read too: How to Perform a Chamberlain Garage Door Opener Code Change? Mastering Security
Here are the main parts involved:
- Chain: The central piece responsible for moving the trolley and door.
- Motor: The component that powers the movement of the chain.
- Trolley: A mechanism attached to the door that moves when the chain is engaged.
- Sprocket: The gear that connects the chain to the motor, driving the motion.
- Limit switch: It controls how far the door moves and helps in stopping it when it reaches the top or bottom.
Understanding these components will help you troubleshoot problems when adjusting or moving the chain.
Why You Might Need To Move The Chain On Your Garage Door Opener
Several factors might necessitate moving the chain on a garage door opener. The most common reasons include:
- Chain is too loose: Over time, the chain may stretch or lose tension, which can result in the door not opening or closing properly.
- Chain is too tight: A chain that is too tight can strain the motor and cause damage.
- Noise issues: A loose or poorly adjusted chain can cause excessive noise while operating the garage door.
- Uneven movement: If the chain is not moving correctly, the door might move unevenly, causing strain on the entire system.
Regardless of the reason, adjusting or moving the chain is a task that homeowners can often handle on their own with a few simple tools and instructions.
How To Move The Chain On A Garage Door Opener: Step-By-Step Guide
Step 1: Turn Off the Power
Before attempting any adjustments or repairs, always ensure the power is turned off to avoid accidents. Unplug the garage door opener or turn off the circuit breaker that powers the system.
Step 2: Inspect the Chain and Components
Take a close look at the chain and the surrounding components. Check for any signs of damage, such as frayed links or debris caught in the chain. Examine the sprocket, motor, and trolley for wear and tear.
If the chain is dirty, clean it using a cloth or a small brush to remove any dirt or grease buildup. This will help the chain move smoothly when adjusted.
Step 3: Check the Tension of the Chain
To check whether the chain is too tight or too loose, perform the following:
- Too loose: If the chain hangs loosely or sags in the middle, it may be too loose. This could prevent the door from opening or closing completely.
- Too tight: If the chain feels unusually taut and tight, it may be pulling too hard on the motor, causing unnecessary strain.
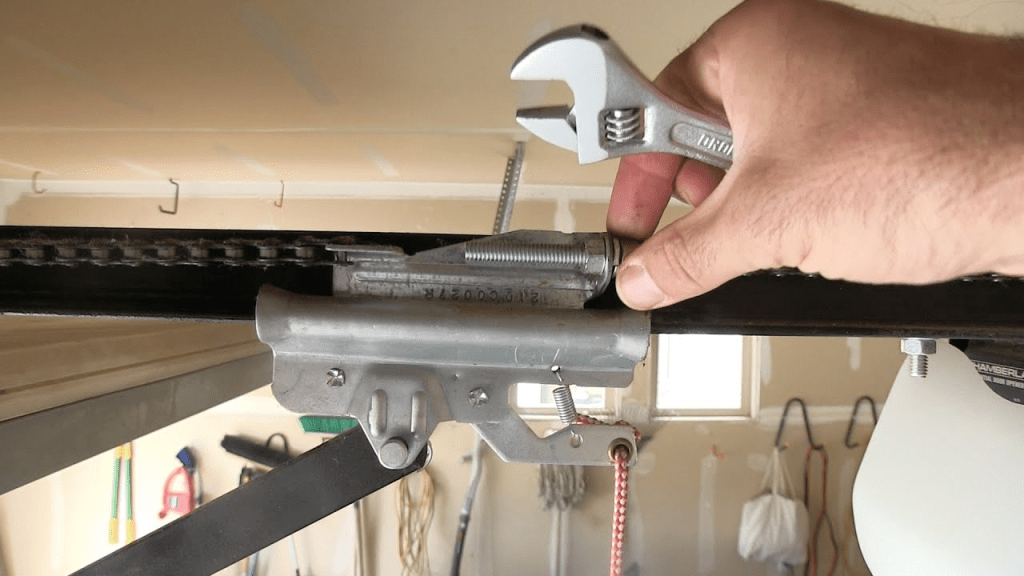
Step 4: Adjust the Chain Tension
Most garage door openers have a chain adjustment mechanism located near the motor or sprocket. This is typically a tension adjustment screw or bolt that can be tightened or loosened to adjust the chain tension.
- Loosening the chain: To loosen the chain, turn the adjustment screw or bolt counterclockwise.
- Tightening the chain: To tighten the chain, turn the adjustment screw or bolt clockwise.
Make small adjustments and check the tension after each turn. You should aim for a chain that is taut but not too tight, with about half an inch of play in the middle of the chain.
Step 5: Test the Door Movement
Once you’ve adjusted the tension, plug the garage door opener back in and test the door. Open and close it several times to ensure the chain is moving smoothly and that the door is operating correctly.
Pay attention to any unusual sounds, jerky movements, or uneven closing. If the door still seems off, repeat the adjustment steps until the movement is smooth.
Step 6: Lubricate the Chain
After adjusting the chain, it’s important to lubricate it to reduce friction and prolong the life of the system. Use a silicone-based garage door lubricant and apply it to the chain. Avoid using grease, as it can attract dirt and grime, leading to further problems.
Common Problems When Moving the Chain on a Garage Door Opener
While moving the chain on a garage door opener is generally straightforward, some problems may arise. Here are a few common issues and their solutions:
Chain Keeps Loosening
If the chain continues to loosen over time, it could be a sign that the tensioning system is malfunctioning. In this case, you may need to replace the tension spring or consult a professional technician to ensure the system is working correctly.
Chain is Not Moving Smoothly
If the chain seems to skip or move unevenly, it could indicate a problem with the sprocket or motor. Inspect these components for wear and tear, and replace any broken or damaged parts.
Unusual Noises
A noisy chain can be a result of insufficient lubrication or misalignment of the chain. Make sure the chain is properly lubricated and that it’s aligned correctly with the sprocket.
How To Prevent Future Chain Issues
To ensure that your garage door opener continues to function smoothly, consider performing regular maintenance. Here are a few tips to prevent future chain issues:
- Lubricate the chain regularly: This will help reduce friction and prevent wear.
- Inspect the system monthly: Check for any signs of wear, such as loose chains or worn-out sprockets, and address issues before they become major problems.
- Ensure proper alignment: Make sure that the chain is properly aligned with the sprocket and motor to prevent misalignment issues.
By taking these preventative measures, you can extend the life of your garage door opener and avoid costly repairs.
Conclusion
Knowing how to move the chain on a garage door opener is an essential skill for any homeowner. With just a few tools and some basic knowledge, you can easily adjust the chain to ensure smooth operation. Remember to check the tension regularly, lubricate the chain, and inspect the system for any wear or damage. By following these simple steps, you can keep your garage door opener running smoothly for years to come.


Leave a Reply