How To Put Chamberlain Garage Door Opener In Learn Mode? Garage door openers have come a long way in terms of technology, and Chamberlain remains one of the most trusted brands in the United States for reliable and smart garage door systems. One essential function built into Chamberlain models is the “Learn Mode”, which plays a crucial role when you want to program new remotes, reset the system, or connect the opener to a vehicle or smart device.
But for many homeowners, figuring out exactly how to put a Chamberlain garage door opener in Learn Mode can be confusing, especially with the wide range of models available. In this comprehensive guide, we’ll walk you through the entire process, explain what Learn Mode actually does, and offer helpful troubleshooting tips if you run into any issues.
Read too: Mastering Quantum Garage Door Opener Programming: A Comprehensive Guide
How To Put Chamberlain Garage Door Opener In Learn Mode
Before diving into the exact steps, it’s important to know why Learn Mode is necessary. This mode activates the wireless programming capability of your Chamberlain opener, allowing it to recognize and pair with new remotes, keypads, vehicles, or other smart accessories.
Here’s a step-by-step guide on how to put a Chamberlain garage door opener into Learn Mode:
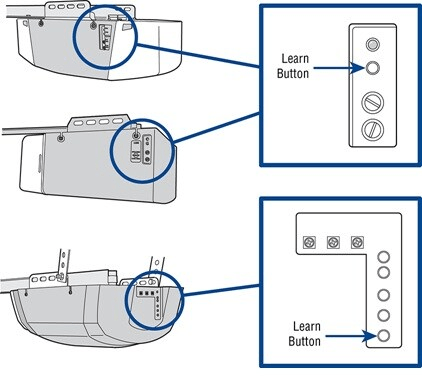
Step 1: Locate the Learn Button
The Learn button is usually located on the back or side of the motor housing unit, which is typically mounted on the ceiling of your garage.
- For most Chamberlain models, you’ll need a ladder to access the motor housing.
- Remove any light covers or panels if they’re blocking your view.
- Look for a button labeled “Learn,” “Program,” or marked by color (commonly yellow, orange, green, or purple).
Step 2: Prepare the Remote or Accessory
Before activating Learn Mode, ensure that the remote, wall console, or vehicle’s HomeLink system you want to program is ready.
- Make sure the remote has a fresh battery.
- For HomeLink, have the car ignition on and the HomeLink button ready for programming.
Step 3: Press the Learn Button
- Press and release the Learn button once.
- A small LED indicator next to it will begin to blink, indicating that the opener is now in Learn Mode.
Note: You usually have 30 seconds to complete the next step before Learn Mode times out.
Step 4: Press the Remote or Control Button
- Within 30 seconds of activating Learn Mode, press the button on the remote, keypad, or vehicle HomeLink system that you wish to program.
- The garage door opener’s light will blink or you may hear a click, confirming the pairing was successful.
What Is the Purpose of Learn Mode?
Learn Mode is an internal programming function that enables your Chamberlain opener to memorize new wireless signals. It’s used for:
- Adding new remotes or wireless keypads
- Connecting vehicle systems (like HomeLink or Car2U)
- Pairing with smart home systems
- Resetting or erasing old codes if remotes are lost or stolen
Essentially, Learn Mode serves as a training mechanism, helping the opener “learn” a new device’s signal for future recognition.
Different Learn Button Colors and What They Mean
Chamberlain garage door openers come with different Learn button colors, which often determine the compatibility and programming process.
| Learn Button Color | Frequency | Compatible Remotes |
|---|---|---|
| Yellow | 390 MHz Security+ 2.0 | Chamberlain remotes with yellow buttons |
| Purple | 315 MHz Security+ | Purple-button Chamberlain remotes |
| Green | 390 MHz Rolling Code | Green-button remotes |
| Orange/Red | 390 MHz Billion Code | Older Chamberlain remotes with orange or red buttons |
Make sure you are using a compatible remote or device based on your opener’s Learn button color.
Programming Additional Devices Using Learn Mode
Programming a Wireless Keypad:
- Press and release the Learn button.
- Within 30 seconds, enter a 4-digit PIN on the keypad.
- Press and hold the Enter button on the keypad.
- The lights on the opener will blink, confirming success.
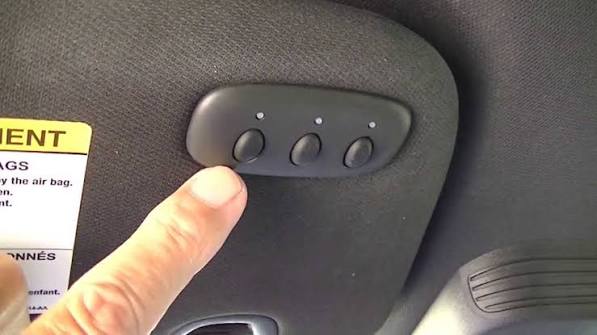
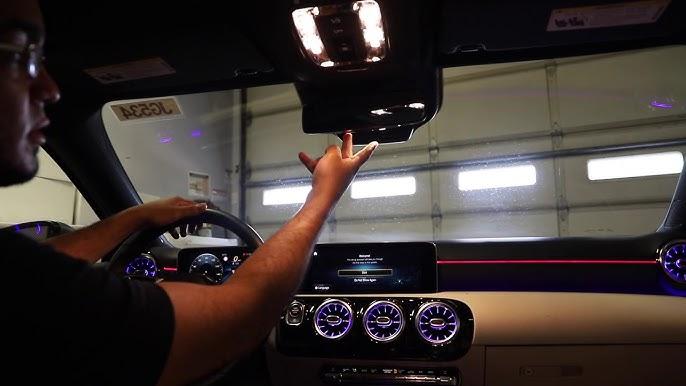
Programming a HomeLink System (Car Remote):
- Press and hold the desired HomeLink button in your car until it begins flashing.
- Press the Learn button on the opener.
- Return to your vehicle and press the HomeLink button 2-3 times until the door moves.
Erasing All Codes from Learn Memory
If you want to clear all programmed remotes and keypads (for instance, after a remote is lost or stolen), follow these steps:
- Hold the Learn button down for 6–10 seconds until the LED light turns off.
- All stored codes are now erased.
- Reprogram your remaining remotes and accessories using Learn Mode.
Troubleshooting Learn Mode Problems
Sometimes, Learn Mode may not work as expected. Below are common issues and solutions:
Problem 1: Learn Button Doesn’t Respond
- Check if the opener is plugged in and has power.
- Inspect for tripped circuit breakers or faulty outlets.
- Try pressing the button more firmly.
Problem 2: Opener Doesn’t Recognize the Remote
- Confirm that the remote is compatible with your Learn button color.
- Replace the battery in the remote.
- Move closer to the motor unit during programming.
Problem 3: LED Doesn’t Blink
- If the LED doesn’t blink after pressing the Learn button, the control board might be damaged.
- Try resetting the system by unplugging the opener for 60 seconds.
Problem 4: Learn Mode Times Out Too Quickly
- Be ready with your remote or keypad as soon as you press the Learn button.
- Practice the steps ahead of time to ensure you don’t miss the 30-second window.
Tips for Success
- Label your remotes with stickers after programming them for easy identification.
- Maintain a log of when and what device was programmed in case of a future reset.
- Keep your ladder and remote handy in case you need to re-enter Learn Mode.
- Consult your owner’s manual for model-specific steps and compatibility.
Compatible Accessories That Use Learn Mode
Learn Mode isn’t just for remotes. It supports a variety of accessories including:
- Wireless Keypads (KLIK2U models)
- MyQ Smart Garage Hub
- HomeLink and Car2U Systems
- Wall-mount Smart Controls
- Chamberlain smart home integration systems (Google Assistant, Amazon Key)
Each accessory has its own pairing procedure, but all rely on Learn Mode to communicate with the motor unit.
Safety Tips During Programming
- Never stand directly under the garage door during Learn Mode programming.
- Keep children and pets clear of the area.
- Use stable ladders and avoid climbing on vehicles or unstable surfaces.
- Only use Learn Mode for authorized remotes to maintain security.
Conclusion: Mastering Learn Mode for Your Chamberlain Opener
Understanding how to put your Chamberlain garage door opener in Learn Mode can save you time, effort, and frustration. Whether you’re setting up a new remote, resetting the opener, or adding a smart home device, Learn Mode is the gateway to effective programming.
With just a few simple steps—locating the Learn button, activating it, and syncing your device—you can customize and secure your garage door opener to meet your needs. And with Chamberlain’s wide compatibility, this single feature makes home automation and security more accessible than ever.
Leave a Reply