When constructing a garage or replacing an old garage door, one of the most critical steps is determining the correct rough opening. A poorly sized opening can lead to improper installation, inefficient operation, and added costs. If you’re wondering, “What should the rough opening be for a garage door?“, you’ve come to the right place.
This comprehensive guide will help homeowners, builders, and contractors understand how to correctly measure, plan, and frame the rough opening for a standard or custom garage door. You’ll learn industry standards, framing techniques, common mistakes, and how the rough opening affects your overall installation.
Read too: How to Perform a Chamberlain Garage Door Opener Code Change? Mastering Security
Why Rough Opening Matters in Garage Door Installation
The rough opening is the unfinished framed opening in your garage wall where the garage door will be installed. It is critical because it determines:
- The size of the garage door that can be installed
- How smoothly the door will operate
- Whether the garage is weather-tight
- The longevity of the door system
If the rough opening is off by even an inch, it can affect alignment, strain the opener, or leave gaps that let in wind, rain, or pests.
What Should The Rough Opening Be For A Garage Door?
The short answer is: the rough opening should be the same size as the garage door itself.
Here’s a breakdown by standard door size:
| Garage Door Size | Rough Opening Width | Rough Opening Height |
|---|---|---|
| 8’ x 7’ | 8 feet | 7 feet |
| 9’ x 7’ | 9 feet | 7 feet |
| 10’ x 8’ | 10 feet | 8 feet |
| 16’ x 7’ | 16 feet | 7 feet |
| 18’ x 8’ | 18 feet | 8 feet |
In each case, the rough opening width and height should match the garage door’s nominal dimensions.
Framing Key Terms:
- Header: The beam that sits above the garage door opening.
- Jambs: The vertical studs on either side of the opening.
- Sill plate: The bottom framing component, typically on the concrete floor.
- Trimmer studs: Support the header and reinforce the frame.
How to Frame the Rough Opening Correctly
Follow these framing principles to ensure a successful garage door installation:
1. Width = Door Width
The width of the rough opening should match the exact width of the garage door. For example, for a 16’ wide door, the rough opening width should be 16’.
There’s no need to add extra inches for trim or tracks — those components mount on the face of the framing, not inside the opening.
2. Height = Door Height
The rough opening height should match the door height — typically 7′ or 8′. The finished floor (concrete slab) to the underside of the header is considered the total height.
If you’re using an automatic opener, make sure to leave enough headroom (usually 12″ to 18″ above the opening) for the track and torsion spring assembly.
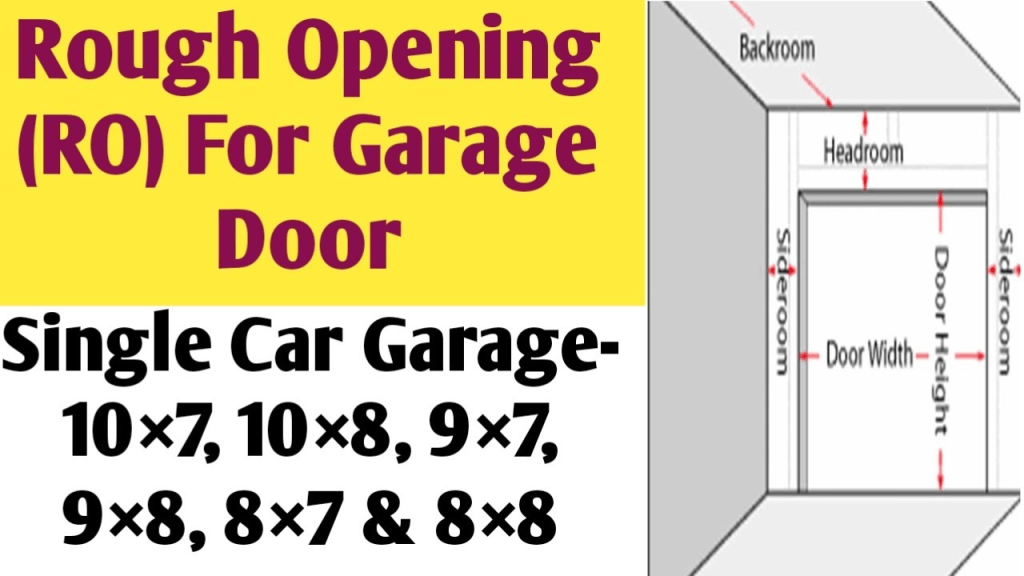
3. Side Room and Headroom
- Side Room: Minimum 3.5” on each side (for vertical tracks and spring assemblies).
- Headroom: Minimum 12” above the door for standard installations. Low-headroom kits are available for tighter spaces.
Understanding Framing Material and Requirements
Your rough opening must be framed with strong, durable materials to support the weight of the garage door and opener system.
Recommended Materials:
- 2×6 or 2×8 pressure-treated lumber for side jambs
- Double or triple 2×12 headers for heavy or wide doors
- Galvanized nails or structural screws to anchor framing securely
Special Considerations for Different Types of Garage Doors
Sectional Garage Doors
These are the most common and work with standard framing techniques. The panels roll up along tracks into the ceiling.
Roll-Up Doors
Roll-up garage doors require a bit more headroom and may need additional framing to support the coil.
Carriage-Style Doors
These open outwards and may need more side clearance. The rough opening size still generally matches the door size.
Custom or Oversized Doors
For doors larger than standard dimensions, always follow the manufacturer’s framing recommendations, as structural reinforcements may be needed.
Common Mistakes When Measuring a Rough Opening
1. Making the Opening Too Wide or Too Tall
This leads to unnecessary gaps, misalignment, and extra trim work.
2. Not Considering the Finished Floor Height
Measurements should always be taken from the finished concrete slab, not the subfloor or dirt.
3. Forgetting Header and Side Room Clearance
Installers may run into trouble if there’s not enough space for the spring system or opener rail.
4. Ignoring Local Building Codes
Some regions have framing codes or load-bearing requirements that impact header size or lumber type. Always check local codes.
Can You Adjust the Rough Opening After Framing?
Yes, but it can be time-consuming and costly.
Reducing the opening is possible by adding new framing or “furring” strips. Widening or raising it may require cutting structural members and could compromise the integrity of the wall.
It’s best to get the measurements right from the start to avoid these headaches.
How to Measure for a Garage Door (Before Framing)
If you’re not sure what door size to choose, measure the opening first and select a door that matches those dimensions.
Measurement Tips:
- Width: Measure from left to right at multiple heights (floor, middle, top).
- Height: Measure from floor to header in multiple spots.
- Side Room: Measure the wall space on both sides of the opening.
- Headroom: Measure from top of opening to ceiling or lowest obstruction.
Should I Leave Extra Space in the Rough Opening?
No. Unlike windows or entry doors, garage doors do not require additional clearance in the rough opening. They mount directly to the face of the opening using the vertical jambs.
Trim, weatherstripping, and track systems are all installed on the face or just behind the opening, not inside it.
Best Practices for Framing Garage Door Openings
- Double-check all measurements before cutting lumber
- Use pressure-treated wood at the base if it contacts concrete
- Make sure the header is level and side jambs are plumb
- Use framing anchors or brackets for additional support
- Seal around framing for energy efficiency and moisture protection
Summary: What Should The Rough Opening Be For A Garage Door?
To summarize, the rough opening for a garage door should exactly match the door’s width and height. Here are the key takeaways:
- A 16’ x 7’ door needs a 16’ wide x 7’ tall rough opening
- No extra width or height is required — finish materials are installed around the opening
- Ensure there’s sufficient side room and headroom
- Use strong, straight, pressure-treated lumber for long-lasting framing
- Follow local codes and manufacturer guidelines to avoid structural issues
Whether you’re a contractor or DIYer, getting the rough opening right is essential for a seamless, efficient, and safe garage door installation.


Leave a Reply