If you’re researching how many turns for the Torquemaster garage door opener, chances are you’re trying to adjust or replace the springs in your Wayne Dalton system. While garage door spring adjustment may seem intimidating, understanding the number of correct turns needed is crucial for both safety and performance.
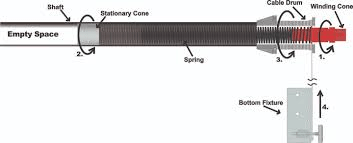
The Torquemaster system, primarily developed by Wayne Dalton, is different from traditional torsion spring systems. Instead of exposed springs, it uses enclosed springs housed in a tube above the door, which provides a cleaner appearance and improved safety. However, adjusting the system—especially knowing how many turns are required—is a key detail many homeowners overlook or get wrong.
This comprehensive guide walks you through everything: from understanding the Torquemaster system to determining the correct number of turns for your garage door’s specific height and weight.
Read too: Mastering the Art of Adjusting a Chamberlain Garage Door Opener for Smooth Operation and Safety
What Is a Torquemaster Garage Door Opener?
Before we discuss how many turns are needed, let’s quickly understand what the Torquemaster system is.
Developed by Wayne Dalton, the Torquemaster garage door opener system differs from traditional torsion systems in the following ways:
- Enclosed Springs: The springs are hidden inside a metal tube.
- Winding Mechanism: Adjustments are made using a winding tool or ratchet, often through a worm gear or external winding plug.
- Safety Benefits: Because the spring is enclosed, it significantly reduces the chance of injury if the spring breaks.
There are two main Torquemaster models:
- Torquemaster I: The original design, with a square winding plug.
- Torquemaster Plus (Torquemaster II): An upgraded model with a circular winding plug.
Knowing your system type is crucial, as the number of turns and method of adjustment varies slightly.
How Many Turns For The Torquemaster Garage Door Opener?
When it comes to adjusting spring tension, the number of turns is not random—it depends on the height and weight of your garage door. The following general rule of thumb is widely accepted for residential garage doors:
General Formula for Torquemaster Springs:
✅ One full turn per foot of door height
✅ Add 1/4 to 1/2 turn for balance and safety margin
So, if your garage door is 7 feet tall, you will typically apply:
7 full turns + 1/4 or 1/2 turn
👉 Total: 7.25 to 7.5 full turns
For an 8-foot garage door, that would be:
8 full turns + 1/4 or 1/2 turn
👉 Total: 8.25 to 8.5 full turns
This calculation applies to both single-car and double-car garage doors, though weight will influence the type and number of springs needed—not the turn count.
Tools Required to Adjust Torquemaster Springs
Before you get started, gather these essentials:
- Winding ratchet tool (typically comes with the opener or can be purchased separately)
- Safety goggles
- Ladder
- Gloves
- Flat-head screwdriver (for removal of any end covers)
- Owner’s manual or spring chart (if available)
⚠️ Safety Tip: Always disconnect the power from the garage door opener before working on the springs.
Step-by-Step Guide to Adjust Spring Tension
Step 1: Locate the Spring Tube
Open the garage door fully and unplug the opener. Use a ladder to access the spring tube located above the door.
Step 2: Identify the Winding Plug
Depending on whether you have Torquemaster I or Torquemaster II, the winding plug may appear square or round.
Step 3: Attach the Winding Tool
Insert your ratchet or socket wrench into the plug on one end of the spring bar.
Step 4: Count and Apply Turns
- For a 7-foot door: Apply 7.25–7.5 full turns clockwise.
- For an 8-foot door: Apply 8.25–8.5 full turns.
- Turn slowly and count each full rotation.
- You should feel increasing tension as you add turns.
Step 5: Check Door Balance
After applying the turns, manually raise the door halfway and let go:
- If it stays in place, it’s correctly balanced.
- If it rises or falls, add or remove 1/4 turn until balanced.
Common Mistakes to Avoid
Adjusting your Torquemaster garage door opener’s springs isn’t overly complex, but here are common pitfalls to watch out for:
- Over-winding the spring: This can cause damage or increased wear on the door mechanism.
- Under-winding: Leads to a weak lift and unnecessary strain on the opener.
- Not counting full turns accurately: Always keep track of full turns with your wrench.
- Using the wrong tool: Only use tools that are compatible with your spring’s winding plug.
- Forgetting to check balance: Always test manually after adjustments.
When to Call a Professional
Although many homeowners handle this task on their own, you should consider calling a garage door technician if:
- You’re unsure about your model (Torquemaster I or II)
- You notice frayed cables or visible spring damage
- The door is heavier than expected
- Your system has multiple springs and complex wiring
Remember: incorrect tension can be dangerous and cause damage to your opener, tracks, or even the door itself.
Upgrading Your Torquemaster System
If your door is over 10–15 years old or uses the original Torquemaster I system, you might want to consider upgrading to the Torquemaster Plus or even a traditional torsion spring system, especially if:
- You’re experiencing repeated issues
- The door no longer stays balanced
- Replacement parts are hard to find
Newer models offer improved durability and are easier to maintain.
FAQ: How Many Turns For The Torquemaster Garage Door Opener?
Q1: Is the number of turns the same for all doors?
A: No. The number of turns depends on door height, not weight. Use one full turn per foot of height, plus an additional 1/4 to 1/2 turn.
Q2: How do I know if my spring is over-tightened?
A: If the door flies open or is hard to close manually, you may have applied too many turns. Reduce by 1/4 turn and retest.
Q3: Can I adjust both sides the same way?
A: Yes, if your door has dual springs, adjust each side with the same number of turns to maintain balance.
Q4: Are these steps the same for double garage doors?
A: Yes, although spring size and torque strength may vary. Always follow manufacturer guidance for your specific model.
Final Thoughts
Understanding how many turns for the Torquemaster garage door opener is crucial for safe, effective garage door maintenance. Whether you’re a DIY enthusiast or simply a homeowner looking to save money, following the correct procedures will help you avoid damage and extend the life of your garage door system.
To recap:
- Use one full turn per foot of door height
- Add 1/4 to 1/2 turn for fine-tuning
- Always test door balance after winding
- Seek professional help if unsure or unsafe
By mastering the correct number of turns and the process itself, you can confidently maintain your garage door and avoid expensive repairs down the line.

Leave a Reply