If you’ve noticed your Chamberlain garage door opener beeping or not working during a power outage, chances are it’s time to change the backup battery. Understanding how to change battery for Chamberlain garage door opener is an essential part of maintaining the system and ensuring it runs smoothly when you need it the most.
Whether you’re a DIY enthusiast or just looking to avoid a service call, this guide will walk you through the process safely and efficiently. We’ll also cover battery types, lifespan, warning signs, and maintenance tips to prolong battery life.
Read too: Mastering the Art of How to Open a Garage Door Safely and Efficiently
Why Battery Replacement Matters for Chamberlain Garage Door Openers
Many Chamberlain openers include a backup battery system that kicks in during power outages. This feature is vital for homeowners who want access to their garage even when the electricity is out — during storms, blackouts, or emergencies.
A failing or dead battery can leave you locked out, potentially creating safety issues or inconvenience. That’s why it’s important to learn how to change battery for Chamberlain garage door opener before it becomes an emergency.
Signs That the Battery Needs Replacement
Before you dive into changing the battery, it’s helpful to know the symptoms of a dying garage door battery. Chamberlain openers typically give you some warnings, including:
- Beeping sound every 30 seconds
- Red LED light on the opener
- Door opens/closes slower than usual
- Wall console displaying battery warning
- Opener doesn’t respond during a power outage
Once these signs appear, it’s time to act.
How To Change Battery For Chamberlain Garage Door Opener: Full Step-by-Step Instructions
Changing the battery in your Chamberlain garage door opener is a simple task that can be completed in less than 10 minutes. Here’s a complete guide.
Tools and Materials You’ll Need
- Phillips screwdriver
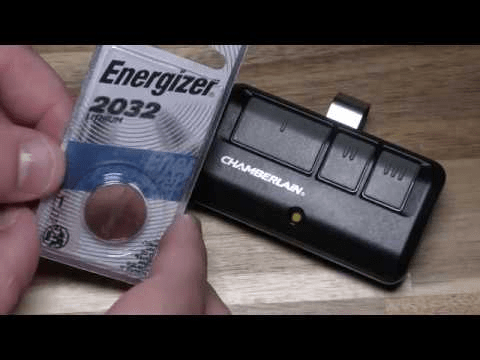
- Replacement battery (12V, 5Ah sealed lead-acid battery – check your model)
- Safety gloves (optional)
Step 1: Identify the Model of Your Chamberlain Opener
Before purchasing a battery, check the model number of your opener (usually found on a label on the side or bottom of the unit). Chamberlain models like the B550, B970, and HD930EV are compatible with backup batteries, but not all units have this feature.
Step 2: Purchase the Correct Replacement Battery
The most common battery used in Chamberlain garage door openers is:
- 12V, 5Ah sealed lead-acid battery
- Dimensions: 4” x 2.5” x 3.5” (approx.)
- Chamberlain recommends their 485LM replacement battery, but other compatible brands may also work
Step 3: Unplug the Garage Door Opener
Safety first. Always unplug the unit from the ceiling outlet to avoid electrical shock while working on it. Wait a few minutes for residual charge to dissipate before proceeding.
Step 4: Locate the Battery Compartment
Most battery compartments are located behind a plastic cover on the back or side of the motor unit. Use a screwdriver to unscrew or unclip the cover.
Step 5: Remove the Old Battery
- Carefully disconnect the red (positive) and black (negative) wires from the terminals.
- Slide the old battery out and set it aside.
- Do not dispose of the battery in the trash – it contains lead and acid and should be taken to a recycling center or battery drop-off location.
Step 6: Install the New Battery
- Slide the new battery into the compartment in the same orientation.
- Connect the red wire to the red (positive) terminal and the black wire to the black (negative) terminal.
- Secure the battery in place and replace the plastic cover.
Step 7: Plug in and Test the Opener
- Plug the opener back into the ceiling outlet.
- The LED light should turn green, indicating the battery is charging or fully charged.
- You may also want to test the system by unplugging the opener again and operating it on battery power.
Step 8: Reset Battery Warnings (If Applicable)
Some models have a wall control that displays a battery warning even after replacement. Hold down the button or follow your owner’s manual to reset the warning indicator.
How Often Should You Change the Battery?
The average lifespan of a Chamberlain garage door opener battery is 3 to 5 years. However, this can vary based on:
- Frequency of use
- Exposure to temperature extremes
- Frequency of power outages
Tip: Test the battery annually by unplugging the opener and using the remote or wall button to open/close the door.
Battery Maintenance Tips
To extend the life of your battery and keep your opener functioning at its best:
- Keep the opener in a cool, dry location
- Avoid frequent unplugging, which causes unnecessary battery discharge
- Listen for warning beeps and check the LED indicators monthly
- Inspect for corrosion on terminal connections annually
What to Do With the Old Battery
Do not throw the battery in the trash. It contains hazardous materials. Here’s what you should do:
- Take it to an auto parts store that accepts lead-acid batteries
- Drop it off at your local recycling center
- Check for municipal hazardous waste collection events in your area
Proper disposal is not just environmentally friendly but often required by law.
Troubleshooting Common Battery Issues
Even after changing the battery, you might encounter some issues. Here’s how to resolve them:
Problem: Light stays red or continues beeping
Solution:
- Wait a few hours — it may still be charging
- Check wire connections to ensure they’re secure
- Ensure you purchased a compatible battery
Problem: Battery drains quickly
Solution:
- Battery might be faulty or old
- Charger circuit in the opener might be defective
- Consider replacing the battery again if within return policy
Benefits of Having a Working Backup Battery
If you’re wondering why it’s worth replacing the battery instead of just relying on power, here are a few good reasons:
- Access during blackouts: Critical during storms or natural disasters
- Increased security: Your garage door can still close during a power failure
- Peace of mind: Especially for those who frequently use their garage as the main entrance
Final Thoughts
Now that you know exactly how to change battery for Chamberlain garage door opener, you can take proactive steps to ensure your system always works when you need it most. Battery replacement is a small task with a big impact on convenience, safety, and security.
This is one of the simplest maintenance jobs you can perform on your garage system, and now you’re equipped with the knowledge and tools to do it correctly. If you’re unsure or uncomfortable, professional service is always an option — but many homeowners can handle this themselves confidently.
Leave a Reply