Programming your Chamberlain garage door opener with a red learn button may sound intimidating, but in reality, it’s a straightforward process if you know the right steps. The red learn button is a key feature found in many Chamberlain models, allowing you to easily pair your remote, keypad, or even a vehicle’s built-in HomeLink system.
In this guide, we’ll walk you through how to program Chamberlain garage door opener with red learn button, provide troubleshooting tips, and ensure your opener operates smoothly. Whether you’re replacing a lost remote or setting up your system for the first time, this tutorial will help you get it done efficiently.
Read too: How To Replace Garage Door Roller Like a Pro? Step-by-Step Guide
Understanding the Red Learn Button on Chamberlain Garage Door Openers
The “learn” button on a Chamberlain opener is the control point for syncing remote controls and wireless keypads. The red learn button specifically indicates that your opener uses a certain type of rolling code security protocol, which changes the access code every time the door is operated.
Key functions of the red learn button include:
- Adding a new remote control
- Pairing a wireless keypad
- Clearing all remote codes for security purposes
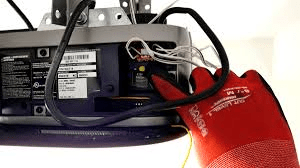
Typically, the red learn button is located on the back or side of the motor unit, near the antenna wire.
Tools and Preparation Before Programming
Before you program Chamberlain garage door opener with red learn button, make sure you have:
- Compatible Remote Control or Wireless Keypad – Verify that your remote works with Chamberlain openers featuring the red learn button.
- Ladder – Safely access the opener mounted on the ceiling.
- Fresh Batteries – Weak remote batteries can cause programming to fail.
- Owner’s Manual – While this guide is detailed, your model’s manual can provide model-specific tips.
Program Chamberlain Garage Door Opener With Red Learn Button – Step-by-Step Instructions
Follow these steps to pair your Chamberlain opener with a remote control or keypad:
Programming a Remote Control
- Locate the Red Learn Button
- Use a ladder to reach the motor unit.
- Look for the red learn button near the antenna wire or under the light cover.
- Press the Learn Button
- Press and release the red learn button.
- The indicator light next to it will glow steadily for about 30 seconds, signaling that the opener is in programming mode.
- Press the Remote Button
- Within those 30 seconds, press and hold the button on your remote you want to program.
- The opener light will blink or you’ll hear two clicks when the pairing is successful.
- Test the Remote
- Press the remote button to ensure the garage door moves.
Programming a Wireless Keypad
- Put the Opener in Programming Mode
- Press and release the red learn button on the motor unit.
- Enter a Personal Identification Number (PIN)
- On the keypad, type a 4-digit PIN of your choice.
- Press the Enter Button
- After entering the PIN, press and hold the Enter button until the opener light blinks.
- Test the Keypad
- Enter your PIN and press Enter to ensure the door operates.
Programming a Vehicle’s Built-In HomeLink System
Many vehicles can be paired directly with your Chamberlain opener:
- Clear the Vehicle’s HomeLink Memory (optional but recommended).
- Press the Red Learn Button on the opener.
- Hold the Desired HomeLink Button in your vehicle until the opener light flashes.
Troubleshooting When Programming Fails
If your Chamberlain garage door opener with red learn button won’t program correctly, try these solutions:
- Replace Remote Batteries – Low power can prevent the signal from being sent.
- Move Closer – Stand within 5–10 feet of the opener when programming.
- Clear Old Codes – Press and hold the red learn button for about 6 seconds to erase all programmed devices before starting fresh.
- Check Compatibility – Not all remotes work with all red learn button models.
- Reduce Interference – Turn off nearby electronics during programming.
How to Erase All Codes for Security
If you lose a remote or suspect unauthorized access, erasing all codes is a smart move:
- Press and hold the red learn button until the indicator light turns off (about 6–8 seconds).
- Release the button.
- All remotes and keypads are now unlinked—you’ll need to reprogram them as needed.
Tips for Long-Term Reliable Operation
- Replace Batteries Annually – Fresh batteries prevent sudden failures.
- Keep the Learn Button Clean – Dust and dirt can affect the button’s sensitivity.
- Avoid Physical Damage – Don’t pull on the antenna wire or press the button too forcefully.
- Document Your PIN – Store your keypad PIN in a secure place.
When to Contact Chamberlain Support
If you’ve tried all the above and your Chamberlain garage door opener with red learn button still won’t program, contact Chamberlain’s customer support. They can help determine if the issue is due to a faulty remote, receiver, or motor unit.
Final Thoughts
Learning how to program Chamberlain garage door opener with red learn button is a skill every Chamberlain owner should have. It saves time, keeps your garage secure, and ensures all access devices are working correctly.
By following the steps in this guide, you can easily program remotes, keypads, and even your car’s built-in system, while also knowing how to troubleshoot problems when they arise.


Leave a Reply