Discovering issues with your garage door spring cable can be daunting, but fear not! Learn step-by-step solutions in our guide on “How To Fix Garage Door Spring Cable Like a Pro.” Empower yourself with the knowledge to address common problems and ensure the seamless operation of your garage door.
Diagnosing the Problem – How To Fix Garage Door Spring Cable
Understanding the symptoms and causes of garage door spring cable issues is crucial before diving into the repair process. This section will guide you through identifying common problems and preparing for effective solutions.
Common Garage Door Spring Cable Issues: A Detailed Overview
Before learning how to fix garage door spring cable problems, familiarize yourself with common issues such as fraying, snapping, or misalignment. This part of the guide will provide insights into the signs that indicate a cable issue and the potential consequences of neglecting these problems.
Read too: Why Your Chamberlain Garage Door Opener Learn Button Is Not Working and How to Fix It? Troubleshooting Guide
Essential Tools and Safety Precautions
Before embarking on the repair journey, it’s essential to gather the right tools and prioritize safety. This section will provide a detailed list of tools needed for garage door spring cable repair and emphasize safety precautions to ensure a smooth and secure repair process.
Step-by-Step Guide: How To Fix Garage Door Spring Cable
Now, let’s delve into the step-by-step process of fixing common garage door spring cable issues. From identifying the faulty cable to executing the repair, this section will provide a comprehensive guide, empowering you to tackle the task confidently.
- Safety First: Disconnecting the Power
- Before any repair work, it’s crucial to disconnect the power to the garage door opener to prevent accidental activation. This step will guide you through safely disconnecting the power source.
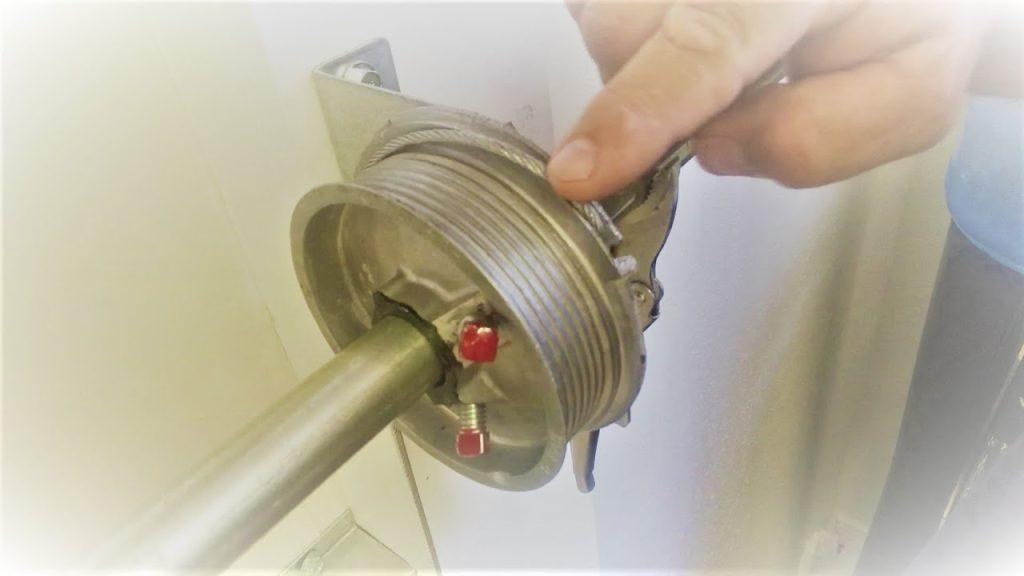
- Locating the Problematic Cable: Inspection Techniques
- Learn effective inspection techniques to identify the specific cable causing the issue. Whether it’s frayed, snapped, or misaligned, this part of the guide will help you pinpoint the problem.
- Replacing the Damaged Cable: Step-by-Step Procedure
- Once the problematic cable is identified, it’s time to replace it. This section will provide a detailed, step-by-step procedure for removing the old cable and installing a new one, ensuring a secure and reliable replacement.
- Ensuring Proper Tension: Adjusting the Springs
- Proper tension in the springs is crucial for the smooth operation of the garage door. Learn how to adjust the tension to ensure optimal functionality and prevent future cable issues.
Preventive Maintenance Tips for Garage Door Spring Cable
Beyond fixing immediate issues, regular maintenance is key to preventing future problems with your garage door spring cable. This section will provide practical tips on preventive maintenance, ensuring the longevity of your garage door’s cable system.
Conclusion: DIY Mastery – How To Fix Garage Door Spring Cable with Confidence
In conclusion, learning how to fix garage door spring cable issues empowers homeowners to take charge of their garage door’s maintenance. By following the detailed guide provided, you can address common problems and ensure the smooth and reliable operation of your garage door.
Remember, if you ever feel uncertain or uncomfortable with the repair process, it’s advisable to seek professional assistance to guarantee the safety and proper functioning of your garage door.
Leave a Reply