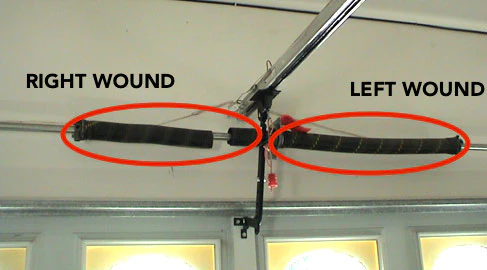
Are you looking to wind your garage door spring but unsure where to start? Worry not! In this guide, we’ll walk you through the process of safely winding your garage door spring, ensuring smooth and reliable operation for years to come.

Understanding the Importance of Winding Your Garage Door Spring
Before we dive into the steps of winding your garage door spring, let’s first understand why it’s essential. The garage door spring plays a crucial role in counterbalancing the weight of the door, making it easier to open and close. Properly wound springs ensure that the door operates smoothly and prevents unnecessary strain on the opener system.
How To Wind Your Garage Door Spring: Step-by-Step Guide
1. Gather the Necessary Tools
Before you begin, gather all the tools and equipment you’ll need for the job. This typically includes winding bars, vice grips, safety glasses, and gloves to protect your hands and eyes.
Read too: Why Your Liftmaster Garage Door Won’t Stay Closed and How to Fix It? Troubleshooting Tips
2. Identify the Type of Spring
Garage doors typically use either torsion springs or extension springs. Identify which type of spring your door has before proceeding, as the winding process may vary depending on the spring type.
3. Release Tension from the Spring
Using winding bars and vice grips, carefully release the tension from the garage door spring. Follow the manufacturer’s instructions for your specific type of spring to ensure safe and proper tension release.
4. Insert the Winding Bars
Once the tension is released, insert the winding bars into the winding cone of the garage door spring. Make sure the bars are securely in place before proceeding to the next step.
5. Wind the Spring
Using the winding bars, slowly and steadily wind the garage door spring in the direction indicated by the manufacturer. Be sure to wind the spring to the appropriate number of turns specified for your door’s weight and size.
6. Test the Tension
After winding the spring, test the tension by manually opening and closing the garage door. The door should move smoothly and evenly without any jerking or resistance. If necessary, make adjustments to the spring tension until the door operates correctly.
7. Secure the Spring
Once you’re satisfied with the tension, secure the garage door spring in place by tightening the set screws on the winding cone. Double-check that everything is properly secured before operating the door.
Conclusion
Winding your garage door spring may seem like a daunting task, but with the right knowledge and tools, it can be done safely and efficiently. By following the steps outlined in this guide and taking necessary safety precautions, you can ensure that your garage door operates smoothly and reliably for years to come.


Leave a Reply