Garage door openers are an essential part of many homes, providing convenience and security. However, like any device that operates with the help of batteries, the time will come when you’ll need to replace the battery in your garage door opener. Knowing how to perform a garage door battery replacement can save you time, money, and the headache of dealing with a non-functioning garage door at the worst possible moment.
In this guide, we’ll walk you through everything you need to know about replacing the battery in your garage door opener. From understanding the signs that indicate you need a battery replacement, to step-by-step instructions on how to swap out the old battery, this article will make the process simple and easy to follow.
Why Garage Door Battery Replacement is Important
Garage door openers rely on a steady supply of power, which is typically provided by a backup battery system. These batteries ensure that your garage door can still function during power outages or if there’s an issue with your main electrical source. Without a functioning battery, you could be left stranded, unable to open or close your garage door when you need it most.
A garage door battery usually lasts about one to two years, depending on the type of battery and the frequency of use. When the battery starts to weaken, you may notice that your garage door opener becomes less responsive or stops working altogether. This is your signal that it’s time for a garage door battery replacement.
Read too: How to Perform a Chamberlain Garage Door Opener Code Change? Mastering Security
Signs You Need a Garage Door Battery Replacement
Before your garage door stops working entirely, there are a few warning signs to look out for that indicate you might need to replace the battery:
- Slower Door Movement: If you notice that your garage door is opening or closing more slowly than usual, it could be a sign that the battery is losing power.
- Dim Lights on the Opener: Many garage door openers have lights that indicate the health of the battery. If these lights are dim or flickering, it’s a sign that the battery needs to be replaced.
- Unresponsive Remote: If your garage door remote only works intermittently or not at all, a dead battery could be the cause.
- Audible Warning Beeps: Some garage door openers will emit warning beeps when the battery is running low, giving you a clear indicator that it’s time for a replacement.
Tools and Materials Needed for Garage Door Battery Replacement
Replacing the battery in your garage door opener is a fairly straightforward task that requires only a few tools. Here’s what you’ll need:
- Replacement battery (consult your garage door opener’s manual for the correct type)
- Screwdriver (typically either a flathead or Phillips, depending on the unit)
- Step ladder (if your garage door opener is mounted high up)
- Gloves (optional, but can help prevent skin oils from affecting the new battery)
Once you’ve gathered your tools and materials, it’s time to get started on replacing the battery.
How to Perform a Garage Door Battery Replacement
Step 1: Determine the Type of Battery You Need
Before you start, you’ll need to identify the type of battery required by your garage door opener. Most garage door openers use a 12-volt battery, but this can vary by brand and model. Check the owner’s manual for your specific garage door opener to find the correct replacement battery. Alternatively, you can remove the old battery to check its specifications and find an exact match.
Step 2: Disconnect the Power Supply
Safety should always be your first concern when working with electronic devices. Before you begin the garage door battery replacement process, ensure that the power supply to the garage door opener is disconnected. Unplug the opener from the wall outlet or flip the breaker switch that controls the power to the unit. This will prevent any accidental electrical shocks while you’re handling the battery.
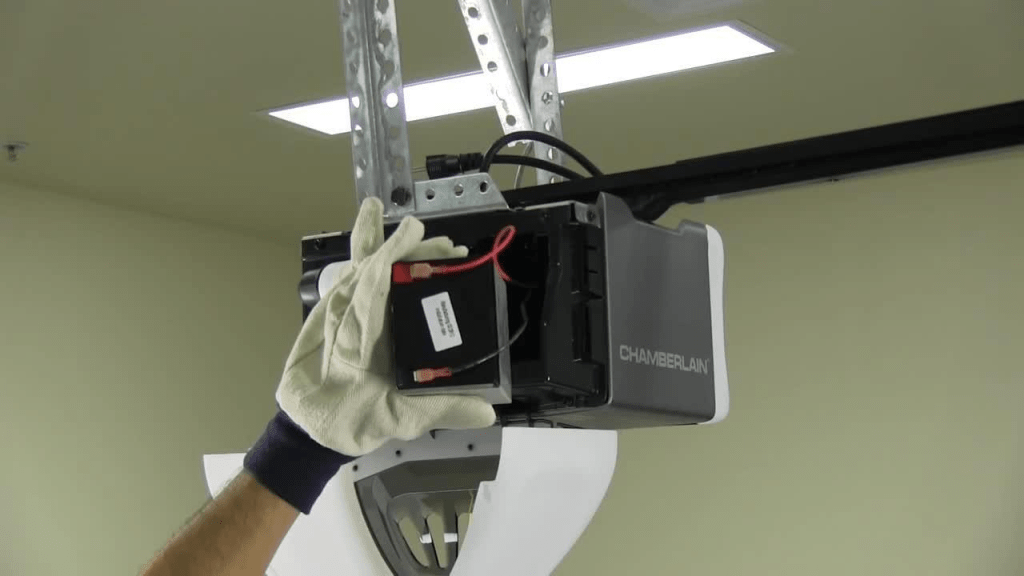
Step 3: Access the Battery Compartment
Most garage door openers have a battery compartment that’s easy to access, typically located on the side or back of the unit. Use your screwdriver to remove the screws that hold the battery compartment cover in place. Be sure to keep the screws in a safe place, as you’ll need them to reattach the cover once the new battery is installed.
Step 4: Remove the Old Battery
Once the battery compartment is open, you’ll see the old battery. Carefully disconnect the wires or clips that are attached to the battery. If your garage door opener uses a rechargeable battery, take note of how the battery is connected, as this will make it easier to install the new one. Dispose of the old battery according to your local regulations, as batteries can contain hazardous materials that should not be thrown in regular trash.
Step 5: Install the New Battery
With the old battery removed, it’s time to install the new one. Connect the wires or clips to the new battery in the same configuration as the old one. Ensure that the connections are secure, as loose connections can prevent the garage door opener from functioning properly.
Once the battery is in place, replace the battery compartment cover and secure it with the screws you set aside earlier.
Step 6: Reconnect the Power Supply
With the new battery installed, you can now reconnect the power supply to your garage door opener. Plug the unit back into the wall outlet or flip the breaker switch to restore power. Test the garage door opener by using your remote to open and close the door. If the door operates smoothly, you’ve successfully completed the garage door battery replacement.
How Often Should You Replace Your Garage Door Battery?
Most garage door opener batteries will last between one to two years, though this can vary depending on how often you use your garage door. If you find yourself replacing the battery more frequently, it could be a sign of another issue, such as a malfunctioning circuit board or power supply problem.
To ensure that your garage door battery stays in good condition, it’s a good idea to test the battery every six months. This will allow you to catch any issues before they become serious, and you can avoid getting stuck with a non-functioning garage door at an inconvenient time.
Maintenance Tips for Your Garage Door Opener Battery
- Regular Testing: As mentioned earlier, testing your battery every six months will help you stay on top of its condition.
- Keep Your Opener Clean: Dust and debris can accumulate inside the battery compartment and on the opener itself, which may lead to overheating or other issues. Keep the unit clean to prolong its lifespan.
- Replace the Battery Before It Dies: While it may be tempting to wait until the battery is completely dead before replacing it, doing so could cause unnecessary wear on your garage door opener’s motor. Replacing the battery at the first sign of trouble can help avoid this.
Benefits of Knowing How to Perform a Garage Door Battery Replacement
Performing a garage door battery replacement yourself has several benefits:
- Cost Savings: By replacing the battery yourself, you avoid paying service fees for a professional technician.
- Convenience: You can replace the battery whenever it’s needed, without waiting for someone to come to your home.
- Peace of Mind: Knowing how to handle a garage door battery replacement ensures that you’re always prepared, even during unexpected power outages.
When to Call a Professional
While replacing a garage door battery is typically a simple task, there may be instances when it’s best to call a professional. If you’ve replaced the battery and your garage door opener still isn’t working, the issue could be related to the motor or the wiring inside the unit. In these cases, a trained technician will be able to diagnose and fix the problem.
Conclusion
Knowing how to perform a garage door battery replacement is an essential skill for any homeowner. It ensures that you won’t be caught off-guard by a non-working garage door during a power outage or an emergency situation. With the right tools and a little bit of know-how, you can easily replace the battery yourself and keep your garage door functioning smoothly.
Remember to monitor your battery’s condition, replace it when necessary, and always follow the manufacturer’s instructions for your specific garage door opener model. Regular maintenance can help extend the life of your garage door system and keep your home secure.


Leave a Reply