Garage door openers are integral to the convenience and security of our homes. But as technology evolves, so do the options available for controlling these devices. One common question among homeowners is: Can I add a remote to my garage door opener? Whether you’re replacing a lost remote or upgrading your current system, the answer is usually yes.
In this article, we’ll explore how to add a remote to your garage door opener, the steps involved, and any specific requirements or limitations depending on your model. We will also discuss some benefits of adding a remote and common troubleshooting tips to make the process smooth.
Read too: Door and Garage Door Companies: Choosing the Right Partner for Your Needs
Can I Add a Remote to My Garage Door Opener? The Basics
Adding a remote to your garage door opener is a relatively simple process, but it does depend on the type of opener you have. Most modern garage door openers allow you to easily program additional remotes to your system. Whether you have a Chamberlain, LiftMaster, Genie, or any other brand, chances are high that your opener supports remote access.
In general, adding a remote involves programming it to communicate with the opener via a unique code that’s recognized by the system. The process of adding a remote can vary depending on your garage door opener model and the brand, but most systems follow a similar process.
Why Add a Remote to Your Garage Door Opener?
There are several reasons you might want to add a remote to your garage door opener system:
- Convenience: With a remote, you don’t have to get out of your car or walk to the garage to open or close the door. This is particularly useful on cold or rainy days.
- Multiple Users: If you have more than one person in your household or if you want to give remote access to friends, neighbors, or family, adding extra remotes is an easy way to share access.
- Replacing a Lost or Broken Remote: If your original remote is lost, damaged, or no longer working, adding a new one can restore your access without needing to replace the entire garage door opener.
- Upgrading Technology: You may want to add a newer remote that works with modern features such as rolling code technology, which provides an extra layer of security by changing the access code every time the door is opened.
How to Add a Remote to Your Garage Door Opener
The process for adding a remote to your garage door opener is generally straightforward. Here’s how to do it:
Step 1: Check Compatibility
Before you begin, ensure that the remote you’re purchasing is compatible with your garage door opener. Many brands offer remotes that work with their own systems, while others are universal. Check the model number of your opener and verify the remote’s compatibility, either by consulting the opener’s manual or contacting customer support.
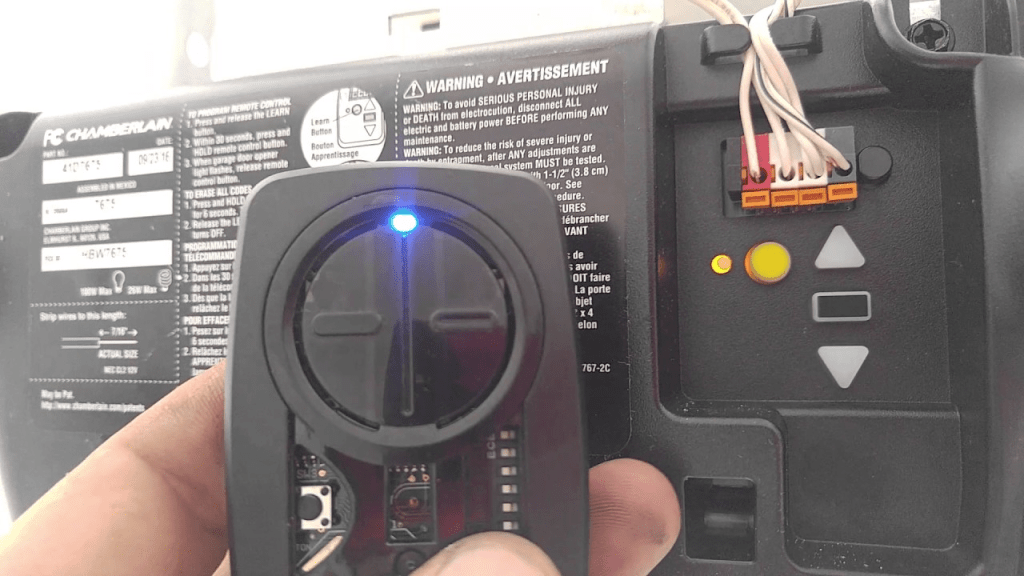
Step 2: Locate the “Learn” Button on Your Garage Door Opener
Most modern garage door openers have a “learn” button that allows you to program remotes. The location of the “learn” button varies by brand, but it is typically found on the motor unit of the opener (the large box that hangs from the ceiling). Here’s where to look for it:
- Chamberlain and LiftMaster Openers: The learn button is usually located near the antenna wire or on the back of the motor unit. It’s typically a small colored button (often green, red, or purple).
- Genie Openers: On Genie systems, the learn button is often found on the back of the opener or inside the motor unit. Look for a button labeled “Learn” or “Program.”
Pressing the learn button enables your opener to pair with a new remote.
Step 3: Program the Remote
Once you’ve located the learn button on your garage door opener, follow these steps to program the remote:
- Press and Hold the Learn Button: Press and hold the learn button for a few seconds. The indicator light will start flashing or will turn on, depending on the model. This means the opener is now in programming mode.
- Press the Button on the Remote: Within 30 seconds of pressing the learn button, press and hold the button on your remote that you want to program. Hold the button until you see the opener’s light blink or hear two clicks, indicating that the remote has been successfully paired.
- Test the Remote: Once the remote is programmed, test it by pressing the button to open or close the garage door. If it works, the programming was successful.
Step 4: Program Additional Remotes (If Needed)
If you need to add more remotes, simply repeat the process for each additional remote. You can usually add multiple remotes to the same opener, but there is typically a limit based on the model of your opener. Be sure to check your opener’s manual for any limitations.
Common Issues When Adding a Remote
While adding a remote to your garage door opener is typically a simple process, you may run into some issues. Here are a few common problems and their solutions:
1. The Remote Doesn’t Work After Programming
- Check Battery: Ensure the remote has fresh batteries. Sometimes, a remote may fail to work simply because the battery is low or dead.
- Reprogram the Remote: If the remote still isn’t working, try reprogramming it following the steps outlined above. Sometimes the programming process can fail if not done correctly.
2. The Learn Button Doesn’t Respond
- Power Issues: If the learn button doesn’t respond, check that your garage door opener is properly powered. Ensure the unit is plugged in and the circuit breaker hasn’t tripped.
- Check for Obstructions: Ensure that the antenna on the opener is not obstructed. The antenna is essential for receiving signals from the remote.
3. Remote Not Compatible
- Universal Remotes: If you’re using a universal remote and it’s not working, check the compatibility chart for your garage door opener model. Not all universal remotes are compatible with all brands of openers, so ensure you’re using the right one for your system.
Additional Options for Adding Remotes
If you don’t want to use traditional remote controls, there are additional options for controlling your garage door:
- Smartphone App: Many modern garage door openers, including Chamberlain, LiftMaster, and others, come with smartphone apps that allow you to control your door remotely. These apps work through Wi-Fi and require a smart garage hub or an internet-enabled opener.
- Wireless Keypads: You can also add wireless keypads outside your garage for quick access. These keypads allow you to open and close the door by entering a PIN.
- Home Automation Systems: If you use a home automation system like Amazon Alexa or Google Assistant, you can often integrate your garage door opener into your smart home system and control it with voice commands or automation rules.
Conclusion
In response to the question, Can I add a remote to my garage door opener? the answer is generally yes! Adding a remote is a simple and effective way to make your garage door opener more convenient and accessible. With just a few steps, you can easily program a new remote to your system, replace lost remotes, or add multiple remotes for different users.
Always make sure to check the compatibility of the remote with your specific opener model and follow the instructions carefully. If you encounter any issues, the troubleshooting tips provided in this guide should help you resolve them quickly.
With the ability to add remotes and other access options, your garage door opener can become an even more integral part of your home’s security and convenience.


Leave a Reply