Installing a commercial garage door opener involves more than just mounting the motor unit—it requires proper wiring of the wall control station to ensure safe and efficient operation. Understanding Commercial Garage Door Opener 3 Button Wall Station Wiring is crucial for facility managers, contractors, and DIY enthusiasts working with industrial or commercial garage doors.
In this guide, we will provide a detailed overview of wiring a 3-button wall station, step-by-step instructions, safety precautions, troubleshooting tips, and maintenance practices. By the end of this article, you will have a comprehensive understanding of Commercial Garage Door Opener 3 Button Wall Station Wiring for optimal performance and safety.
Read too: The Complete Guide to Tighten Chain On Garage Door Opener for Smooth Operation
What Is a 3-Button Wall Station and Why It Matters
A 3-button wall station for commercial garage door openers typically includes:
- Open Button: Activates the garage door to open.
- Close Button: Activates the garage door to close.
- Stop Button: Immediately stops door movement for safety or emergency purposes.
Proper wiring is essential because:
- Safety: Ensures emergency stop functionality and prevents accidental operation.
- Efficiency: Provides convenient access to multiple doors from a single wall station.
- Reliability: Reduces wear on the opener by providing consistent control signals.
- Compliance: Meets commercial safety standards for industrial door operation.
Incorrect wiring can result in malfunctioning doors, safety hazards, or system damage.
Tools and Materials Needed
Before starting Commercial Garage Door Opener 3 Button Wall Station Wiring, gather the following tools and materials:
- Commercial 3-button wall station compatible with your garage door opener
- Low-voltage wire (typically 18/2 or 18/4 gauge, check manufacturer specifications)
- Wire strippers and cutters
- Screwdrivers (flathead and Phillips)
- Electrical tape or wire connectors
- Ladder or step stool for wall access
- Voltage tester (for safety verification)
Having all tools ready ensures a smooth and safe wiring process.
Step-by-Step Guide: Commercial Garage Door Opener 3 Button Wall Station Wiring
Step 1: Ensure Safety First
- Disconnect power to the garage door opener to prevent accidental activation.
- Wear safety gloves and glasses.
- Keep the area clear of personnel, especially when working with active doors.
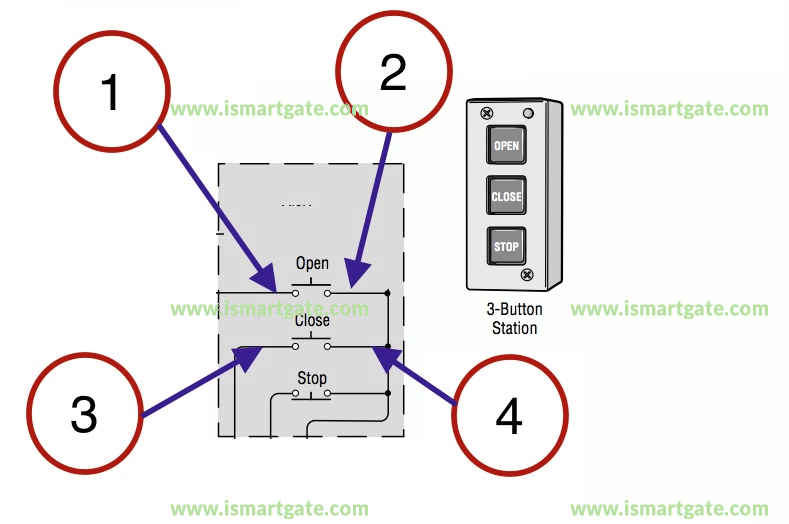
Step 2: Identify Wall Station Terminals
Most 3-button commercial wall stations have clearly labeled terminals:
- Open (O)
- Close (C)
- Stop (S)
- Common (COM)
Refer to the manufacturer’s wiring diagram for your specific wall station model.
Step 3: Run Low-Voltage Wires
- Measure and cut the wire length needed from the wall station to the opener control board.
- Secure the wire along walls or conduits using cable clips or raceways.
- Strip ¼ inch of insulation from each wire end to prepare for terminal connections.
Step 4: Connect Wires to the Wall Station
- Attach each wire to the corresponding terminal on the wall station.
- Open wire → Open terminal
- Close wire → Close terminal
- Stop wire → Stop terminal
- Common wire → Common terminal
- Tighten screws securely but avoid over-tightening, which can damage terminals.
Step 5: Connect Wires to the Garage Door Opener
- Locate the low-voltage terminal block on the commercial garage door opener control board.
- Match each wire to the appropriate terminal: Open, Close, Stop, and Common.
- Secure the wires using the terminal screws and ensure no stray strands are exposed.
Step 6: Test the System
- Reconnect power to the opener.
- Test each button:
- Open: Door should rise smoothly
- Close: Door should lower smoothly
- Stop: Door should halt immediately
- If the door does not respond correctly, check wiring connections and polarity.
Troubleshooting Common Issues
Even with careful wiring, some issues may arise. Here’s how to troubleshoot:
- Door Doesn’t Move: Verify power is connected and wall station terminals are correctly wired.
- Stop Button Malfunction: Ensure the wire is securely connected to the Stop terminal.
- Intermittent Operation: Check for loose wires or damaged cable insulation.
- Multiple Doors Not Responding: Confirm each opener’s terminals are correctly assigned to the corresponding wall station wires.
Proper troubleshooting ensures safe and reliable operation of commercial garage doors.
Safety Tips When Wiring a 3-Button Wall Station
- Disconnect Power: Prevents accidental activation of the garage door.
- Use Proper Wire Gauge: Follow manufacturer recommendations to prevent electrical hazards.
- Label Wires: Clearly label each wire for Open, Close, Stop, and Common to avoid mistakes.
- Test Carefully: Operate the door slowly during initial tests.
- Follow Manufacturer Instructions: Commercial openers may have specific wiring requirements.
Safety measures prevent injury and damage to commercial garage door systems.
Benefits of Proper Commercial Garage Door Opener Wiring
Proper wiring of a 3-button wall station provides several advantages:
- Enhanced Safety: The Stop button allows immediate emergency halting.
- Efficient Door Control: Open and Close buttons operate multiple doors reliably.
- Reduced Maintenance Costs: Proper wiring reduces unnecessary strain on opener motors.
- Compliance with Regulations: Meets safety and operational standards for commercial facilities.
By following correct wiring practices, commercial properties can maintain safe, efficient, and code-compliant garage door operation.
Common Mistakes to Avoid
- Incorrect Terminal Connections: Double-check Open, Close, Stop, and Common wiring.
- Skipping Safety Steps: Always disconnect power before wiring.
- Using Wrong Wire Gauge: May result in voltage drop or short circuits.
- Loose Connections: Can lead to intermittent door operation.
- Ignoring Manufacturer Diagrams: Each commercial opener may have unique wiring requirements.
Avoiding these mistakes ensures the system operates safely and reliably.
Maintenance Tips for 3-Button Wall Stations
Regular maintenance prolongs the life of commercial garage door control systems:
- Inspect Wires: Check for fraying, damage, or loose connections every 3–6 months.
- Clean Terminals: Remove dust or corrosion from terminal screws.
- Test Buttons: Operate all three buttons regularly to ensure responsiveness.
- Replace Damaged Components: Do not use cracked wall stations or exposed wires.
Routine maintenance ensures optimal performance and reduces downtime in commercial operations.
When to Call a Professional
While wiring a wall station is manageable for experienced personnel, professional help is recommended if:
- The control board is malfunctioning
- The facility operates multiple high-capacity doors simultaneously
- Wiring conflicts with other building automation systems
- Persistent operational issues remain after proper installation
A certified technician ensures compliance with commercial safety standards and reliable operation.
Conclusion
Understanding Commercial Garage Door Opener 3 Button Wall Station Wiring is critical for the safe and efficient operation of industrial and commercial garage doors. By following step-by-step instructions, adhering to safety precautions, and performing routine maintenance, facility managers and DIY technicians can ensure reliable performance and long-term durability.
Proper wiring ensures that Open, Close, and Stop functions operate correctly, reduces maintenance costs, and provides peace of mind. Whether installing a new wall station or upgrading an existing system, mastering Commercial Garage Door Opener 3 Button Wall Station Wiring empowers commercial property owners to maintain a safe, efficient, and compliant facility.


Leave a Reply