When your garage door opener stops working properly, it can cause daily frustration. For many homeowners using a Craftsman model, the problem often comes down to a worn gear inside the motor assembly. Instead of buying a brand-new opener, a Craftsman 1 2 Hp Garage Door Opener Gear Replacement can bring your unit back to life at a fraction of the cost.
This detailed guide will walk you through everything you need to know—from recognizing gear problems, gathering tools, and installing new gears, to extending the lifespan of your opener. Whether you’re a seasoned DIYer or a beginner tackling your first garage repair, this article will help you confidently complete the process.
Read too: Door and Garage Door Companies: Choosing the Right Partner for Your Needs
Why Gears Fail in a Craftsman Garage Door Opener
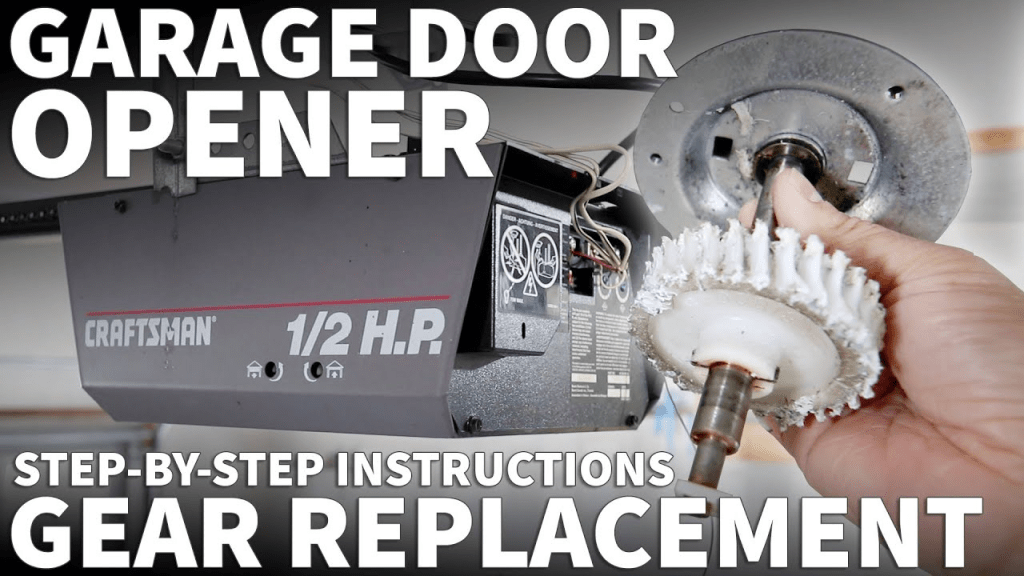
The Craftsman 1/2 horsepower garage door opener is a reliable and widely used unit, but like any mechanical device, it’s subject to wear and tear. Inside the motor housing, a nylon gear works alongside a worm gear mounted on the motor shaft. Over time, the nylon gear wears down or strips, especially if the door is unbalanced or the system isn’t properly lubricated.
Common causes of gear failure include:
- Normal wear from years of use
- Unbalanced garage door creating extra strain
- Improper lubrication leading to friction
- Temperature extremes weakening materials
- Overuse from frequent open/close cycles
When these gears fail, the motor may still run, but the opener can’t move the door. That’s when a Craftsman 1 2 Hp Garage Door Opener Gear Replacement becomes necessary.
Signs You Need a Gear Replacement
Before you order a gear kit, make sure the gears are the problem. Look for these warning signs:
- Motor runs but the chain or belt doesn’t move
- Grinding or clicking noises when the opener is running
- Plastic shavings inside the housing cover
- Door starts to move but stops halfway
- Loose or sagging chain/belt
If you notice any of these symptoms, it’s time to plan for a Craftsman 1 2 Hp Garage Door Opener Gear Replacement.
What Comes in a Gear Replacement Kit?
A standard gear replacement kit usually includes:
- Main nylon drive gear with shaft
- Worm gear for the motor shaft
- Bearings, washers, and retaining clips
- Mounting hardware (pins, screws)
- High-quality lubricant for gears
Most kits are affordable, ranging from $15–$35, and are designed to be compatible with several Craftsman, Chamberlain, and LiftMaster models.
Tools You’ll Need for the Job
Before beginning your Craftsman 1 2 Hp Garage Door Opener Gear Replacement, gather these tools:
- Phillips and flathead screwdrivers
- Socket wrench set
- Needle-nose pliers
- Hammer and punch
- Cleaning rag or brush
- Safety gloves and glasses
Having the right tools ensures a smooth repair process and prevents damage to the new parts.
Step-by-Step: Craftsman 1 2 Hp Garage Door Opener Gear Replacement
This project typically takes 1–2 hours and can save you significant repair costs.
Step 1: Disconnect Power
Always unplug the opener before working. Safety should be your first priority.
Step 2: Remove the Housing Cover
Take off the light lens and unscrew the motor housing cover to access the gear assembly.
Step 3: Release the Chain or Belt
Relieve tension from the chain or belt and remove it from the sprocket.
Step 4: Access the Gear Assembly
Locate the stripped nylon drive gear and worm gear inside the housing.
Step 5: Remove Old Gears
Using your tools, carefully remove the old gears, washers, and pins. Clean out any plastic shavings.
Step 6: Install New Worm Gear
Slide the replacement worm gear onto the motor shaft and secure it with clips or screws.
Step 7: Install New Drive Gear
Insert the new nylon gear and shaft into position, making sure washers and bearings are aligned.
Step 8: Lubricate the Assembly
Apply a thin layer of the supplied grease to ensure smooth operation.
Step 9: Reassemble the Opener
Reattach the chain or belt, tighten to proper tension, and replace the motor housing cover.
Step 10: Test the System
Reconnect power and run the opener. The garage door should move smoothly without grinding.
How Much Does Gear Replacement Cost?
- DIY repair with kit: $20–$35 for parts
- Professional repair: $100–$200 (labor plus parts)
- Full opener replacement: $250–$450 for new unit + installation
For most homeowners, doing the repair themselves with a Craftsman 1 2 Hp Garage Door Opener Gear Replacement kit is the most cost-effective option.
Tips to Extend the Life of Your New Gears
After replacement, proper maintenance will ensure your gears last as long as possible:
- Lubricate annually: Apply grease to gears, sprockets, and the chain/belt.
- Balance the garage door: Check springs and adjust if the door feels too heavy.
- Tighten chain or belt: Keep it snug but not overly tight.
- Limit excessive cycles: Don’t repeatedly open and close the door unnecessarily.
- Keep housing clean: Dust and debris buildup can cause friction.
DIY vs. Professional Gear Replacement
Should you do the repair yourself or call a professional?
- DIY Advantages: Saves money, easy for those with basic tool knowledge, satisfying project.
- DIY Disadvantages: Requires 1–2 hours, risk of mistakes if instructions aren’t followed.
- Professional Advantages: Quick, guaranteed work, no effort required.
- Professional Disadvantages: Higher cost.
If you’re comfortable with mechanical repairs, a DIY Craftsman 1 2 Hp Garage Door Opener Gear Replacement is very doable.
Safety Considerations
While replacing gears is straightforward, always keep safety in mind:
- Unplug power before beginning
- Wear gloves to protect against sharp parts
- Don’t overtighten chain or belt
- Test door balance to prevent strain on the opener
FAQs
Q: How long do replacement gears last?
A: Typically 8–12 years, depending on usage and maintenance.
Q: Can I use a universal gear kit?
A: Many universal kits work with Craftsman, but confirm compatibility with your model.
Q: What if the opener still doesn’t work after gear replacement?
A: The problem may be with the circuit board, motor, or sensors.
Q: Is lubrication really necessary?
A: Yes, without it, the gears will wear down much faster.
Final Thoughts
A failing opener doesn’t mean you need to buy a brand-new unit. With a Craftsman 1 2 Hp Garage Door Opener Gear Replacement, you can restore your opener’s performance and extend its life for many more years. The process is manageable for most homeowners, requires only basic tools, and saves significant money compared to professional repairs or full replacement.
By recognizing the signs of gear wear, following proper installation steps, and committing to regular maintenance, you’ll keep your Craftsman opener running smoothly and reliably.


Leave a Reply