Craftsman garage door openers are renowned for their durability and reliability, providing homeowners with convenient access to their garage spaces. However, to maintain optimal performance, occasional adjustments may be necessary. In this comprehensive guide, we’ll delve into essential tips for Craftsman garage door opener adjustments, helping you fine-tune your opener for smooth operation and long-term reliability.

Understanding Craftsman Garage Door Opener Adjustments
Craftsman garage door opener adjustments encompass a range of settings and configurations that can be customized to suit your specific needs. Some common adjustments include:
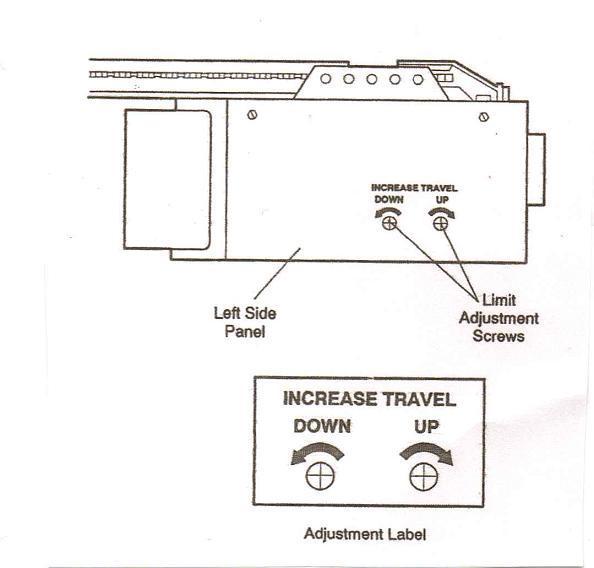
- Travel Limits: Adjusting the travel limits determines how far the garage door opens and closes. Properly setting these limits ensures that the door operates smoothly and efficiently without overextending or straining the opener.
- Force Settings: The force settings control the amount of force exerted by the garage door opener when opening and closing the door. Adjusting these settings can prevent the door from closing too forcefully or reversing unexpectedly.
- Safety Sensor Alignment: Craftsman garage door openers are equipped with safety sensors that detect obstructions in the door’s path. Ensuring proper alignment of these sensors is crucial for safe and reliable operation.
- Remote Control Programming: Programming the remote control or keypad allows you to customize access to your garage and ensure compatibility with other devices.
Step-by-Step Guide to Craftsman Garage Door Opener Adjustments
Follow these step-by-step instructions to perform Craftsman garage door opener adjustments effectively:
1. Adjust Travel Limits
- Locate the travel limit adjustment screws on the garage door opener unit.
- Use a screwdriver to turn the adjustment screws clockwise or counterclockwise to increase or decrease the travel limits, respectively.
- Test the door’s operation after each adjustment to ensure it opens and closes smoothly without hesitation.
2. Fine-Tune Force Settings
- Locate the force adjustment controls on the garage door opener unit.
- Gradually adjust the force settings using the provided controls until the door operates smoothly without excessive force or resistance.
- Test the door’s operation by opening and closing it manually to ensure proper balance and alignment.
3. Align Safety Sensors
- Inspect the safety sensors located near the bottom of the garage door tracks.
- Ensure that the sensors are aligned with each other and free from any obstructions.
- Adjust the position of the sensors as needed to ensure proper alignment and functionality.
4. Program Remote Controls
- Follow the manufacturer’s instructions to program the remote control or keypad for your Craftsman garage door opener.
- Test the remote control’s functionality by opening and closing the garage door from various locations within range.
Read too: No Power to Genie Garage Door Opener – Resolving the Issue with Ease: Troubleshooting Guide
Professional Assistance and Maintenance
If you encounter difficulties or are unsure about performing Craftsman garage door openers adjustments, consider seeking professional assistance. A qualified technician can diagnose any issues and make necessary adjustments to ensure optimal performance and safety.
In conclusion, mastering Craftsman garage door opener adjustments is essential for maintaining smooth operation and prolonging the lifespan of your opener. By following these tips and performing regular maintenance, you can enjoy reliable access to your garage space for years to come.


Leave a Reply