Framing a garage door rough opening is a critical step in the construction process, ensuring that your garage door fits perfectly and operates smoothly. Understanding the essential steps and tips for framing this opening is key to a successful garage project.
Introduction
When building or renovating a garage, framing the door rough opening is a fundamental aspect of the process. This step lays the foundation for the installation of the garage door and determines its functionality and durability. In this comprehensive guide, we will delve into the intricacies of framing a garage door rough opening, providing you with the knowledge and insights needed to tackle this task with confidence.
Understanding the Importance of Framing A Garage Door Rough Opening
The rough opening of a garage door serves as the structural framework that supports the door and allows it to operate smoothly. Proper framing is essential to ensure that the door fits correctly, operates efficiently, and provides adequate support to prevent sagging or misalignment over time.
Key Steps in Framing A Garage Door Rough Opening
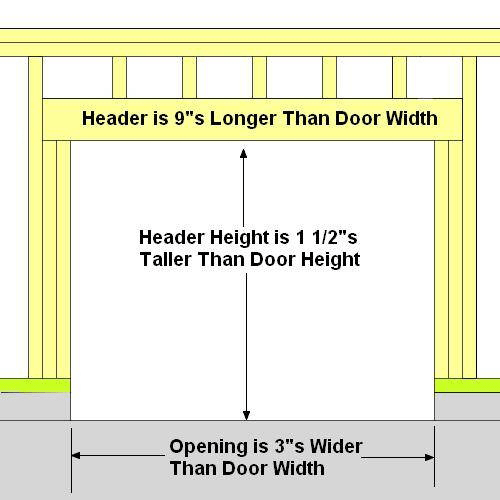
- Measurements and Planning: Accurate measurements are crucial for framing a garage door rough opening. Begin by measuring the width and height of the door, accounting for any additional space needed for hardware and weatherproofing materials.
- Marking and Layout: Use a framing square and level to mark the dimensions of the rough opening on the header, jambs, and sill plates. Double-check the measurements to ensure accuracy before proceeding with the framing process.
- Installing the Header: The header provides support across the top of the rough opening and distributes the weight of the door evenly. Depending on the size of the door and the load-bearing requirements, the header may consist of a single piece of lumber or multiple pieces assembled together.
- Constructing the Jambs: The jambs are the vertical components of the rough opening that support the sides of the garage door. Secure the jambs in place using nails or screws, ensuring that they are plumb and level to prevent any issues with the operation of the door.
- Adding Support and Reinforcement: To enhance the structural integrity of the rough opening, consider adding additional support and reinforcement as needed. This may include installing braces, blocking, or other framing elements to strengthen the framework and prevent bowing or warping over time.
- Sealing and Weatherproofing: Once the rough opening is framed, it is essential to seal any gaps or cracks and apply weatherproofing materials to prevent moisture infiltration and improve energy efficiency.
Tips for Success
- Use High-Quality Materials: Invest in high-quality lumber and fasteners for optimal durability and performance.
- Follow Manufacturer Guidelines: Refer to the manufacturer’s instructions for the garage door and framing components to ensure proper installation.
- Seek Professional Assistance if Needed: If you are unsure about any aspect of framing the rough opening, don’t hesitate to seek advice from a qualified professional.
Read too: Why Your Liftmaster Garage Door Won’t Stay Closed and How to Fix It? Troubleshooting Tips
Conclusion
Framing a garage doors rough opening is a critical step in the construction process that requires careful planning, precision, and attention to detail. By following the essential steps and tips outlined in this guide, you can ensure that your garage door fits perfectly and operates smoothly for years to come.


Leave a Reply