Proper framing for a garage door opening is essential to ensure the structural integrity and smooth operation of the garage door. Whether you are building a new garage or replacing an existing door, understanding the framing process is crucial for a successful installation. In this article, we will provide a step-by-step guide to framing for a garage door opening, covering key considerations and best practices to achieve a sturdy and functional result.

Step 1: Gather the Necessary Tools and Materials
Before starting the framing process, gather all the necessary tools and materials. You will need a measuring tape, level, hammer, nails, screws, saw, and framing lumber. Ensure you have the correct measurements for the garage door size to create the appropriate opening.
Step 2: Mark the Opening Location
Use a measuring tape to mark the dimensions of the garage door opening on the wall. Ensure that the marks are level and plumb to guarantee the door fits correctly and operates smoothly.
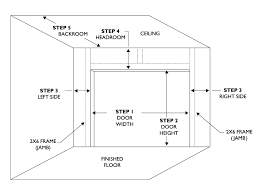
Step 3: Install the Header
The header is a critical component that supports the weight of the garage door and transfers it to the surrounding framing. Cut a piece of framing lumber to the width of the garage door opening and nail it into place above the marked opening. Make sure it is level and securely fastened.
Step 4: Add the Side and Top Jambs
Next, add the side jambs to the framing. Measure and cut two pieces of lumber to the height of the garage door opening. Nail them into place on either side of the opening, ensuring they are plumb and level. Then, add the top jamb by measuring and cutting a piece of lumber to fit across the top of the door opening. Nail it into place, ensuring it is level and aligned with the side jambs.
Step 5: Install the King Studs and Trimmers
The king studs are vertical framing members that provide support for the header. Measure and cut two pieces of lumber to fit between the top jamb and the floor. Nail them into place on either side of the header. Next, add the trimmers, which are vertical framing members that support the sides of the garage door opening. Measure and cut two pieces of lumber to fit between the top jamb and the floor on each side of the opening. Nail them into place, ensuring they are plumb and aligned with the side jambs.
Step 6: Add the Sill Plate
The sill plate is the bottom horizontal framing member of the garage door opening. Measure and cut a piece of lumber to fit the width of the opening and nail it into place on the floor.
Step 7: Check for Level and Plumb
Throughout the framing process, regularly check for level and plumb to ensure the garage door opening is square and properly aligned. Adjust as needed to achieve accurate measurements.
Step 8: Inspect for Any Gaps or Misalignments
After completing the framing, inspect the garage door opening for any gaps or misalignments. Address any issues before proceeding with the installation of the garage door.
Conclusion:
Framing for a garage door opening is a critical step in the construction or replacement process. Following this step-by-step guide will help you create a sturdy and properly aligned opening for your garage door. Proper framing ensures the door operates smoothly and safely while providing structural stability for years to come. Remember to use the appropriate tools, take accurate measurements, and regularly check for level and plumb to achieve a successful framing outcome for your garage door.
Leave a Reply