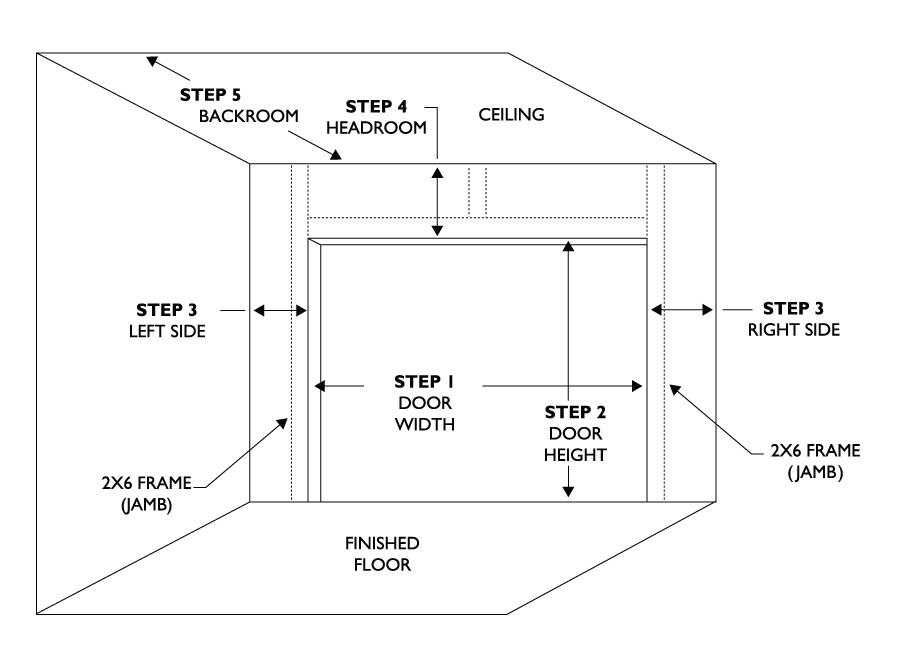
When it comes to installing a garage door, proper framing is essential for a seamless and secure fit. The garage door framing rough opening serves as the foundation for the entire installation process. Understanding the dimensions, materials, and techniques involved in creating the rough opening ensures that your garage door functions smoothly and maintains its structural integrity. In this article, we’ll delve into the significance of the garage door framing rough opening and how to get it right.
Importance of the Garage Door Framing Rough Opening:
The garage door framing rough opening is the space in the wall where the garage door will be installed. It provides the necessary clearance and support for the door’s operation while maintaining a secure seal against the elements.
Creating the Perfect Garage Door Framing Opening:
- Measure Accurately: Begin by measuring the width and height of the garage door. Add a few inches to each dimension to allow for proper clearance and installation. The exact measurements can vary based on the type and size of the garage door you’re installing.
- Select Framing Materials: Choose suitable framing materials, such as treated lumber, that can withstand the elements and provide sturdy support for the door. The framing materials you choose should match the overall construction of your garage.
Steps to Create the Rough Opening:
- Mark the Layout: Use a chalk line or tape measure to mark the dimensions of the rough opening on the wall above the garage door opening. This ensures accuracy during the framing process.
- Cut the Opening: Cut through the wall following the marked lines. Use appropriate tools, such as a saw, to create a clean and precise opening.
- Frame the Sides: Install vertical studs on both sides of the opening. These studs will provide support for the garage door tracks and contribute to the overall stability of the installation.
- Frame the Header: Construct a header above the opening to support the weight of the garage door. The header should be made of sturdy materials and sized according to the manufacturer’s recommendations.
Tips for a Successful Rough Opening:
- Follow Manufacturer Guidelines: Different garage door manufacturers may have specific guidelines for rough opening dimensions. It’s crucial to adhere to these recommendations to ensure a proper fit.
- Check for Level and Plumb: As you frame the rough opening, constantly check for level and plumb to ensure that the door operates smoothly and evenly.
Conclusion:
The garage door framing rough opening is a critical component of a successful garage door installation. Accurate measurements, suitable framing materials, and proper construction techniques contribute to a secure and functional door that enhances the functionality and aesthetics of your garage. By taking the time to create a precise rough opening, you lay the foundation for a garage door that operates seamlessly and withstands the test of time.
Regenerate


Leave a Reply