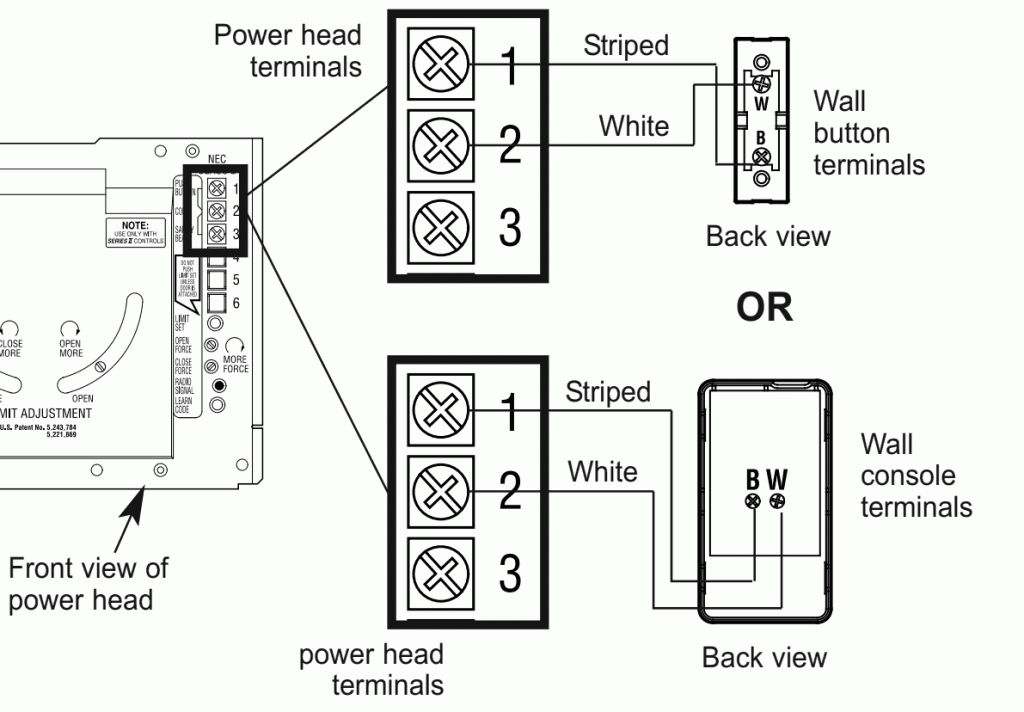
A garage door opener is a modern convenience that many of us take for granted until it stops working. When it comes to troubleshooting and making repairs, understanding the garage door opener wire diagram can be immensely helpful. In this article, we will provide you with insights into garage door opener wire diagrams, their importance, and how to use them effectively.

Understanding the Garage Door Opener Wire Diagram
A garage door opener wire diagram visually represents the electrical connections and wiring in your opener’s operation. It’s a valuable resource for identifying and understanding the components, wiring paths, and electrical connections within the system.
Components of a Garage Door Opener Wire Diagram
A typical garage door opener wire diagram will include the following components:
- Motor: The diagram will show the motor and its wiring, which controls the movement of the garage door.
- Power Supply: It includes the power source and its connection to the motor and control circuit.
- Control Circuit: This section illustrates the control circuitry, which includes components like limit switches, safety sensors, and remote control devices.
- Limit Switches: Limit switches are crucial for determining when the garage door should stop fully open or fully closed.
- Safety Sensors: Safety sensors detect obstructions in the closing door’s path, preventing accidents and damage.
- Remote Control Devices: The wire diagram illustrates how remote control devices send signals to the opener for door operation.
The Importance of Garage Door Opener Wire Diagrams
Understanding the wire diagram of your garage door opener is essential for several reasons:
- Troubleshooting: When your garage door opener malfunctions, the wire diagram can serve as a valuable tool for troubleshooting. It allows you to identify which component or wiring may be causing the issue.
- Repairs: If a component of your garage door opener needs replacement or repair, the wire diagram guides you in safely disconnecting and reconnecting the appropriate wires.
- Maintenance: Regular maintenance of your garage door opener, such as cleaning and lubricating components, becomes more accessible when you understand the wire diagram.
- Upgrades: If you plan to upgrade or replace your garage door opener, the wire diagram is crucial for ensuring compatibility and making a smooth transition.
Using the Wire Diagram for Troubleshooting
Here’s how you can use the garage door opener wire diagram for troubleshooting common issues:
- Identifying Loose or Damaged Wires: If your garage door opener is not responding correctly, the wire diagram helps you identify loose, damaged, or disconnected wires. You can then reattach or replace them as needed.
- Checking Safety Sensors: If the garage door reverses immediately after closing or doesn’t close at all, the wire diagram helps you locate the safety sensors and the wires connected to them. Ensure they are properly aligned and free from obstructions.
- Diagnosing Motor Problems: If the motor is not working correctly, the wire diagram guides you in inspecting the wiring connected to the motor, control circuit, and power supply to identify potential issues.
- Understanding Remote Control Connections: If your remote control devices aren’t working, the wire diagram aids in tracing and identifying loose or damaged wires in the system.
Regular Maintenance and Safety
Aside from troubleshooting and repairs, a garage door opener wire diagram can be beneficial for regular maintenance. It allows you to:
- Lubricate Moving Parts: Understanding the components and connections helps pinpoint parts requiring lubrication for smooth operation.
- Clean and Inspect: The diagram helps you locate areas that require cleaning or inspection, ensuring the opener’s longevity.
- Safety Checks: Regularly referring to the wire diagram is crucial for safety checks, especially with features like safety sensors that prevent accidents.
Conclusion
A garage door opener wire diagram is a valuable resource for homeowners, providing essential information about the electrical connections within the opener system. It aids in troubleshooting, repairs, maintenance, and upgrades, ultimately ensuring the smooth and safe operation of your garage door. Familiarizing yourself with the wire diagram and consulting it when needed will help you maintain your garage door opener and address any issues effectively.


Leave a Reply