Garage doors are an essential part of our homes, providing security and convenience. One crucial component of a garage door system is the torsion spring. These springs counterbalance the weight of the garage door, making it easy to open and close. However, over time, torsion springs may need adjustment to ensure that your garage door functions properly and safely. In this guide, we’ll walk you through the steps of adjusting a garage door torsion spring safely and effectively.
Understanding Torsion Springs
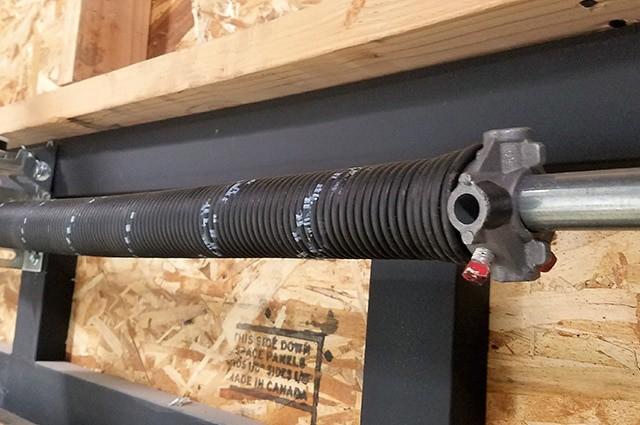
Before attempting to adjust a garage door torsion spring, it’s essential to understand how they work. Torsion springs are tightly wound coils of metal that store energy when twisted. This stored energy is what helps lift the heavy garage door. If the spring is too tight or too loose, it can lead to various issues, including difficulty in opening or closing the door and even safety hazards.
Safety First:
Working with garage door torsion springs can be dangerous. These springs are under extreme tension and can cause serious injury if mishandled. It’s highly recommended to consult a professional if you’re not experienced with garage door repairs. Safety goggles, gloves, and the right tools are a must.
Identifying the Problem Before adjusting the torsion spring, identify the issue with your garage door. Common problems that may require adjustment include:
- Difficulty in Opening or Closing: If your garage door feels unusually heavy or is difficult to lift manually, it could be a sign that the torsion spring needs adjustment.
- Uneven Movement: When your garage door doesn’t move smoothly and seems to jerk or shake during operation, it’s a sign that the torsion spring might be imbalanced.
- Sagging or Crooked Door: A crooked garage door is a clear indication of torsion spring problems. It may indicate that one side of the spring is tighter than the other.
Adjusting the Torsion Spring Adjusting a garage door torsion spring requires precision and careful execution. Here’s a step-by-step guide:
Step 1: Release the Tension
Before starting any adjustment, release the tension in the torsion spring. This is a crucial safety step. Use a winding bar to loosen the set screws on the spring slightly. You should feel the tension decrease.
Step 2: Determine the Direction
Identify whether your torsion spring is left-wound or right-wound. This determines which way you should turn the spring for adjustment.
Step 3: Make Small Adjustments
Using the appropriate winding bar, turn the spring in the direction needed to adjust the tension. Make small quarter-turn adjustments and test the door’s balance after each turn. Continue until the door opens and closes smoothly.
Step 4: Test the Balance
Raise the garage door halfway and let go. It should stay in place. If it rises or falls, further adjustments are needed. Repeat the adjustment process until the door remains balanced.
Step 5: Tighten Set Screws
Once the desired tension is achieved, tighten the set screws on the torsion spring. Ensure they are secure but not overly tight.
Step 6: Test the Door
Operate the garage door manually and with the opener a few times to ensure it functions correctly. Listen for any unusual sounds or movements.
Step 7: Seek Professional Help if Necessary
If you are uncertain about any step or encounter difficulties, it’s best to contact a professional garage door technician. Safety should always be a top priority.
Conclusion
How to adjust a garage door torsion spring can be a challenging task, and safety should be your utmost concern. If you are inexperienced or uncomfortable with this procedure, it’s wise to seek the help of a professional. Properly adjusted torsion springs ensure that your garage door operates smoothly and safely, providing you with peace of mind and convenience in your daily life.


Leave a Reply