Garage doors play a pivotal role in securing our homes, and understanding their intricate components is essential for proper maintenance. Among these components, torsion springs are critical for the smooth operation of the door. In this comprehensive guide, we’ll walk you through the essential steps of “How To Adjust Garage Door Torsion Springs” to ensure your garage door functions seamlessly.
The Importance of Torsion Springs
Before delving into the adjustment process, it’s crucial to understand why torsion springs are vital. Torsion springs counterbalance the weight of the garage door, making it easier to open and close. Over time, these springs may require adjustment due to wear and tear, changes in temperature, or simply as part of routine maintenance.
Signs Your Torsion Springs Need Adjustment
- Uneven Opening or Closing: If your garage door is not opening or closing evenly, it could be a sign that the torsion springs are imbalanced.
- Excessive Noise: Squeaking or grinding noises during operation may indicate that the torsion springs need adjustment or lubrication.
- Difficulty in Manual Operation: If you encounter difficulty manually opening or closing the garage door, it’s a clear indication that the torsion springs may be out of balance.
How To Adjust Garage Door Torsion Springs: Step-by-Step Guide
1. Safety First
Before you begin, prioritize safety. Ensure that you have all the necessary safety gear, including gloves and safety glasses. Disconnect the garage door opener to prevent any accidental activation.
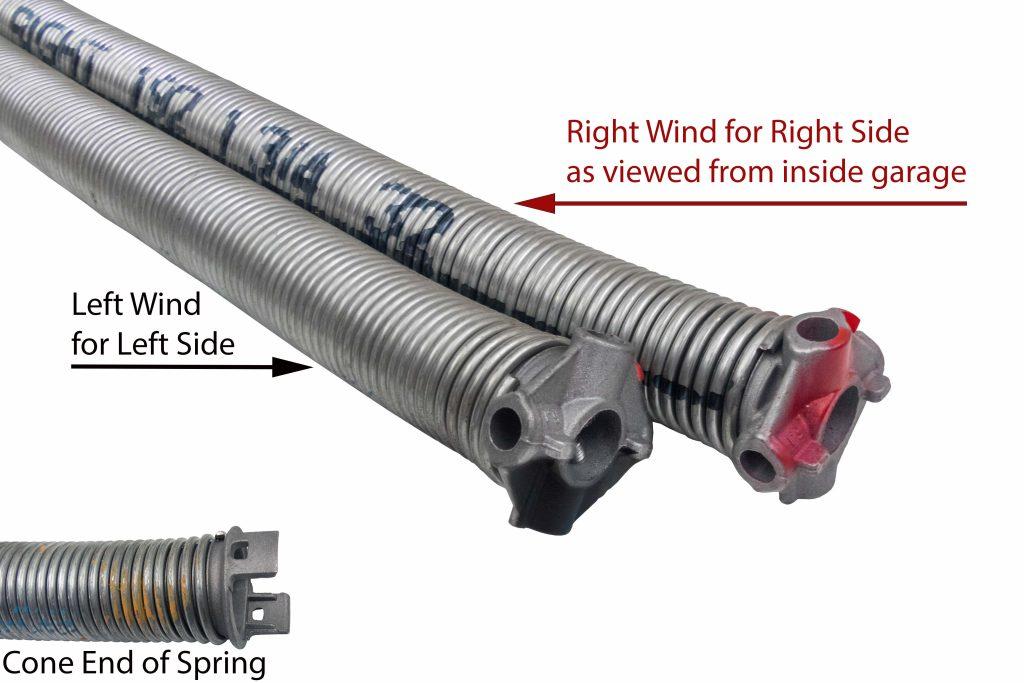
2. Identify the Torsion Springs
Locate the torsion springs above the garage door. Identify the winding and stationary cones, which hold the tension. Use a marker to mark the current positions for reference during adjustment.
3. Release Tension
Using a winding bar, insert it into one of the holes on the winding cone. Slowly release the tension from the torsion spring by turning the cone in the direction opposite to the spring’s wind. Do this for both springs.
4. Adjustment Incrementally
Make adjustments in small increments. Test the garage door after each adjustment to ensure it is balanced. Continue this process until the door opens and closes evenly.
5. Balancing Both Springs
It’s crucial to adjust both torsion springs even if only one seems problematic. Balancing both springs ensures the longevity and optimal performance of your garage door.
Tips for a Successful Adjustment: How To Adjust Garage Door Torsion Springs
- Regular Inspection: Periodically inspect your torsion springs for signs of wear or damage. Catching issues early can prevent more extensive damage.
- Professional Assistance: If you’re uncomfortable or unsure about adjusting torsion springs, it’s advisable to seek professional help. DIY adjustments may lead to accidents if not done correctly.
- Lubrication: Apply a silicone-based lubricant to the springs to reduce friction and noise. This also contributes to the longevity of the springs.
Read too: Why Is My Chamberlain Garage Door Opener Opening By Itself? Decoding the Mystery
Conclusion
Mastering the art of “How To Adjust Garage Door Torsion Springs” empowers homeowners to maintain the functionality and longevity of their garage doors. By understanding the signs of imbalance, following a systematic adjustment process, and incorporating regular maintenance, you can ensure a smoothly operating garage door. Prioritize safety, stay informed, and take control of your home maintenance for a secure and functional living space.


Leave a Reply