A garage door opener is a critical component in maintaining the convenience and safety of your home. The Genie garage door opener, known for its reliability and innovation, includes adjustable force settings to ensure smooth and safe operation. However, when these settings are off, you may notice that your door won’t close properly, reverses unexpectedly, or doesn’t respond at all.
This is where knowing how to adjust Genie garage door opener force adjustment becomes essential. Whether your door is too difficult to close or opens too aggressively, adjusting the force correctly can help prolong your opener’s life and prevent potential damage or injury.
Read too: Mastering Quantum Garage Door Opener Programming: A Comprehensive Guide
In this detailed guide, we’ll explain what force adjustment is, why it matters, and how you can safely recalibrate your Genie garage door opener for optimal performance.
What Is Force Adjustment on a Garage Door Opener?
Force adjustment refers to the amount of power the opener uses to open and close your garage door. If the force setting is too low, the door might stop midway or reverse unnecessarily. If it’s too high, the opener might force the door closed even when there’s an obstruction, potentially creating a safety hazard.
Genie garage door openers have separate settings for opening force and closing force, allowing for more precise calibration.
Signs Your Genie Garage Door Opener Needs Force Adjustment
Before diving into how to adjust Genie garage door opener force adjustment, it’s important to recognize when it’s necessary. Here are common signs:
- The door reverses before closing all the way
- The opener struggles or stops midway
- The door slams shut or opens too fast
- The opener’s safety sensors are working properly, but it still won’t close
- There are no obstructions, yet the door behaves unpredictably
If you’ve ruled out issues with the safety eyes, track misalignment, or springs, it’s time to fine-tune the force settings.
How To Adjust Genie Garage Door Opener Force Adjustment
Now, let’s get into the heart of this article: how to adjust Genie garage door opener force adjustment step by step. These steps are applicable for most Genie models including the ChainMax, QuietLift, and IntelliG models.
⚠️ Safety First
Before working on any opener settings:
- Unplug the unit or shut off the power at the breaker.
- Clear the area of children and pets.
- Use a sturdy ladder and follow proper safety precautions.
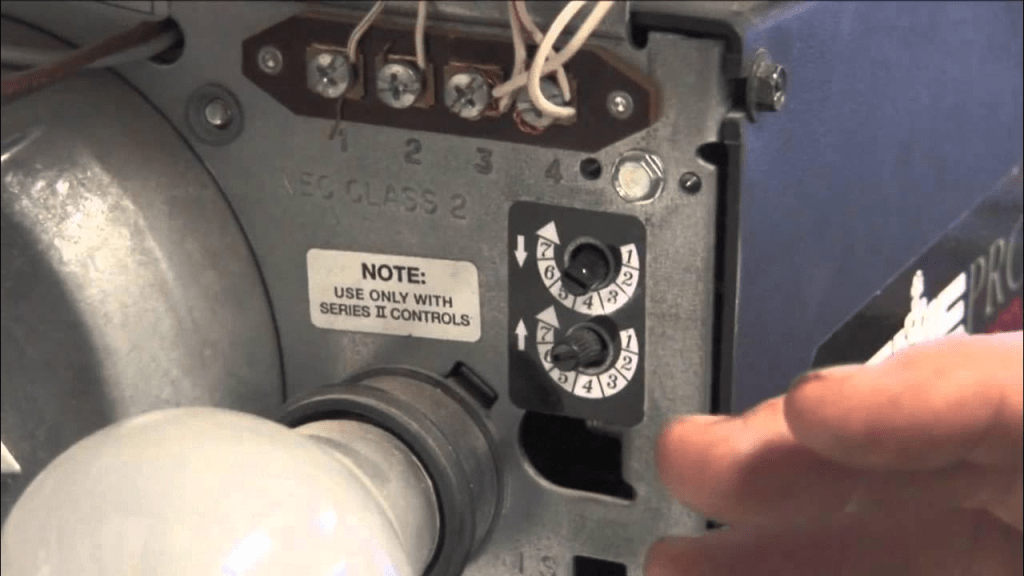
Step 1: Locate the Force Adjustment Controls
On most Genie openers, the force adjustment screws or dials are located near the back or side panel of the powerhead (the motor unit attached to the ceiling). Look for two labeled dials:
- “Open Force” (Up Force)
- “Close Force” (Down Force)
Each dial usually turns clockwise (to increase force) and counter-clockwise (to decrease force). Refer to your owner’s manual for exact locations if unsure.
Step 2: Test the Existing Settings
Plug the unit back in and use your remote or wall button to activate the door.
- Open the door fully. Observe if it struggles, hesitates, or stops midway.
- Close the door completely. See if it reverses, stops, or slams shut.
Take notes of how the door behaves in both directions. This gives you a reference point for adjustment.
Step 3: Adjust the Opening Force
If the door struggles or doesn’t open all the way:
- Turn the “Open Force” dial clockwise slightly (¼ turn).
- Test the door again.
- Repeat in small increments until the door opens smoothly without strain.
Be careful not to overtighten—only add as much force as needed for smooth movement.
Step 4: Adjust the Closing Force
If the door reverses while closing or doesn’t close fully:
- Turn the “Close Force” dial clockwise slightly.
- Test again after each adjustment.
- Stop once the door closes smoothly without reversing.
If the door closes too hard or fast, reduce the force slightly by turning the dial counter-clockwise.
Step 5: Re-Test the Safety Reverse
Once you’ve made your adjustments:
- Place a 2×4 board flat under the door path.
- Close the door using the opener.
- The door should hit the board and reverse immediately.
If it doesn’t reverse, reduce the closing force and try again. This ensures your opener complies with UL 325 safety standards, which are crucial for preventing injury or damage.
Step 6: Final Calibration and Consistency
After adjustment:
- Open and close the door 4–6 times to ensure consistent performance.
- Check for any grinding, straining, or hesitation.
- Listen for abnormal sounds and monitor the motor’s effort.
If issues persist after adjusting the force, there may be underlying problems such as worn-out rollers, misaligned tracks, or spring tension issues.
Common Mistakes to Avoid When Adjusting Force Settings
Learning how to adjust Genie garage door opener force adjustment means avoiding these critical errors:
- Over-adjusting force settings to mask mechanical issues
- Ignoring safety reverse test results
- Forgetting to unplug the opener before working on it
- Making large adjustments instead of gradual changes
- Not referencing the user manual for your specific model
Always aim for the lowest force needed to operate the door safely and smoothly.
When to Call a Professional
If you’ve tried adjusting the force and still experience:
- Door imbalance
- Opener strain or overheating
- Loud grinding noises
- Safety reversal failure
It’s time to call a professional technician. These symptoms might indicate issues with:
- Torsion or extension springs
- Door alignment
- Motor gear wear
- Broken drive mechanism
Professional servicing ensures long-term performance and safety.
Benefits of Proper Force Adjustment
Taking the time to learn how to adjust Genie garage door opener force adjustment comes with several advantages:
- Smooth, reliable operation
- Reduced wear and tear on the opener
- Enhanced safety, especially around pets and children
- Improved opener lifespan
- Compliance with garage door safety regulations
Genie Models with Force Adjustment Features
Most modern Genie models come with manual or electronic force adjustment:
- Genie ChainMax 1000
- Genie QuietLift 800
- Genie StealthDrive Connect
- Genie Excelerator Series
Always check your product’s manual to locate the adjustment dials or digital settings.
FAQs
❓ Can I adjust Genie opener force using a remote?
No, force settings must be adjusted manually on the opener unit itself. Remotes can control open/close but not calibration.
❓ How often should I check force settings?
At least once per year, or whenever the door starts to behave erratically.
❓ What if my opener has electronic controls instead of dials?
Some high-end Genie openers use digital keypads or LCD screens for adjustments. Refer to the user manual for detailed instructions.
Conclusion
Knowing how to adjust Genie garage door opener force adjustment is a simple yet vital skill for any homeowner with an automatic garage door system. It ensures the opener functions safely, quietly, and efficiently, reducing wear on components and preventing damage or injury.
Follow the steps outlined in this guide to test and calibrate your opener. With just a screwdriver and some patience, you can restore peak performance to your Genie opener without the cost of a service call.
Still unsure about handling it yourself? A certified technician is only a call away and can inspect for deeper mechanical issues if needed.


Leave a Reply