A garage door that doesn’t open or close all the way can be frustrating—and even dangerous. Many homeowners face this issue and assume it means expensive repairs, when often it’s just a travel limit setting issue. In this guide, we’ll show you How To Adjust Travel On LiftMaster Garage Door Opener safely and step by step, even if you’re a beginner with no technical background.
What Does “Travel Adjustment” Mean on a LiftMaster Garage Door Opener?
Travel adjustment controls how far your garage door moves up and down when opening and closing. If your door:
- Doesn’t close all the way
- Reverses before touching the ground
- Opens too far or not far enough
Then the travel limits may need tuning.
Read too: Door and Garage Door Companies: Choosing the Right Partner for Your Needs
LiftMaster openers come with built-in limit-setting mechanisms that control this movement. When set incorrectly, it can cause stress on your opener motor or even become a safety hazard.
According to a study by the U.S. Consumer Product Safety Commission, over 30,000 garage-door-related injuries occur annually, many linked to misalignment or improper settings. That’s why understanding travel adjustment is essential.
Why Do You Need to Adjust Travel on a LiftMaster Opener?
Here’s when you should consider adjusting the travel settings:
| Problem | Likely Cause | Solution |
|---|---|---|
| Door stops short of floor | Down travel set too short | Increase down travel |
| Door hits floor then reverses | Down travel too long | Decrease down travel |
| Door doesn’t fully open | Up travel too short | Increase up travel |
| Door slams open violently | Up travel too long | Reduce up travel |
Modern LiftMaster models use either manual adjustment dials or a digital control panel.
What Tools Do You Need? (Quick Checklist)
Prepare these before starting:
- Step ladder (6 ft or higher)
- Flathead screwdriver
- Flashlight
- Soft cloth
- Safety gloves
Make sure your garage is well-lit and keep children or pets away during adjustment.
How To Adjust Travel On LiftMaster Garage Door Opener (Step-by-Step)
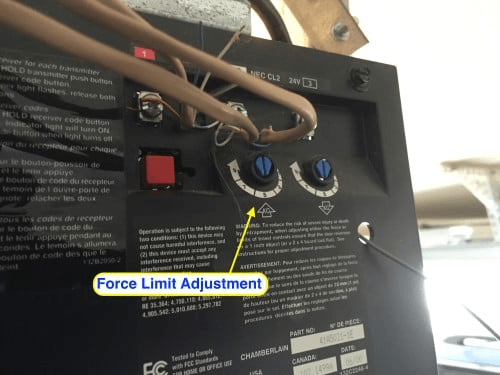
1. Locate the Travel Adjustment Controls
Most LiftMaster openers have two adjustment buttons or dials:
- Up/Travel Limit
- Down/Travel Limit
These are usually located on the back or side panel of the motor housing.
2. Identify Your LiftMaster Model
There are two main configuration types:
| Model Type | Adjustment Method |
|---|---|
| Older models | Manual screw knobs |
| Newer models | Digital push buttons |
Check your unit label or manual to identify this.
3. How to Adjust Down Travel
This controls how far your door goes down.
Steps:
- Stand on your ladder and find the Down Travel screw or button.
- Turn the screw clockwise by ¼ turn (or press the down arrow button once).
- Press the remote to test closing.
- Repeat until the door closes fully and rests lightly on the ground.
⚠️ Important: Stop immediately if the door starts slamming hard.
4. How to Adjust Up Travel
This controls how far your door opens.
Steps:
- Find the Up Travel control.
- Turn the screw clockwise slightly or press the up arrow once.
- Test by opening the door.
- Stop adjusting once the door clears your vehicle height with extra 2–3 inches space.
5. Test the Auto-Reverse Safety Feature
After adjustments:
- Place a solid object (like a wooden block) on the ground.
- Close the door.
- The door should hit it and reverse immediately.
If not, your safety system may be misaligned. According to UL 325 safety standards, all garage door openers must reverse upon contact.
Common Mistakes to Avoid When Adjusting Travel
“Most garage door problems stem from over-adjustment,” says Michael Turner, a certified garage door technician with over 15 years of experience.
Avoid these:
- Over-turning adjustment screws
- Skipping safety sensor testing
- Adjusting without securing door track
- Standing directly under the door
Travel Adjustment: Belt vs Chain Drive Differences
| Feature | Belt Drive | Chain Drive |
|---|---|---|
| Noise Level | Quiet | Slightly loud |
| Travel Sensitivity | More precise | A bit forgiving |
| Maintenance | Low | Moderate |
However, the adjustment process remains similar across both drive types.
Why Your LiftMaster Garage Door Might Still Not Work
If adjustment didn’t solve your issue, the cause might be:
- Broken torsion springs
- Misaligned safety sensors
- Damaged travel module
- Motor failure
If unsure, consult a professional or check LiftMaster guide resources via a general overview like this one on garage door openers from Wikipedia:
👉 https://en.wikipedia.org/wiki/Garage_door_opener
Benefits of Proper Travel Adjustment
✔ Safety
✔ Reduced Motor Strain
✔ Smoother Operation
✔ Longer Opener Lifespan
✔ Better Energy Efficiency
A properly adjusted travel system reduces wear and saves money long-term.
Quick Summary: Up vs Down Adjustment Table
| Adjustment | Function | If Set Incorrect |
|---|---|---|
| Up Travel | Controls opening height | Door hits rail or stops early |
| Down Travel | Controls closing depth | Door won’t close or slams |
FAQ: How To Adjust Travel On LiftMaster Garage Door Opener
Q1: How long does it take to adjust travel settings?
Typically 15–25 minutes depending on your experience and model type.
Q2: Can improper travel adjustment damage my garage door?
Yes. Over-adjustment can strain the motor, damage rollers, or cause sensor failure.
Q3: How often should I adjust travel?
Once every 12–18 months or if you notice abnormal door behavior.
Q4: Should I unplug the opener before adjusting?
Yes, always disconnect power for safety while making manual adjustments.
Q5: Can travel adjustments fix noisy operation?
Partially. It helps reduce strain but won’t fix worn rollers or dry tracks.
Final Thoughts: Adjust Smart, Stay Safe
Learning How To Adjust Travel On LiftMaster Garage Door Opener empowers you to solve common garage door problems without overspending on service calls. With careful steps, proper tools, and safety checks, you can extend your opener’s lifespan and maintain safe operation.
If this guide helped you, feel free to share it with friends or on your social media—someone else might be dealing with the same problem!


Leave a Reply