Introduction
A dumbwaiter is a small freight elevator designed to carry items between floors, making it a convenient addition to multi-level homes, restaurants, and workshops. If you’re looking for a cost-effective way to automate lifting lightweight items, repurposing a garage door opener can be a brilliant solution.
In this comprehensive guide, we’ll walk you through how to build a dumbwaiter with a garage door opener, covering materials, tools, installation steps, and troubleshooting tips. Whether you’re a DIY enthusiast or simply looking for a functional home improvement project, this guide will help you achieve a working, motorized dumbwaiter.
Read too: How to Perform a Chamberlain Garage Door Opener Code Change? Mastering Security
Why Use a Garage Door Opener for a Dumbwaiter?
Garage door openers are powerful, reliable, and relatively easy to adapt for lifting mechanisms. Here’s why they work well for dumbwaiters:
- Strong Lifting Capability – Designed to lift heavy garage doors, making them ideal for small cargo.
- Smooth and Controlled Operation – Provides steady movement with limit switches for stopping at desired positions.
- Remote Control Compatibility – Can be operated using a wall switch, remote, or smartphone (for smart openers).
- Cost-Effective Alternative – Much cheaper than commercial dumbwaiter systems.
Materials and Tools You’ll Need
Materials:
- A garage door opener (preferably a chain or belt-driven model)
- A wood or metal platform (to serve as the dumbwaiter lift)
- Steel cables or chains (to connect the platform to the opener)
- Pulleys (to guide the cables for smooth operation)
- Wood or metal framing (to build the dumbwaiter shaft)
- Guide rails (to keep the platform stable)
- Limit switches (to stop the platform at the desired levels)
- Wall-mounted control switch (for manual operation)
- Reinforced brackets and fasteners (for secure mounting)
Tools:
- Power drill and bits
- Screwdrivers
- Wrenches
- Tape measure
- Level
- Saw (for cutting wood or metal)
- Wire cutters/strippers
Planning Your Dumbwaiter Design
Before you start building, plan out the design and installation location.
1. Choose a Suitable Location
- Select an area where the dumbwaiter will be most useful (e.g., between kitchen and basement, between garage and upper floors).
- Ensure there is enough vertical space for movement.
2. Measure the Shaft Dimensions
- The shaft should be slightly larger than the platform to allow smooth movement.
- Standard dumbwaiters are around 24 inches wide and 30 inches deep, but you can customize as needed.
3. Decide on the Mounting Position
- The garage door opener should be installed at the top of the shaft or on the ceiling.
- Use pulleys to redirect cables if necessary.
How To Build A Dumbwaiter With A Garage Door Opener
1: Build the Dumbwaiter Shaft
- Frame the shaft – Construct a wooden or metal enclosure that extends between the floors you want to connect.
- Install guide rails – Attach vertical tracks along both sides of the shaft to keep the platform stable.
- Cut out access doors – Create an opening at each level for loading and unloading items.
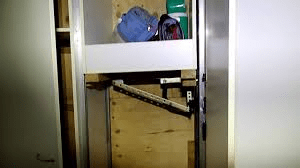
2: Install the Garage Door Opener
- Mount the motor unit – Secure the garage door opener to the ceiling or top of the shaft using strong brackets.
- Attach the drive mechanism – Connect the chain or belt to the pulleys that will lift the platform.
- Secure the opener’s rail system – Ensure that the moving trolley aligns with the shaft.
3: Attach the Platform to the Drive System
- Connect steel cables to the platform – Fasten cables to all four corners to maintain balance.
- Attach cables to the opener’s trolley – This will allow the motor to lift and lower the platform smoothly.
- Test the movement manually – Pull on the cables to check for smooth travel.
4: Install Limit Switches and Controls
- Position limit switches – These will stop the platform at the top and bottom levels.
- Wire the control switch – Connect a wall-mounted switch or use the remote that comes with the opener.
- Test the system – Run the motor to check if the platform stops correctly at each floor.
Testing and Adjustments
Once installed, test your dumbwaiter by running it through multiple cycles.
- Check for smooth operation – Ensure there are no obstructions in the shaft.
- Adjust cable tension – If the platform is tilting, balance the cables.
- Fine-tune the limit switches – Adjust their positions to stop the platform exactly where needed.
Common Troubleshooting Tips
1. Dumbwaiter Stops Midway
- Check if the garage door opener motor is overloaded.
- Ensure cables are properly aligned and not tangled.
2. Platform Wobbles During Operation
- Make sure guide rails are secured properly.
- Tighten loose fasteners and check for any uneven weight distribution.
3. Motor Makes Noise But Platform Doesn’t Move
- Inspect the drive system for disconnected cables.
- Verify that the trolley is engaging correctly.
4. Remote Control Doesn’t Work
- Reprogram the remote or replace the batteries.
- Ensure the opener’s receiver is functional.
Safety Considerations
To prevent accidents and ensure long-term reliability:
- Limit weight capacity – Do not exceed the rated lifting capacity of the garage door opener.
- Install a backup manual pulley – In case of a power failure, a manual pulley system can be useful.
- Regularly inspect the system – Check for frayed cables, misaligned pulleys, or worn-out parts.
- Label access doors – Clearly mark the dumbwaiter openings to prevent accidental use.
Conclusion
Building a dumbwaiter using a garage door opener is a practical and cost-effective solution for transporting items between floors. By carefully designing the shaft, installing a strong lifting mechanism, and setting up proper controls, you can create a functional and reliable dumbwaiter for your home or business.
With proper maintenance and occasional adjustments, your DIY dumbwaiter will serve as a convenient and efficient transport system for years to come. Now that you know how to build a dumbwaiter with a garage door opener, you can confidently start your project and enjoy the benefits of this innovative home improvement solution.


Leave a Reply