Having a reliable Liftmaster garage door opener remote is essential for convenient access to your garage. Over time, the battery in the remote will deplete, leading to reduced performance or a completely non-responsive device. Knowing how to change the battery in Liftmaster garage door opener remote ensures you avoid unnecessary frustration and downtime. This comprehensive guide will walk you through the steps to replace the battery and maintain the remote’s optimal performance.
Why Does Your Liftmaster Garage Door Opener Remote Need a Battery Change?
The Liftmaster garage door opener remote relies on a small battery to transmit signals to the opener unit. A dying battery can result in weak signals, inconsistent functionality, or no response at all. Replacing the battery at the first sign of trouble helps maintain smooth operation.
Read too: Door and Garage Door Companies: Choosing the Right Partner for Your Needs
Signs That Your Liftmaster Garage Door Opener Remote Battery Needs Replacement
Before diving into the replacement process, it’s essential to recognize the signs that your remote’s battery is failing:
- The remote only works intermittently.
- You need to press the buttons multiple times for the door to open or close.
- The remote’s range has noticeably decreased.
- The LED indicator on the remote is dim or doesn’t light up.
Tools Needed for Battery Replacement
Before starting, gather the following tools and materials:
- A new battery (usually CR2032 or CR2025, depending on the model).
- A small flathead screwdriver or coin.
- A clean, flat workspace to avoid losing small components.
How To Change Battery In Liftmaster Garage Door Opener Remote
Replacing the battery in your Liftmaster garage door opener remote is straightforward. Follow these detailed steps to complete the process quickly and efficiently:
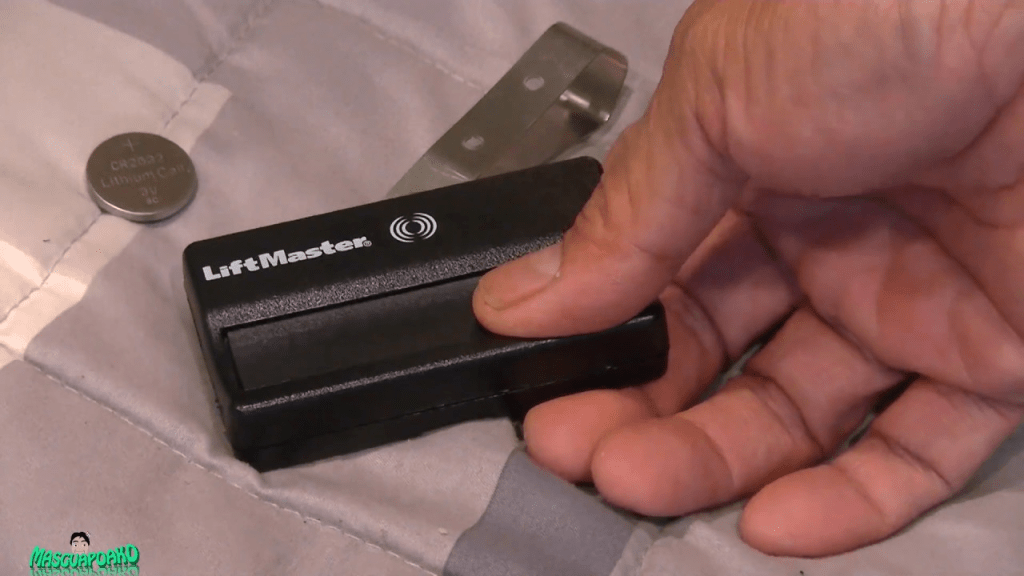
1. Identify the Type of Battery Your Remote Uses
Check the user manual or the back of your remote for the battery specifications. Most Liftmaster remotes use coin-cell batteries like CR2032 or CR2025.
2. Open the Remote
- Locate the seam or small slot on the edge of the remote.
- Insert a flathead screwdriver or coin into the slot and gently twist to pry open the case.
- Be careful not to damage the casing or internal components.
3. Remove the Old Battery
- Take note of the battery’s orientation (positive and negative sides).
- Carefully remove the old battery using your fingers or a non-metallic tool.
4. Insert the New Battery
- Place the new battery in the compartment, ensuring it’s correctly oriented. The positive side (usually marked with a “+”) should face up.
5. Close the Remote’s Casing
- Align the two halves of the remote’s casing.
- Press them together until they snap securely into place.
6. Test the Remote
Press the buttons to check if the remote functions properly. If the garage door doesn’t respond, ensure the battery is seated correctly and that the casing is fully closed.
Troubleshooting After Battery Replacement
If your Liftmaster garage door opener remote doesn’t work after changing the battery, try the following:
1. Reprogram the Remote
- Sometimes, replacing the battery can reset the remote’s programming.
- Locate the “Learn” button on your garage door opener unit (usually on the back or side).
- Press and hold the “Learn” button until the indicator light blinks.
- Press a button on the remote to reprogram it to the opener.
2. Clean the Battery Contacts
- Corrosion or dirt on the contacts can prevent proper battery connection.
- Use a cotton swab dipped in rubbing alcohol to clean the contacts gently.
3. Check the Remote’s Range
- Ensure there are no obstructions or interference between the remote and the opener.
- Stand closer to the opener and test the remote.
4. Inspect the Remote for Damage
- Physical damage to the remote can prevent it from working, even with a new battery.
- If the remote is cracked or the buttons feel unresponsive, consider replacing it.
5. Replace the Remote if Necessary
- If the remote still doesn’t work after troubleshooting, it might be faulty. Purchase a replacement remote compatible with your Liftmaster opener.
Tips for Maintaining Your Liftmaster Garage Door Opener Remote
To keep your remote functioning optimally, follow these maintenance tips:
- Replace the Battery Annually
Even if the remote is working fine, replacing the battery once a year prevents unexpected issues. - Keep the Remote Clean
Dust and debris can accumulate around the buttons, affecting their functionality. Wipe the remote with a damp cloth periodically. - Avoid Dropping the Remote
Dropping the remote can damage internal components, leading to malfunctions. - Store in a Safe Location
Keep the remote in a designated spot to avoid misplacing it or exposing it to extreme temperatures.
Frequently Asked Questions
1. How often should I replace the battery in my Liftmaster remote?
Replace the battery every 12–18 months or as soon as you notice a decline in performance.
2. What type of battery does a Liftmaster remote use?
Most Liftmaster remotes use CR2032 or CR2025 coin-cell batteries.
3. Do I need to reprogram my remote after changing the battery?
Not always, but if the remote doesn’t work after replacing the battery, reprogramming it may be necessary.
4. Can I use a rechargeable battery in my Liftmaster remote?
No, rechargeable batteries are not recommended as they may not provide the correct voltage for the remote.
Conclusion
Knowing how to change the battery in Liftmaster garage door opener remote ensures your garage door operates smoothly and without interruption. By following the steps outlined in this guide and performing regular maintenance, you can extend the life of your remote and enjoy hassle-free access to your garage.


Leave a Reply