If your garage door is responding to old remotes, compromised clickers, or lost transmitters, it’s time to reset the system. Learning how to clear all remotes from garage door opener helps restore safety, prevent unauthorized access, and fix syncing issues. This guide walks you through the process step-by-step using beginner-friendly instructions.
How To Clear All Remotes From Garage Door Opener (Step-by-Step Guide)
Most modern garage door openers—Chamberlain, LiftMaster, Craftsman, Genie—allow you to erase all programmed remotes using the Learn or Program button. While the steps can vary slightly by model, the principles are the same.
Read too: Why Are My Garage Doors Opening By Themselves? Troubleshooting Guide
Below is a complete walkthrough.
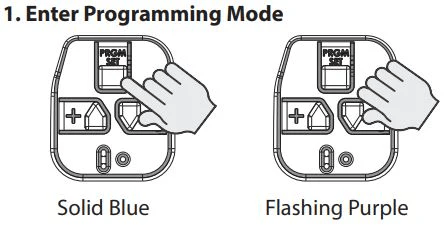
1. Locate the Learn or Program Button
The first step in learning how to clear all remotes from garage door opener is finding the control button on the motor unit. This is usually found:
- On the back panel
- Behind a light cover
- Near the antenna wire
Most brands use color-coded Learn buttons:
| Brand | Button Label | Typical Button Color |
|---|---|---|
| LiftMaster | Learn | Yellow, Purple, Red/Orange |
| Chamberlain | Learn | Yellow, Purple |
| Genie | Program/Set | Black, Blue |
Pro Tip: If you can’t locate the button, check your model number and search the user manual. Many PDFs are available through manufacturers or on sources like Wikipedia for additional background on garage door technologies (e.g., Garage Door Opener article).
2. Press and Hold the Learn Button To Erase All Remotes
Once you’ve located the Learn/Program button:
- Press and hold the button for 6–10 seconds.
- Wait until the LED light turns off or changes behavior (often from solid to off).
- Release the button.
This action erases all remote controls, wireless keypads, and vehicle HomeLink devices that were previously synced.
What Happens After Clearing?
- All remotes stop functioning immediately.
- The opener returns to factory-default memory for remotes.
- You must reprogram any remotes you want to use again.
3. Reprogram Only the Remotes You Want to Keep
If you’re erasing your remotes because one was lost or stolen, you’ll need to program the safe ones back in.
Steps:
- Press the Learn button (don’t hold it).
- Press the remote button you want to program.
- Wait for a click, light flash, or LED blink signaling success.
Repeat for each remote.
4. Why You May Need To Clear All Garage Door Remotes
Users often search “Why erase all remotes?” or “Do I need a full reset?” Here are the most common reasons:
Security Protection
A 2023 home security survey found that 63% of homeowners never reset their garage openers after moving in—which can allow previous occupants access.
Clearing remotes ensures no unauthorized user can open your garage.
Lost or Stolen Remote
If you misplaced a remote, clearing all remotes prevents strangers from using it.
Interference or Sync Issues
Sometimes remotes stop working due to:
- Frequency conflicts
- Corrupt memory
- Partial programming errors
A reset often resolves these problems.
New Home Purchase
Real estate experts note that garage access is one of the most overlooked security points in newly purchased homes. Resetting remotes should be done during move-in.
5. Signs Your Garage Door Opener Needs a Reset
If you’re unsure, look for these signs:
- Door opens only intermittently
- Remote range is significantly reduced
- One remote works but others don’t
- Vehicle HomeLink suddenly stops syncing
- Keypad accepts codes inconsistently
Any of these may indicate that a memory reset is the fastest fix.
6. Clearing Remotes on Specific Brands (Detailed Instructions)
LiftMaster & Chamberlain
- Press and hold Learn (6–10 seconds).
- LED turns off.
- All remotes and keypads are erased.
Genie Openers
- Locate Program/Set button.
- Press until the LED blinks red.
- Hold for 10 seconds until light turns off.
- Memory is cleared.
Craftsman (Sears)
Most Craftsman openers are rebranded LiftMaster units:
- Hold Learn for 6 seconds.
- Light turns off.
- Memory is cleared.
7. Can You Erase Just One Remote Instead of All?
Unfortunately, for most openers, you cannot delete a single remote.
You must erase all and reprogram the ones you want to keep.
The only exceptions are:
- Some Wi-Fi smart openers (app-based removal)
- Certain high-end Genie models
8. How Long Does the Process Take?
Clearing all remotes generally takes less than one minute.
- 10 seconds to erase memory
- 15–20 seconds per remote to reprogram
- 1 minute total if you only use one remote
9. Safety Precautions Before Clearing Your Remote Memory
Turn On Adequate Lighting
You’ll be working near the motor housing.
Make Sure No One Is Using the Garage Door
During resets, doors can move unexpectedly on some models.
Check Ladder Stability
If your opener is ceiling-mounted, avoid injuries.
Disconnect Smart Locks or Automations
Smart home routines may trigger the door while resetting.
10. Troubleshooting: Remote Still Works After Clearing
If a remote still operates after clearing memory, try:
1. Repeat the Reset
Hold the Learn button for a longer duration (up to 12 seconds).
2. Check for External Receivers
Some older garages use add-on receivers separate from the opener.
3. Replace Remote Battery
Weak batteries cause inconsistent resetting feedback.
4. Check Antenna Wire
Ensure the hanging antenna wire is intact and not cut.
11. Clearing Wireless Keypads (Optional But Recommended)
To ensure no old PINs remain active:
- Press and hold Learn for the full 10–12 seconds.
- This clears both remotes and keypads for most models.
- Reprogram a new PIN using keypad instructions.
12. Pros & Cons of Clearing All Remotes
Below is a quick comparison table to help users decide.
Pros vs Cons
| Pros | Cons |
|---|---|
| Restores full security | Requires reprogramming remotes |
| Fixes most remote issues | May require ladder access |
| Clears old owner’s controls | Some keypads need extra steps |
| Good for new homeowners | Memory issues possible on older units |
FAQ (H2)
Q1: Does unplugging the garage door opener erase remotes?
A: No. Unplugging only removes power temporarily. Remote memory is stored in non-volatile memory, so remotes remain paired.
Q2: How do I know the remotes were successfully cleared?
A: After clearing, test any remote. None should open the door. If a remote still works, the memory may not have fully reset or an external receiver may be installed.
Q3: Will clearing remotes affect my wall control panel?
A: No. Wall panels are hardwired and remain functional. Only wireless devices such as remotes, keypads, and HomeLink systems are erased.
Q4: Can I clear remotes from my car’s HomeLink system?
A: Yes. HomeLink must be cleared separately. Hold the two HomeLink outer buttons for 10–20 seconds until the indicator flashes rapidly.
Q5: What if my Learn button doesn’t work?
A: The opener may have:
- A damaged circuit board
- Loose wiring
- A locked-out mode enabled
Replace the logic board or contact a technician if the button is unresponsive.
Q6: Is it safe to clear remotes on an older garage door opener?
A: Yes, but older openers (before 1993) may lack rolling-code security. If your opener is older than 20 years, experts recommend upgrading to a modern unit for safety.
Conclusion
Clearing all remotes from your garage door opener is one of the simplest ways to regain control, improve security, and solve common connectivity issues. Whether you’re moving into a new home or replacing lost remotes, the steps are quick and beginner-friendly.
If this guide helped you, share it on your social media so others can secure their garages too!

Leave a Reply