Pairing your vehicle with your garage door opener can add a whole new level of convenience and security to your daily routine. Instead of juggling remote controls or keypads, imagine just pressing a built-in button in your car to open your garage. If you’re wondering how to pair Chamberlain garage door opener to car, you’ve come to the right place.
In this guide, we’ll walk you through everything you need to know—from vehicle compatibility and button locations to programming steps for both rolling code and fixed code systems. Whether you drive a brand-new SUV or an older sedan, this guide will help you successfully pair your car with a Chamberlain garage door opener.
Read too: How To Replace Garage Door Roller Like a Pro? Step-by-Step Guide
Why Pairing Your Car With Your Chamberlain Garage Door Opener Matters
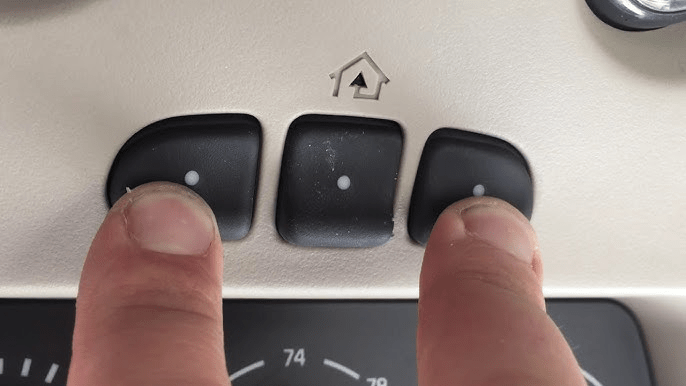
The pairing process allows you to control your Chamberlain garage door opener using your car’s built-in HomeLink or Car2U system. Most modern vehicles come equipped with integrated garage door buttons, typically located on the overhead console, rearview mirror, or sun visor.
Once paired, you can:
- Open or close your garage without using a remote
- Eliminate the need to carry or replace batteries in clickers
- Enjoy hands-free operation that adds convenience and enhances safety
But before diving into the instructions on how to pair Chamberlain garage door opener to car, it’s important to determine compatibility.
Checking Compatibility: Does Your Car Work With Chamberlain Openers?
Chamberlain garage door openers are designed to work with most HomeLink and Car2U systems, but some older vehicles may require a HomeLink Compatibility Bridge to complete the process.
How to Know If Your Car Is Compatible:
- HomeLink version: Cars manufactured before 2012 may need the HomeLink bridge accessory if using a Security+ 2.0™ Chamberlain opener.
- Rolling Code systems: Chamberlain openers manufactured after 1993 typically use rolling code technology for added security.
- Check your vehicle manual: Look for terms like “HomeLink”, “Car2U”, or “Universal Garage Door Opener”.
- Visit HomeLink.com: This website allows you to input your car’s make, model, and year to verify compatibility.
If your car supports HomeLink or Car2U, you’re ready to move forward with the setup.
Tools You’ll Need Before You Begin
To ensure a smooth pairing process, gather the following:
- Your vehicle with the ignition on (but engine off)
- A Chamberlain remote control
- Access to the garage door opener’s Learn button on the motor unit
- A ladder (if the Learn button is located high on the garage ceiling)
How To Pair Chamberlain Garage Door Opener To Car
Let’s walk through the general process of how to pair Chamberlain garage door opener to car, broken down into two key stages: programming the vehicle and syncing with the opener.
Step 1: Clear Any Existing Codes (Optional)
If your vehicle’s buttons were previously programmed, it’s best to start fresh.
To erase old codes:
- Hold down the first and third HomeLink buttons simultaneously.
- Continue holding until the indicator light flashes rapidly (approximately 20 seconds).
- Release both buttons. This resets all existing HomeLink codes.
Note: This step is optional but recommended when switching vehicles or troubleshooting pairing issues.
Step 2: Train Your Vehicle With the Remote
This step teaches your car to mimic the signal of your Chamberlain remote.
To program a HomeLink button:
- Turn the car ignition to the “ON” or “RUN” position (do not start the engine).
- Hold your Chamberlain remote 1–3 inches from the desired HomeLink button.
- Press and hold both the remote button and the HomeLink button at the same time.
- Continue holding until the HomeLink light changes from a slow blink to a rapid flash (this may take up to 30 seconds).
Once the light flashes quickly, your car has learned the remote’s signal. Now it’s time to sync with the garage door opener.
Step 3: Press the Learn Button on the Chamberlain Opener
Head to your garage opener’s motor unit. On the back or side, you’ll find a colored Learn button (usually red, orange, yellow, or purple depending on the model).
To initiate pairing:
- Climb a ladder safely and press the Learn button once (do not hold it).
- You’ll typically have 30 seconds to return to your car and complete the pairing.
Step 4: Finalize the Sync From Your Vehicle
Immediately after pressing the Learn button:
- Return to your vehicle.
- Press and hold the programmed HomeLink button for 2–3 seconds.
- Release, then press again for 2–3 seconds.
- Repeat this step until the garage door responds (usually within 2–3 attempts).
Once the door moves, congratulations! You’ve successfully paired your Chamberlain garage door opener to your car.
Troubleshooting Tips for Pairing Issues
Even if you’ve followed every step, it’s possible to hit a few snags. Here are common issues and how to fix them:
Problem: HomeLink light never changes to rapid blinking.
- Fix: Move the remote slightly closer or farther from the button.
- Check battery strength in the remote.
Problem: Garage door doesn’t respond after pressing the Learn button.
- Fix: Ensure you pressed (not held) the Learn button.
- Try again within the 30-second time limit.
- Repeat the press-and-hold step in the vehicle multiple times.
Problem: Your vehicle is older and won’t pair.
- Fix: You may need a HomeLink Compatibility Bridge, available from Chamberlain or HomeLink.com.
What If Your Vehicle Uses Car2U Instead of HomeLink?
Some Ford, Chrysler, and GM vehicles come equipped with Car2U, which has a different process:
Steps to program Car2U with a Chamberlain opener:
- Press and hold the two outer Car2U buttons for 20 seconds (to clear codes).
- Hold your Chamberlain remote 1–3 inches from the Car2U buttons.
- Press both buttons simultaneously until the Car2U light flashes rapidly.
- Press the Learn button on the Chamberlain opener.
- Within 30 seconds, press the programmed Car2U button 2–3 times until the garage door operates.
Refer to your vehicle’s manual for exact button locations and LED behavior.
Frequently Asked Questions (FAQs)
Q: Do I need the original remote to pair my car to the Chamberlain opener?
A: Yes, most vehicles need the remote for the initial signal programming. After that, the car operates independently.
Q: Can I program multiple cars to the same Chamberlain opener?
A: Yes. Each vehicle can be programmed using the same Learn button and steps.
Q: What color is the Learn button on Chamberlain openers?
A: It varies—common colors include yellow, red, purple, or orange. The color can indicate the security protocol type.
Q: What is rolling code technology?
A: It’s a security feature that changes the code each time the remote is used, preventing code theft.
Benefits of Pairing Your Car with Chamberlain Openers
Still wondering if the process is worth it? Here are the top benefits of pairing your car:
- Hands-free operation improves safety while driving.
- Reduced clutter by eliminating the need for extra remotes.
- Secure access with built-in vehicle encryption.
- Fewer battery issues, since car systems are powered by the vehicle.
Modern vehicles and smart garage technology are designed to work hand-in-hand, making it easier than ever to automate your home entry experience.
Final Thoughts
Now that you know how to pair Chamberlain garage door opener to car, you’re just a few steps away from making your daily routine more efficient and secure. Whether you’re programming a brand-new car with HomeLink or trying to sync an older model with a Chamberlain Security+ 2.0™ opener, this guide has you covered.
Take your time, follow each step, and enjoy the convenience of integrated garage access—no more digging for remotes or wondering if the garage door actually closed.


Leave a Reply