Programming a garage door opener can seem intimidating, but it doesn’t have to be. One of the most common methods used for syncing a remote control with a garage door opener is by using dip switches. These small switches, found inside the remote and the opener, work together to match frequencies and codes, allowing you to control your garage door with ease.
In this article, we’ll walk you through the process of programming a garage door opener using dip switches, providing all the necessary steps, tips, and troubleshooting advice you’ll need for a successful setup. Whether you’re installing a new opener, replacing a remote, or simply looking to reprogram your system, this guide has got you covered.
Read too: The Complete Guide to Tighten Chain On Garage Door Opener for Smooth Operation
What Are Dip Switches?
Before we dive into the programming process, let’s first explain what dip switches are and why they’re important in programming a garage door opener.
Dip switches are small, manual switches that are typically used for setting or configuring electronic systems like garage door openers. They allow users to set different codes, frequencies, or settings by flipping the switches to either the “on” or “off” positions. By doing this, the garage door opener and the remote control can match each other’s codes, ensuring secure communication between the two devices.
Each dip switch is either in the “on” (closed) or “off” (open) position. This arrangement creates a unique combination of codes. Both the opener and the remote must match exactly for the system to function properly.
Now, let’s take a look at how to program a garage door opener with dip switches.
How To Program A Garage Door Opener With Dip Switches: Step-by-Step Guide
Programming your garage door opener with dip switches is a relatively straightforward process. It involves accessing the dip switches on both the garage door opener and the remote, then setting them to match. Here’s how you can do it:
Step 1: Locate the Dip Switches
The first thing you need to do is locate the dip switches on both the garage door opener and the remote control.
- Locate the Dip Switches on the Garage Door Opener:
- The dip switches on the opener are usually found on the motor unit, which is typically installed on the ceiling of your garage.
- Look for a small compartment cover on the opener’s motor unit. You may need to remove the cover to access the dip switches.
- The switches are usually labeled with numbers or small icons indicating their positions.
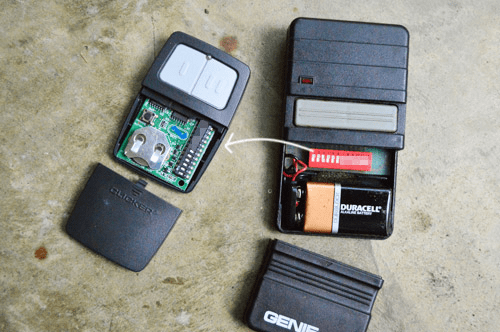
- Locate the Dip Switches on the Remote Control:
- Open the battery compartment of your remote control.
- Inside, you will find a set of small switches that are similar to those on the opener. The number of switches can vary depending on the model of your opener and remote.
Step 2: Set the Dip Switches on the Garage Door Opener
Next, you’ll need to set the dip switches on the garage door opener itself. Follow these steps:
- Access the Dip Switch Panel: Remove the cover on the opener’s motor unit to expose the dip switches.
- Match the Switches: You’ll notice several small switches arranged in a row. Each switch can be set to either the “on” or “off” position. For programming, you need to set the switches to match the configuration you plan to use for the remote.
- Record the Settings: Make a note of the current switch settings, as you may need to refer to them later. It’s important to know the existing configuration in case you want to return to the original settings.
Step 3: Set the Dip Switches on the Remote Control
Now that you’ve accessed the dip switches on the opener, it’s time to set the corresponding dip switches on the remote control. Here’s how:
- Open the Remote Control: Remove the battery cover and any batteries inside the remote.
- Set the Switches: Use a small tool, such as a pen or paperclip, to flip the switches inside the remote. Match the positions of the switches to the exact settings you recorded from the garage door opener.
- Close the Remote: After adjusting the switches to the correct configuration, replace the battery and secure the remote cover.
Step 4: Program the Remote to the Garage Door Opener
Once both the opener and the remote have the same dip switch settings, you can proceed with the programming process:
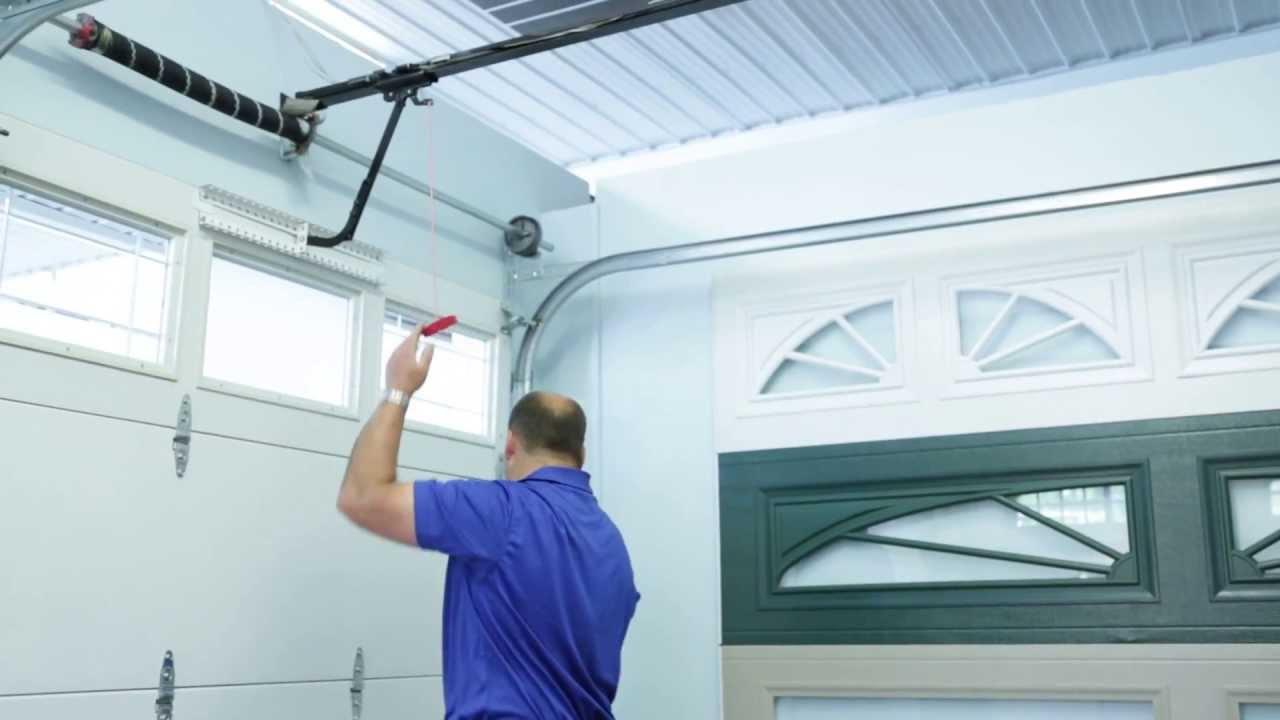
- Activate the Learning Mode on the Opener:
- On many garage door openers, there is a “Learn” button located on the motor unit. This button activates the learning mode, allowing the opener to recognize the remote control.
- Press and hold the Learn button for 3-5 seconds. The indicator light next to the button should turn on, signaling that the opener is in learning mode.
- Press the Remote Button:
- While the opener is in learning mode, press the button on the remote control that you want to use to operate the garage door.
- Hold the button for 3-5 seconds, then release it. The opener should respond by either flashing its light or making a sound, indicating that the remote has been successfully programmed.
- Test the Remote:
- Once the programming is complete, test the remote by pressing the button. The garage door should open or close depending on the direction you programmed.
- If the opener doesn’t respond, repeat the programming process and ensure the dip switches on both the opener and remote are set to the exact same positions.
Step 5: Additional Remotes or Keypads (Optional)
If you have more than one remote or keypad to program, simply repeat the process for each additional device. Make sure each remote has the same dip switch configuration as the opener, and follow the same steps to sync them to the system.
Step 6: Final Adjustments
Once you’ve successfully programmed all remotes or keypads, put everything back in place. Secure the covers of both the opener and the remote, and test the system to ensure everything works properly.
Common Issues and Troubleshooting Tips
While programming a garage door opener with dip switches is typically straightforward, you may encounter some common issues. Here are a few tips to help you troubleshoot:
1. The Opener Doesn’t Respond to the Remote
- Double-check that the dip switches on the remote and opener are set to the same configuration.
- Ensure that the opener is in learning mode when you press the remote button.
- Make sure the batteries in the remote are fresh and installed correctly.
2. The Remote Works Intermittently
- Ensure that the remote’s battery is fully charged and that the switches are securely set.
- Check for any interference from other devices that might be affecting the signal.
3. Remote Not Responding at All
- Ensure that the remote’s dip switches are properly aligned with the opener’s dip switches.
- If you recently replaced the opener or remote, check that the devices are compatible with each other.
- Consult the manufacturer’s manual for any additional instructions specific to your opener model.
Why Use Dip Switches for Garage Door Opener Programming?
Dip switches offer several advantages for programming a garage door opener:
- Simplicity: Dip switches provide a manual, easy-to-understand method for setting up a garage door opener.
- Security: The unique combination of dip switches offers better security compared to systems that rely on fixed codes.
- Compatibility: Many older and newer garage door openers use dip switches, making them a reliable and compatible option for syncing remotes and keypads.
Conclusion: Mastering How To Program A Garage Door Opener With Dip Switches
Now that you’ve learned how to program a garage door opener with dip switches, you’re ready to set up your system with ease. By following the simple steps outlined in this guide, you can successfully sync your opener and remote, ensuring smooth operation of your garage door.
Remember to double-check your dip switch settings, test your system, and troubleshoot any issues as needed. With a bit of patience, you’ll have your garage door opener working flawlessly in no time.

Leave a Reply