Programming your garage door opener might sound intimidating, but with the right instructions, it’s surprisingly easy. Whether you’re setting up a new opener or replacing an old wall button, knowing how to program Chamberlain garage door opener wall button is essential for smooth operation and convenience.
In this detailed guide, we’ll walk you through everything you need to know about programming your Chamberlain wall control button—from identifying your model to successful programming and troubleshooting tips.
Read too: The Complete Guide to Tighten Chain On Garage Door Opener for Smooth Operation
Why Learn How To Program Chamberlain Garage Door Opener Wall Button?
Your Chamberlain wall button acts as the primary control point for opening and closing the garage door from inside. It can also be used for additional functions like turning lights on/off or locking the opener system.
Understanding how to program Chamberlain garage door opener wall button is beneficial for:
- Installing a new opener or control panel
- Replacing a faulty wall button
- Upgrading to a multifunctional control panel
- Troubleshooting connection issues
- Adding extra convenience to your garage access system
It’s also a must-know skill if you’ve recently moved into a home with an existing Chamberlain system and need to reprogram the wall button for security.
Understanding the Chamberlain Wall Button Types
Before jumping into programming, it’s important to know which type of wall control you’re working with. Chamberlain offers a few variations:
1. Standard Wall Button
- Basic open/close functionality
- Usually one single button
2. Multi-Function Wall Control
- Allows additional features: light toggle, lock button, time-to-close
- Often features a digital display
3. Smart Wall Controls
- Compatible with MyQ® Technology
- May connect via Wi-Fi or Bluetooth
- May require app pairing
Knowing your model will help ensure you follow the correct programming method.
Tools You’ll Need
Here are the basic tools and items you might need during installation or reprogramming:
- Flathead screwdriver (for wiring terminals)
- Step ladder (if your opener is ceiling-mounted)
- Chamberlain user manual (optional but helpful)
- A flashlight (to see inside motor unit if needed)
How To Program Chamberlain Garage Door Opener Wall Button – Step-by-Step Instructions
Let’s dive into the actual programming process. Whether you’re installing a new wall button or resetting an existing one, these steps cover both basic and advanced setups.
Step 1: Safety First
Before handling any electrical wiring or controls:
- Disconnect the power to your garage door opener from the main power source.
- If your opener is plugged into a wall outlet, unplug it.
- This ensures your safety during installation or programming.
Step 2: Remove Old Wall Button (If Applicable)
If you’re replacing an existing wall button:
- Unscrew the old wall control plate from the wall.
- Disconnect the two wires attached to the terminals.
- Take note of which wire was connected to each terminal (usually labeled “white” and “red” or “white with black stripe”).
Step 3: Install the New Wall Button
- Connect the two wires to the corresponding terminals on the new Chamberlain wall button.
- Polarity usually doesn’t matter, but it’s best to follow the labeled colors if available.
- Secure the new wall control panel to the wall with screws.
- Plug the opener back into power or restore the circuit.
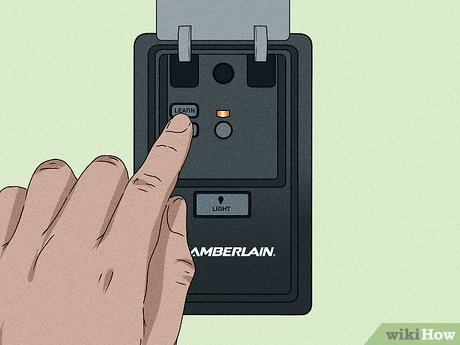
Step 4: Locate the “Learn” Button on the Motor Unit
Go to the garage door opener motor unit (usually on the ceiling of the garage). You’ll need to find the Learn button, typically located near the antenna wire or light cover.
The Learn button colors often indicate the type of technology your opener uses:
- Yellow: Security+ 2.0 (newer openers)
- Purple: Security+ (mid-range models)
- Red/Orange: Older models
This button is key to syncing the wall button with the motor unit.
Step 5: Programming the Wall Button
Here’s how to program the Chamberlain wall button using the Learn button:
- Press and release the Learn button on the garage door opener motor. The LED next to it will light up (for about 30 seconds).
- Press and hold the wall button you want to program.
- When the opener lights blink or you hear two clicks, programming is complete.
- Release the button.
Your Chamberlain wall control is now synced with the garage door opener.
Tips for Using Chamberlain Multi-Function Wall Controls
If your wall control has extra features, here are some tips to get the most out of them:
Light Button
Use this to turn on/off the garage door opener lights without activating the door.
Lock Button
Engages a vacation lock mode. When enabled, it disables all remote controls but keeps the wall button active.
Timer-to-Close
Some models let you program the door to automatically close after a set time (1, 5, or 10 minutes). Follow the display instructions on your wall unit or consult your manual.
Troubleshooting Wall Button Programming Issues
Even the most straightforward setups can occasionally run into snags. Here’s how to address common problems when programming your Chamberlain wall button:
Issue 1: Wall Button Not Working
- Double-check wiring connections to make sure they are secure.
- Verify the opener is receiving power.
- Try resetting the system by unplugging the motor unit for 30 seconds and reconnecting.
Issue 2: Wall Button Only Turns on Light
- This may indicate a locked system. Hold the lock button for a few seconds to disable vacation mode.
- Reprogram the button using the Learn process.
Issue 3: Learn Button Not Responding
- Check if the opener is using Security+ 2.0; some wall controls require a slightly different process or may come pre-programmed.
- Inspect for dust or obstructions on the Learn button.
Smart Wall Buttons and MyQ Integration
If you’re using a smart wall control with MyQ® Technology, here’s how to pair it with your smartphone:
- Download the MyQ App from the App Store or Google Play.
- Create an account or log in.
- Select Add Device and follow in-app instructions.
- The wall control will flash or beep when successfully paired.
- Control your garage door from anywhere via the app.
Some smart buttons may also support voice control via Google Assistant or Amazon Alexa (requires subscription).
Maintenance Tips for Chamberlain Wall Controls
To ensure long-term performance:
- Check wiring annually for corrosion or fraying
- Clean the button surface to prevent sticking
- Test all functions monthly (open/close, light, lock)
- Replace the wall control battery (if applicable) every 1–2 years
Regular maintenance ensures that your programmed settings and functions remain reliable over time.
When to Replace the Wall Button
Sometimes reprogramming isn’t enough. Here’s when you should consider replacing your Chamberlain wall control:
- Button is unresponsive or physically damaged
- Light or display is dim or flickering
- Features like lock or timer don’t work consistently
- Wall control fails to program even after troubleshooting
Replacement wall buttons are widely available online or through Chamberlain’s official website.
Final Thoughts
Knowing how to program Chamberlain garage door opener wall button gives you the control and confidence to maintain or upgrade your garage system efficiently. From standard open/close functions to smart home integrations, the wall control panel is a critical piece of your garage door opener system.
Whether you’re a DIY homeowner or just looking to enhance your home’s security and accessibility, following this step-by-step guide will ensure a successful setup every time. With easy installation, responsive performance, and smart capabilities, Chamberlain wall buttons are designed for modern living.


Leave a Reply