Garage door rollers play a vital role in the smooth operation of your garage door. Over time, these rollers can wear out or become damaged, leading to noisy and inefficient door movement. If you’re experiencing issues with your garage door rollers, don’t worry; you can replace them yourself with the right tools and a bit of guidance. In this article, we’ll provide you with a step-by-step guide on how to replace a garage door roller to keep your garage door operating smoothly.
Understanding Garage Door Rollers
Types of Rollers
Garage door rollers come in various types, including:
- Advantages: Nylon rollers are quiet and durable, making them a popular choice for many homeowners.
- Disadvantages: They can wear out over time due to the friction between the nylon and the track.
2. Steel Rollers
- Advantages: Steel rollers are exceptionally durable and can withstand heavy use.
- Disadvantages: They can be noisy as they roll along the track.
3. Teflon Rollers
- Advantages: Teflon rollers are known for their quiet operation and resistance to corrosion.
- Disadvantages: They tend to be more expensive than other types.
4. Ball-Bearing Rollers
- Advantages: Ball-bearing rollers are smooth and durable, offering quiet operation.
- Disadvantages: They can be relatively costly.
Tools and Materials You’ll Need
Before you begin, gather the following tools and materials:
- New Garage Door Rollers: Make sure you have the right type and size for your garage door.
- Ladder: You’ll need a ladder to safely access the garage door.
- Socket Wrench with a 7/16-inch Socket: This tool will help you remove the nuts and bolts.
- Pliers: Pliers can be handy for gripping and holding parts.
- Safety Glasses: Protect your eyes from any debris that may fall during the process.
- Clamps: Use clamps to secure the door in place while you work on it.
Steps to Replace a Garage Door Roller
Step-by-Step Instructions
1. Prepare Your Work Area
- Safety First: Ensure the garage door is closed and disconnect the power source, such as unplugging the opener or turning off the electricity to the opener circuit.
- Secure the Door: Use clamps to secure the door in place, preventing it from moving during the replacement process.
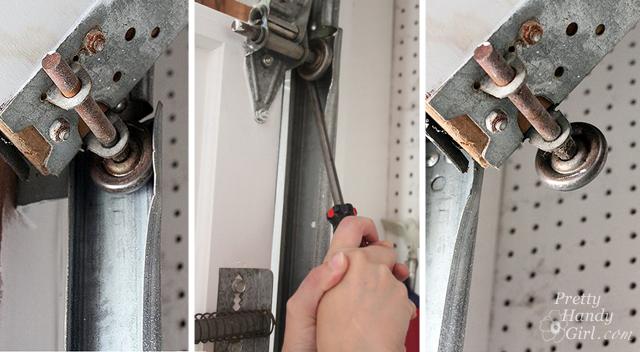
2. Remove the Old Rollers
- Locate the Roller: Identify the roller you want to replace.
- Remove the Nuts and Bolts: Use a socket wrench with a 7/16-inch socket to remove the nuts and bolts that secure the roller to the track.
- Slide Out the Roller: Carefully slide the old roller out of the track.
3. Install the New Roller
- Insert the New Roller: Place the new roller into the track, ensuring it aligns correctly.
- Secure with Nuts and Bolts: Use the socket wrench to reattach the new roller using the nuts and bolts.
4. Test the Door
- Remove the Clamps: Release the clamps securing the door.
- Test the Door: Carefully open and close the garage door a few times to ensure the new roller functions smoothly and quietly.
Conclusion
Replacing a garage door roller is a manageable DIY project that can enhance the performance and reduce the noise of your garage door. By following these step-by-step instructions and using the right tools and materials, you can replace your garage door rollers and enjoy a smoother, quieter door operation. Remember to prioritize safety, and if you encounter any difficulties, consider seeking professional assistance.


Leave a Reply