Is your garage door making strange noises or struggling to open and close smoothly? It might be time to replace the rollers. In this detailed guide, we’ll walk you through the process of how to replace garage door roller effectively, saving you time and money on professional repairs.

Understanding Garage Door Rollers
Before we dive into the replacement process, let’s understand the role of garage door rollers:
Garage door rollers are small wheels attached to the door tracks, allowing the door to move up and down smoothly. Over time, these rollers can wear out due to constant use and exposure to the elements, leading to issues such as noisy operation and difficulty in opening and closing the door.
Signs That Your Garage Door Rollers Need Replacement
- Excessive Noise: Grinding or squeaking noises when opening or closing the garage door.
- Uneven Movement: The door jerks or gets stuck while in motion.
- Visible Wear: Inspection reveals worn-out or damaged rollers.
How To Replace Garage Door Roller: Step-by-Step Guide
Follow these steps to replace garage door roller efficiently:
Step 1: Gather Your Tools and Materials
Before you begin, make sure you have the following tools and materials:
- Replacement garage door rollers
- Pliers
- Adjustable wrench
- Socket wrench set
- Lubricant
Step 2: Secure the Garage Door
Ensure the garage door is fully closed and disconnect the power to the automatic opener to prevent accidents.
Step 3: Remove the Old Rollers
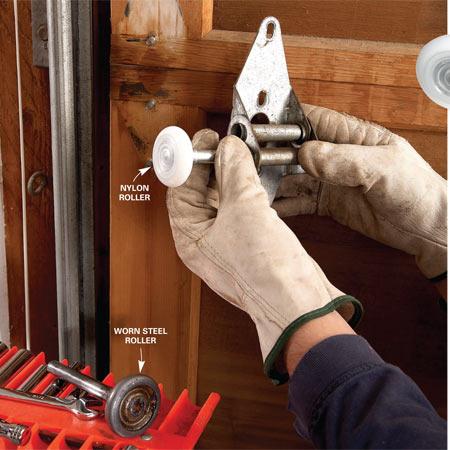
Using pliers and a socket wrench, carefully remove the bolts holding the old rollers in place. Slide the rollers out of the tracks.
Step 4: Install the New Rollers
Slide the new rollers into the tracks, aligning them with the existing holes. Secure them in place with the bolts and tighten using the wrench.
Step 5: Lubricate the Rollers
Apply lubricant to the rollers to ensure smooth operation. Be sure to use a lubricant specifically designed for garage door rollers.
Step 6: Test the Door
Reconnect the power to the automatic opener and test the garage door to ensure it moves smoothly without any issues.
Tips for Success
- Safety First: Always wear protective gear, such as gloves and safety glasses, when working on garage door repairs.
- Regular Maintenance: Inspect and lubricate your garage door rollers regularly to prevent premature wear and tear.
- Professional Help: If you’re unsure about any aspect of the replacement process, don’t hesitate to seek professional assistance.
Read too: Why Your Liftmaster Garage Door Won’t Stay Closed and How to Fix It? Troubleshooting Tips
Conclusion
By following this step-by-step guide on how to replace garage door roller, you can ensure smooth and efficient operation of your garage door for years to come. Regular maintenance and timely replacement of worn-out rollers are essential for keeping your garage door in top condition. So why wait? Take control of your garage door maintenance today and enjoy hassle-free operation for years to come.


Leave a Reply