When your garage door opener suddenly stops responding, the issue is often electrical rather than mechanical. In many cases, learning How To Replace Logic Board On Garage Door Opener can save hundreds of dollars compared to full replacement. This guide walks you through the process safely, clearly, and with beginner-friendly explanations.
What Is a Logic Board on a Garage Door Opener?
The logic board—also called the control board or circuit board—is the brain of your garage door opener.
The Logic Board Controls:
- Remote signal reception
- Wall switch operation
- Safety sensors
- Motor timing and force settings
Read too: Door and Garage Door Companies: Choosing the Right Partner for Your Needs
If this board fails, the opener may still have power but won’t function correctly.
According to appliance repair technicians, logic board failure accounts for nearly 40% of modern garage opener malfunctions once motors and sensors are ruled out.
How Do You Know the Logic Board Is Bad?
Before learning how to replace logic board on garage door opener, confirm the symptoms.
Common Signs of a Faulty Logic Board:
- Remote works intermittently
- Wall button doesn’t respond
- Door opens randomly
- LED error codes blinking
- Opener has power but won’t move
If sensors and remotes are confirmed working, the logic board is usually the culprit.
Is It Worth Replacing the Logic Board?
This is one of the most common homeowner questions.
Cost Comparison
| Option | Average Cost |
|---|---|
| Logic board replacement | $75–$150 |
| Professional labor | $100–$200 |
| Full opener replacement | $350–$700 |
Replacing the logic board is often the most cost-effective solution, especially if the opener is less than 10 years old.
Is Replacing a Logic Board Safe for Beginners?
Yes—with proper precautions.
You don’t need advanced electrical skills, but attention to safety is critical.
Safety Requirements:
- Disconnect power completely
- Avoid static electricity
- Label wires before removal
- Follow manufacturer instructions
If you’re comfortable using a screwdriver and following steps carefully, this repair is manageable.
Tools and Materials You’ll Need
Before starting, gather everything to avoid interruptions.
Required Tools:
- Phillips screwdriver
- Flathead screwdriver
- Needle-nose pliers
- Anti-static wrist strap (recommended)
- Smartphone (for photos)
Materials:
- Compatible replacement logic board
- Owner’s manual (model-specific)
How To Replace Logic Board On Garage Door Opener (Step-by-Step)
Step 1: Disconnect Power Completely
Unplug the opener from the outlet.
Wait 2–3 minutes to allow capacitors to discharge.
⚠️ Never work on a powered unit.
Step 2: Open the Garage Door Opener Housing
Remove the plastic or metal cover using a screwdriver.
Set screws aside in a small container.
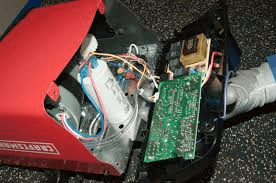
You should now see the logic board mounted with visible wiring.
Step 3: Document Wire Connections
Before unplugging anything:
- Take clear photos from multiple angles
- Label wires with tape if needed
This prevents incorrect reconnections later.
Step 4: Disconnect Wiring Harnesses
Gently unplug connectors using needle-nose pliers if tight.
Never pull directly on wires—only on connectors.
Step 5: Remove the Old Logic Board
Unscrew mounting screws (usually 2–4).
Carefully lift the board out without bending it.
Avoid touching metal contacts with bare fingers.
Step 6: Install the New Logic Board
Align the new board exactly as the old one was positioned.
Secure it with screws—snug, not overtight.
Reconnect all wiring harnesses one by one.
Step 7: Reassemble and Restore Power
Replace the housing cover.
Plug the opener back in.
Watch for:
- LED indicator lights
- Startup sounds
This confirms power restoration.
Step 8: Reprogram Remotes and Settings
Most openers require:
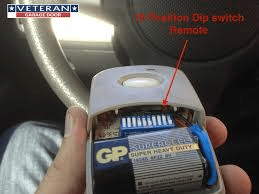
- Remote re-pairing
- Travel limit reset
- Force adjustment calibration
Follow manufacturer instructions carefully.
Testing After Logic Board Replacement
Run at least 3 full open/close cycles.
Confirm:
- Smooth door movement
- Proper sensor response
- Remote and wall button functionality
If issues persist, double-check wiring connections.
Common Mistakes to Avoid
❌ Skipping Power Disconnection
Even low-voltage boards can cause damage.
❌ Using the Wrong Board Model
Logic boards are not universal.
❌ Forgetting to Reprogram
The opener won’t function properly without recalibration.
Advantages vs Disadvantages of Logic Board Replacement
✅ Advantages
- Much cheaper than replacement
- Restores full functionality
- Environmentally friendly repair
❌ Disadvantages
- Requires careful handling
- Not effective if motor is failing
- Older units may lack board availability
When Should You Replace the Entire Opener Instead?
Logic board replacement may not be ideal if:
- Opener is over 15 years old
- Motor is noisy or overheating
- Replacement board is discontinued
- Safety standards are outdated
In these cases, full replacement is often smarter long-term.
Professional Insight: Why Logic Boards Fail
Experts cite the most common causes as:
- Power surges
- Moisture exposure
- Heat buildup
- Aging electronic components
Installing a surge protector can significantly extend board life.
Authoritative Reference
For a general overview of electronic control boards and automation systems, see:
👉 https://en.wikipedia.org/wiki/Printed_circuit_board
FAQ: How To Replace Logic Board On Garage Door Opener
Q1: How long does it take to replace a logic board?
Usually 30–60 minutes for most DIY homeowners.
Q2: Can a bad logic board damage the motor?
Rarely, but erratic signals can strain components over time.
Q3: Do all garage door openers have replaceable logic boards?
Most modern units do, but very old models may not.
Q4: Is professional installation necessary?
Not required, but recommended if you’re uncomfortable with wiring.
Q5: Will replacing the logic board erase settings?
Yes. You’ll need to reprogram remotes and limits.
Conclusion
Learning How To Replace Logic Board On Garage Door Opener can save money, extend the life of your opener, and restore reliable operation. With proper safety steps and careful wiring, this repair is well within reach for many homeowners.
If this guide helped you, share it on social media so others can fix their garage door opener with confidence 🔧🚪


Leave a Reply