When a garage door opener suddenly stops responding, behaves erratically, or ignores remotes, many homeowners ask How To Test Logic Board On Garage Door Opener before replacing the entire unit. This is a smart question—because the logic board (also called the control board) is essentially the “brain” of the opener, and it’s often responsible for mysterious failures.
In this complete guide, you’ll learn how to safely test a garage door opener logic board, identify clear signs of failure, rule out simpler problems, and decide whether repair or replacement makes more sense. The instructions are written for beginners, with clear steps and practical explanations.
Read too: Why Are My Garage Doors Opening By Themselves? Troubleshooting Guide
What Is a Logic Board on a Garage Door Opener?
The logic board is an electronic circuit board that controls nearly every function of your garage door opener, including:
- Receiving signals from remotes and wall buttons
- Activating the motor
- Communicating with safety sensors
- Controlling lights and limits
- Managing safety and error codes
In simple terms, if the logic board fails, the opener may have power—but won’t work correctly.
For general background on how garage door openers function as systems, see:
https://en.wikipedia.org/wiki/Garage_door_opener
Why Is Testing the Logic Board Important?
Replacing parts blindly can be expensive and frustrating. Testing helps you:
- Avoid unnecessary motor replacement
- Confirm whether electronics are the real issue
- Decide between repair and full opener replacement
- Explain the problem clearly to a technician if needed
Industry insight: In many residential openers, the logic board accounts for 30–50% of electronic-related failures, especially after power surges.
Common Symptoms of a Bad Logic Board
Before testing, confirm the symptoms match a logic board issue.
Typical warning signs include:
- Wall button works but remotes don’t
- Opener has power but won’t run
- Random opening or closing
- Lights flash unexpectedly
- Safety sensors are aligned but ignored
- Burning smell or visible scorch marks
If multiple symptoms appear at once, the logic board becomes a prime suspect.
Safety First: What You Must Do Before Testing
Testing involves working near electronics. Safety is non-negotiable.
Essential safety steps:
- Unplug the garage door opener from the outlet
- Disengage the garage door using the emergency release
- Use a stable ladder
- Wear safety glasses
- Never touch exposed wiring when powered
Important: Garage door springs are not part of the opener logic board, but electrical shock is still a risk.
Tools You’ll Need to Test the Logic Board
Prepare these tools before starting:
Basic tools:
- Phillips screwdriver
- Flathead screwdriver
- Flashlight or headlamp
- Clean cloth
Testing tools:
- Digital multimeter (with AC/DC voltage settings)
- Small insulated screwdriver
Having a multimeter significantly improves test accuracy.
Step 1: Confirm the Opener Has Power (Rule Out Easy Causes)
Before blaming the logic board, confirm basic power delivery.
Check the following:
- Outlet works (test with another device)
- Circuit breaker is not tripped
- GFCI outlet is not reset
- Power cord is intact
If there’s no power, the logic board is not the problem.
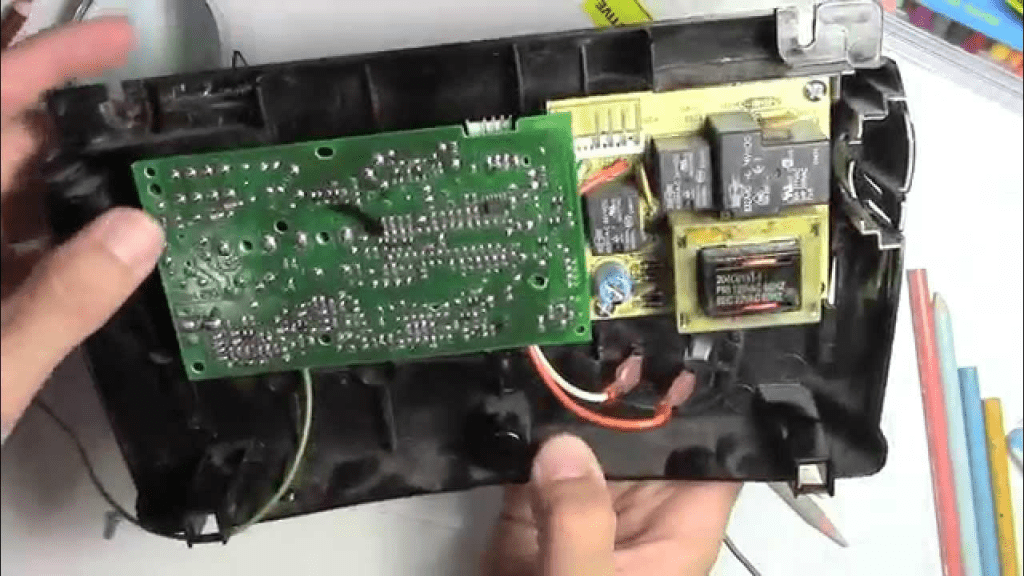
Step 2: Remove the Opener Cover to Access the Logic Board
Most logic boards are behind the opener housing.
How to access:
- Unplug the opener
- Remove the light cover (if needed)
- Unscrew the main housing
- Lower the cover carefully
Once removed, the logic board is usually mounted near the back or side of the unit.


4
Step 3: Perform a Visual Inspection (Most Important Step)
Many logic board failures are visually obvious.
Look closely for:
- Burn marks or dark spots
- Melted plastic
- Corroded terminals
- Loose wire connectors
- Swollen or leaking capacitors
Rule of thumb: If the board looks burnt or smells bad, it has failed—testing is no longer necessary.
Step 4: Check for Loose or Damaged Connections
Sometimes the board itself is fine.
Inspect:
- Wire harness plugs
- Sensor connections
- Wall control terminals
Gently reseat each connector. Loose connections can mimic logic board failure.
Step 5: Test Wall Button Input (Simple Functional Test)
The wall button sends a direct signal to the logic board.
How to test:
- Reconnect power temporarily
- Press the wall button
- Observe board response (click, LED, relay sound)
Results:
- No response: Possible logic board failure
- Response but no motor action: Continue testing
Unplug the opener again before proceeding.
Step 6: Test Logic Board LED Indicators
Many modern logic boards include diagnostic LEDs.
What to look for:
- Solid light = normal standby
- Flashing pattern = error code
- No light = no power or failed board
Check your opener’s manual to decode LED patterns if present.
Step 7: Use a Multimeter to Test Voltage Output
This is the most technical—but most accurate—test.
Multimeter setup:
- Set to AC voltage for input testing
- Set to DC voltage for board output testing
What to test:
- Input voltage to logic board (usually 120V AC)
- Low-voltage output (commonly 12V–24V DC)
Example: If the board receives correct input voltage but produces 0V output, the logic board is defective.
Step 8: Test Safety Sensor Signal Processing
If sensors are aligned but ignored, the logic board may not be processing signals.
Signs of board-related sensor failure:
- Sensors show steady lights but door won’t close
- Opener reverses immediately
- Error codes persist after sensor replacement
This confirms internal processing failure—not sensor failure.
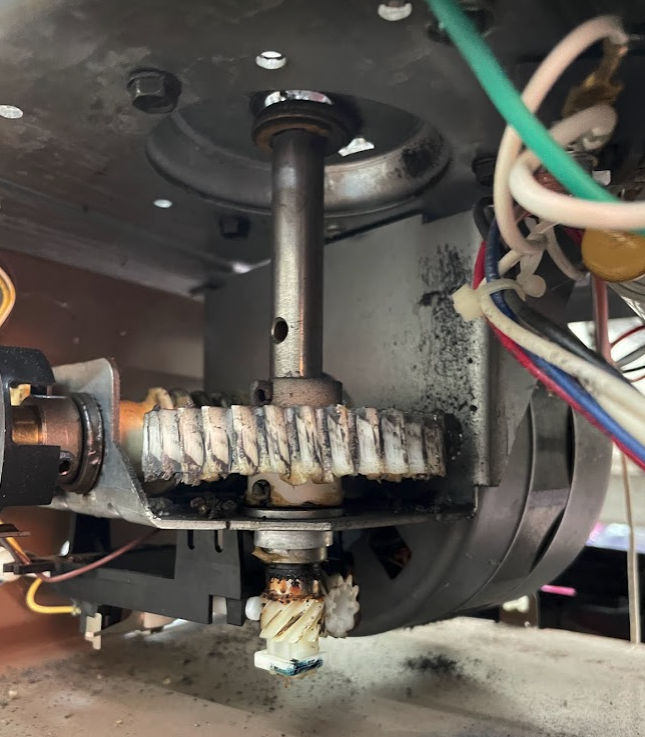
Step 9: Eliminate Other Possible Causes
Before declaring the board dead, rule out:
Alternative failures:
- Bad wall control
- Faulty remote receiver
- Worn motor capacitor
- Stripped drive gear
Logic boards should be diagnosed after eliminating these simpler problems.
Logic Board Test Results: What They Mean
Results table:
| Test Result | Meaning |
|---|---|
| No input power | Electrical supply issue |
| Burn marks present | Board failed |
| Input OK, no output | Board defective |
| LED error persists | Board malfunction |
| Random behavior | Board instability |
This table helps confirm your diagnosis confidently.
Repair vs Replacement: What’s the Smarter Choice?
When repair makes sense:
- Opener is under 10 years old
- Board replacement cost is reasonable
- Motor and drive system are in good condition
When replacement is better:
- Opener is 12–15+ years old
- Multiple electronic failures exist
- Replacement board costs near a new opener
Cost Expectations (Realistic Overview)
- Logic board replacement: $80–$180
- Professional labor: $100–$200
- New opener installed: $300–$600
Testing first can save hundreds of dollars.
Common Mistakes to Avoid When Testing Logic Boards
Avoid these DIY errors:
- Testing with power connected improperly
- Touching board components with bare hands
- Skipping visual inspection
- Misreading multimeter settings
- Assuming remotes equal board failure
Slow, careful testing prevents misdiagnosis.
FAQ: Logic Board Testing Explained
How To Test Logic Board On Garage Door Opener Safely?
Unplug the opener, inspect visually, test wall button response, and verify voltage output using a multimeter.
Can a Garage Door Opener Have Power but a Bad Logic Board?
Yes. The unit may power on, but the board fails to process signals or activate the motor.
Do Logic Boards Fail After Power Surges?
Yes. Power surges are one of the most common causes of logic board failure.
Is It Hard to Replace a Logic Board?
Replacement is usually straightforward, but testing first ensures the board is truly the problem.
Should I Test the Logic Board Before Buying a New Opener?
Absolutely. Testing can confirm whether a simple repair is possible.
Conclusion
Understanding how to test logic board on garage door opener gives homeowners a powerful advantage when troubleshooting mysterious opener problems. By following a systematic approach—visual inspection, functional testing, and voltage checks—you can accurately diagnose failures and avoid unnecessary replacements.
A faulty logic board doesn’t always mean the entire opener is finished. With proper testing, you can make smarter, safer, and more cost-effective repair decisions.
If this guide helped you, share it on social media so other homeowners can confidently troubleshoot garage door opener electronics the right way.


Leave a Reply