How To Tighten Garage Door Spring? Garage doors are an essential part of our homes, providing security and convenience. However, like any mechanical system, they require regular maintenance to ensure smooth operation. One crucial aspect of garage door maintenance is keeping the springs in optimal condition. In this guide, we’ll walk you through the process of tightening your garage door spring safely and effectively.
Understanding Garage Door Springs
Before we delve into the tightening process, let’s understand the role of garage door springs. Garage doors typically use either torsion springs or extension springs to counterbalance the weight of the door and facilitate smooth opening and closing. These springs undergo significant tension, making them critical components of the system.
Signs Your Garage Door Spring Needs Tightening
- Difficulty Opening or Closing: If you notice that your garage door is struggling to open or close smoothly, it could be a sign that the spring needs adjustment.
- Sagging or Uneven Movement: Inspect your garage door for any signs of sagging or uneven movement when opening or closing, indicating that the spring tension may be uneven.
- Loud Noises: Excessive noise, such as creaking or grinding sounds, during operation can also indicate spring issues that may require tightening.
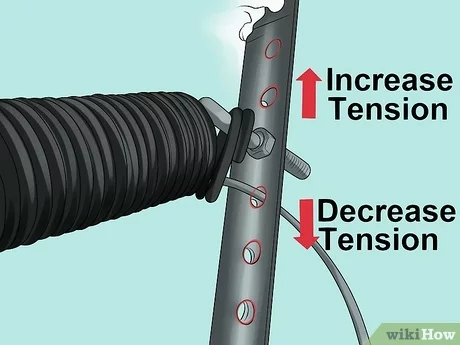
How to Tighten Garage Door Spring
Step 1: Gather Necessary Tools
Before you begin, gather the following tools:
- Safety gloves
- Adjustable wrench
- C-clamps
- Vice grips
- Ladder
Step 2: Ensure Safety
Safety is paramount when working with garage door springs. Disconnect the power to the garage door opener and ensure that the door is fully closed before starting the tightening process.
Step 3: Identify the Type of Spring
Determine whether your garage door uses torsion springs or extension springs, as the tightening process may vary depending on the type of spring.
Step 4: Locate the Adjustment Points
Torsion springs typically have adjustment rods located above the door, while extension springs may have pulleys and cables near the door tracks.
Step 5: Tighten the Springs
Using the appropriate tools, carefully tighten the springs by adjusting the tension rods or tightening the cables. Be cautious not to over-tighten, as this can cause damage to the springs or other components.
Step 6: Test the Door
After tightening the springs, test the garage door to ensure that it opens and closes smoothly. Make any necessary adjustments until the door operates correctly.
Professional Assistance
If you’re uncomfortable or unsure about tightening your garage door spring yourself, it’s best to seek assistance from a qualified technician. Improper adjustment of garage door springs can be dangerous and lead to serious injuries or property damage.
Conclusion
Regular maintenance, including tightening the garage door spring, is essential for ensuring the smooth and safe operation of your garage door. By following the steps outlined in this guide and prioritizing safety, you can maintain your garage door in top condition and enjoy years of reliable performance.
Read too: Why Your Liftmaster Garage Door Won’t Stay Closed and How to Fix It? Troubleshooting Tips


Leave a Reply