Is your garage door showing signs of wear and tear, and you suspect the springs need tightening? Learn the essential steps on “How To Tighten Springs On Garage Door” and ensure your garage door operates smoothly and safely.
Demystifying the Process – How To Tighten Springs On Garage Door
Understanding the intricacies of garage door springs and knowing how to tighten them is crucial for ensuring the longevity and proper functioning of your garage door. In this section, we will guide you through the step-by-step process of tightening springs effectively.
The Importance of Properly Tightened Springs: Ensuring Balance and Safety
Before delving into the how-to, it’s essential to comprehend why maintaining properly tightened springs is crucial. This part of the article will explain how balanced springs contribute to the overall stability of the garage door and, more importantly, enhance the safety of its operation.
Preparing for the Task: Safety First
Before you embark on tightening the springs, it’s paramount to prioritize safety. This section will outline the necessary safety precautions, including the use of safety glasses, gloves, and other protective gear. Understanding the potential risks involved is crucial to preventing accidents during the tightening process.
Identifying the Type of Garage Door Springs: Torsion or Extension
Garage doors typically use either torsion or extension springs. Knowing which type your garage door employs is essential for selecting the appropriate tightening method. This segment will guide you in identifying the springs and understanding their unique characteristics.
Torsion Springs Tightening: Step-by-Step Guide
For garage doors with torsion springs, the tightening process follows a specific set of steps. This section will provide a detailed, step-by-step guide, including identifying the winding cone, using winding bars, and adjusting the tension to achieve the desired tightness.
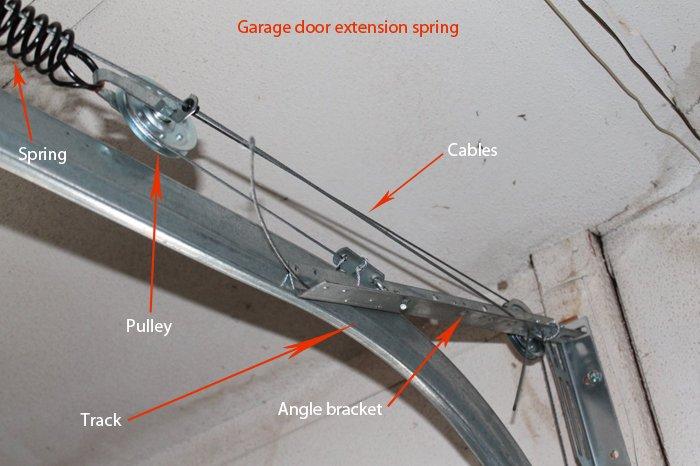
Extension Springs Tightening: Step-by-Step Instructions
If your garage door uses extension springs, the tightening process differs from torsion springs. This part of the article will walk you through the steps of tightening extension springs, emphasizing safety measures and highlighting the tools required for the task.
Signs Your Garage Door Springs Need Tightening
Understanding when your garage door springs need tightening is crucial for proactive maintenance. This section will outline common signs such as uneven door movement, excessive noise, or visible gaps in the springs. Recognizing these indicators will prompt timely action, preventing potential issues down the line.
Routine Maintenance Tips: Preventive Measures for Longevity
To ensure your garage door springs stay in optimal condition, regular maintenance is key. This segment will provide additional tips on preventive measures, including lubrication, inspection routines, and when to seek professional assistance for more complex issues.
Read too: Why Your Chamberlain Garage Door Opener Learn Button Is Not Working and How to Fix It? Troubleshooting Guide
Conclusion: Empowering Homeowners to Handle Garage Door Maintenance
In conclusion, learning “How To Tighten Springs On Garage Door” empowers homeowners to take charge of their garage door maintenance. By following the outlined steps, understanding the signs of when tightening is needed, and incorporating routine maintenance practices, you can extend the lifespan of your garage door and ensure its safe and efficient operation.
Remember, if you ever feel uncertain or uncomfortable handling garage door spring tightening, it’s always advisable to seek professional assistance to guarantee the safety of both you and your garage door.


Leave a Reply