Many homeowners feel stuck when installing or repairing a garage door opener—especially when wiring is involved. If you’re searching for How To Wire Up A Chamberlain Garage Door Opener, chances are you want a clear, safe, and beginner-friendly explanation without technical overload. This guide walks you through the entire wiring process step by step, helping you avoid common mistakes while ensuring your opener works smoothly and safely.
What Is a Chamberlain Garage Door Opener and How Does the Wiring Work?
A Chamberlain garage door opener is a motorized system that opens and closes your garage door using a combination of power wiring (high voltage) and control wiring (low voltage). Chamberlain units—manufactured by Chamberlain Group—are widely used in the US due to their reliability, safety features, and smart home compatibility.
Read too: The Complete Guide to Tighten Chain On Garage Door Opener for Smooth Operation


4
The wiring system typically connects:
- The motor unit (power source)
- The wall control button
- The safety reversing sensors
- Optional smart control modules
Understanding how these components connect is essential before touching any wires.
Why Proper Wiring Is Critical for Chamberlain Openers
Correct wiring is not just about making the opener work—it’s about safety and longevity.
Industry data from US home service providers shows that nearly 1 in 4 garage door opener service calls are caused by incorrect wiring or loose connections. Improper wiring can lead to:
- Non-functioning safety sensors
- Doors that won’t close fully
- Intermittent wall control response
- Electrical shorts or blown circuit boards
By following the correct wiring method, you protect both your opener and your household.
Tools and Materials You’ll Need Before Wiring
Before starting, prepare everything in advance to avoid interruptions.
Essential Tools
- Phillips screwdriver (medium size)
- Flathead screwdriver (4–6 mm tip)
- Wire stripper (18–22 AWG)
- Non-contact voltage tester
Required Materials
- 2-conductor low-voltage wire (solid copper recommended)
- Plastic wire staples
- Electrical tape
Safety reminder: Always unplug the opener and turn off the garage circuit breaker before wiring.
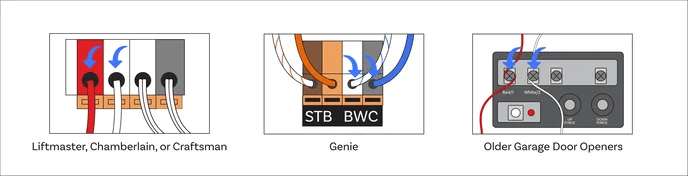
How To Read a Chamberlain Garage Door Opener Wiring Diagram
Most Chamberlain wiring diagrams follow a logical and consistent layout, making them easier for beginners once you know what to look for.
Common Terminal Labels Explained
| Label | Function |
|---|---|
| R / W | Wall control terminals |
| S / S | Safety sensor terminals |
| AC | Power input |
| GND | Ground |
Typical Wire Colors
- White: Common/neutral
- Red: Control signal (wall button or sensor)
- Black: Power/hot (inside motor unit only)
For general background on wiring color standards, you can refer to Wikipedia’s electrical wiring overview to understand why these conventions exist.
Step-by-Step: How To Wire Up A Chamberlain Garage Door Opener
Step 1: Turn Off Power Completely
Unplug the opener from the ceiling outlet and switch off the breaker. Confirm with a voltage tester—there should be 0 volts at all terminals.
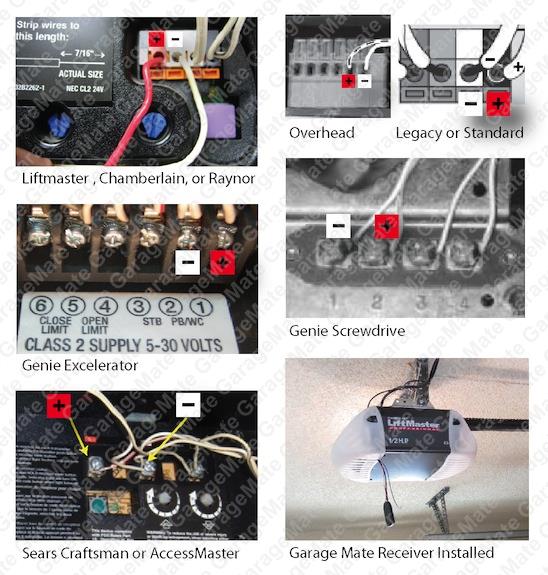
Step 2: Open the Motor Unit and Locate Terminals
Remove the light cover or rear panel. You’ll see a terminal strip usually color-coded or labeled for:
- Wall control
- Safety sensors
Take a photo before wiring—it helps if you need to double-check later.
Step 3: Wire the Safety Sensors
Safety sensors are mounted near the garage floor on both sides.
Steps:
- Run low-voltage wire from each sensor to the motor unit
- Strip 10–12 mm (⅜–½ inch) of insulation
- Insert wires into the S/S terminals
- Tighten screws until snug (no copper exposed)
🔎 Pro tip: Sensor wires are not polarized, so orientation doesn’t matter.
Step 4: Wire the Wall Control Button
The wall control sends a low-voltage signal to activate the door.
How to do it:
- Use a separate 2-conductor wire
- Connect wires to the R/W terminals
- Secure the wire along the wall every 30–40 cm (12–16 inches)
Most Chamberlain wall controls operate on 12–24V DC, making them safe for DIY installation.
Step 5: Secure and Route Wires Properly
Good wire management improves safety and durability.
Best practices:
- Keep wires away from moving rails
- Avoid sharp bends tighter than 45°
- Maintain at least 5 cm (2 inches) from high-voltage lines
Step 6: Restore Power and Test the System
Plug the opener back in and turn on the breaker.
Test the following:
- Wall button responsiveness
- Sensor alignment (solid LED lights)
- Door reversal when beam is blocked
If any test fails, recheck wiring against the diagram.
Common Wiring Mistakes and How to Avoid Them
Mistakes vs Solutions
❌ Mixing wall control and sensor terminals
✅ Always match terminal labels exactly
❌ Loose terminal screws
✅ Tighten firmly, but don’t overtighten
❌ Using damaged or thin wire
✅ Use 18–22 AWG solid copper wire
Avoiding these errors dramatically reduces troubleshooting time later.
Troubleshooting Chamberlain Garage Door Opener Wiring Issues
Door Won’t Close Completely
- Sensor wiring reversed or loose
- Sensor lenses misaligned
Wall Button Not Working
- Incorrect terminal used
- Broken conductor inside the wire
Clicking Sound but No Movement
- Control wiring correct, power wiring faulty
- Internal board protection mode activated
Using the wiring diagram as a reference allows you to isolate issues logically.
When Should You Call a Professional Installer?
While low-voltage wiring is DIY-friendly, you should stop and call a professional if:
- You smell burning plastic
- Terminals show scorch marks
- The breaker trips repeatedly
Professional installers ensure compliance with US electrical safety standards and manufacturer warranties.
FAQ: How To Wire Up A Chamberlain Garage Door Opener
Frequently Asked Questions
Q1: Are all Chamberlain garage door opener wiring setups the same?
No. Terminal layouts are similar, but labels and configurations vary by model and year.
Q2: What voltage do Chamberlain safety sensors use?
Most operate on 12–24 volts DC, which is safe for homeowners.
Q3: Can I reuse old wiring?
Yes, if the wire insulation is intact and meets 18–22 AWG standards.
Q4: Why are my sensor lights blinking?
Blinking usually indicates misalignment or an open circuit in the sensor wiring.
Q5: Does a Chamberlain opener need grounding?
The motor unit is grounded through the power cord. Control wiring does not require grounding.
Conclusion
Knowing How To Wire Up A Chamberlain Garage Door Opener gives you confidence to install, repair, or troubleshoot your system safely without unnecessary service calls. By following the wiring diagram carefully and using proper tools, most homeowners can complete the job successfully in under an hour. If this guide helped you, share it on social media so other DIY homeowners can wire their garage door openers safely and correctly.


Leave a Reply