Garage doors are essential for the security and convenience of your home. They provide easy access while keeping your vehicles and belongings safe. However, like any mechanical system, garage doors can experience issues over time, particularly with their springs. Knowing how to install garage door springs can save you time and money, but it’s crucial to understand the process thoroughly and follow safety precautions. This guide will walk you through everything you need to know about installing garage door springs, including types of springs, the tools required, safety tips, and a step-by-step installation guide.
Understanding Garage Door Springs
Before you embark on the installation process, it’s vital to understand the two main types of garage door springs:
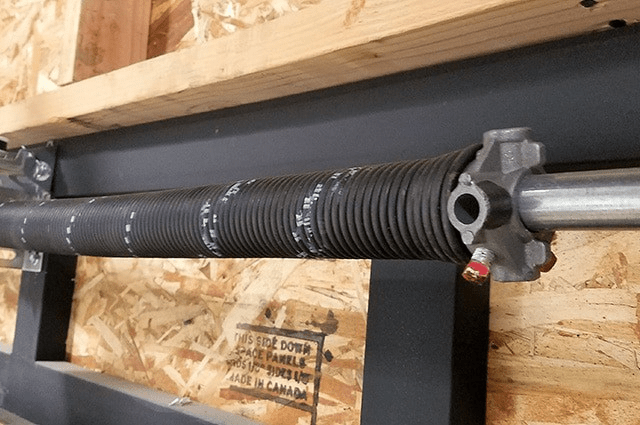
1. Torsion Springs
- Description: Torsion springs are located above the garage door and are wound tightly to provide the force necessary to lift the door. They are commonly used in heavier doors and provide more lifting power than extension springs.
- Lifespan: These springs typically last for about 10,000 cycles, which translates to approximately 7-9 years of use, depending on how often you open and close the door.
Read too: Door and Garage Door Companies: Choosing the Right Partner for Your Needs
2. Extension Springs
- Description: Extension springs are located on either side of the garage door and stretch to provide the lifting force. They are typically used in lighter doors.
- Lifespan: Similar to torsion springs, extension springs have a lifespan of around 10,000 cycles.
Knowing which type of spring your garage door uses is crucial for the installation process.
Safety Precautions
Before attempting to install garage door springs, prioritize safety:
- Wear Protective Gear: Use safety goggles, gloves, and long sleeves to protect yourself from injuries.
- Disconnect Power: Always unplug the garage door opener to avoid accidental activation.
- Work with a Partner: If possible, have someone help you during the installation process. This can make handling heavy doors easier and safer.
- Follow Manufacturer Instructions: Always refer to the manufacturer’s manual for your specific garage door model and spring type.
Tools You Will Need
Having the right tools is essential for a successful installation. Here’s a list of what you’ll need:
- Wrenches and Sockets: For loosening and tightening nuts and bolts.
- Screwdrivers: A flat-head and a Phillips screwdriver will be necessary.
- Clamps: To secure the door while working on it.
- Pliers: For gripping and twisting wire.
- Safety Glasses and Gloves: For protection during installation.
- Measuring Tape: To ensure accurate measurements.
- Ladder: If you’re working with torsion springs, a sturdy ladder will be necessary.
How to Install Garage Door Springs: Step-by-Step Guide
Now that you understand the types of springs and have gathered your tools, let’s dive into the process of installing garage door springs.
Step 1: Disconnect the Garage Door Opener
Before you begin any work, ensure the garage door opener is disconnected. This prevents any accidental operation while you’re working on the door.
Step 2: Remove the Old Springs
- Release Tension: If you’re dealing with torsion springs, you’ll need to unwind them carefully to release tension. Use a winding bar to do this. Insert the bar into the winding cone and carefully unwind the spring by turning it counterclockwise.
- Unscrew the Springs: Once the tension is released, use your wrenches to remove the bolts securing the springs to the bracket on the garage door. For extension springs, detach them from the tracks and the brackets.
Step 3: Measure and Cut New Springs (If Necessary)
If you’re replacing the springs, ensure the new ones match the size and type of the old springs. Measure the old springs carefully and cut the new springs to the appropriate length, if needed.
Step 4: Install the New Springs
For Torsion Springs:
- Position the Spring: Place the new torsion spring on the center support bracket, ensuring it is centered.
- Secure the Ends: Attach the ends of the spring to the mounting brackets on either side of the door.
- Wind the Spring: Using a winding bar, carefully wind the spring in the correct direction (usually clockwise). Follow the manufacturer’s instructions for the number of turns needed.
- Secure the Winding Cone: Once the spring is wound, secure the winding cone to the spring with bolts.
For Extension Springs:
- Attach the New Springs: Hang the new extension springs on the brackets located above the door tracks.
- Connect to the Door: Attach the cables to the springs, ensuring they’re secured properly.
- Adjust Tension: Adjust the tension of the springs according to the manufacturer’s specifications. This may involve adjusting the pulley system.
Step 5: Test the Garage Door
After installing the new springs, it’s crucial to test the garage door to ensure everything works correctly. Here’s how:
- Reconnect the Opener: Plug the garage door opener back in.
- Open and Close the Door: Operate the garage door manually to ensure it opens and closes smoothly. If the door is too heavy or doesn’t stay in place, you may need to adjust the tension of the springs.
- Observe for Any Issues: Check for any unusual noises or movements during operation. If you notice anything amiss, stop and reassess the installation.
Maintenance Tips for Garage Door Springs
Once you’ve successfully installed your garage door springs, maintenance is key to prolonging their lifespan:
- Regular Inspections: Check the springs for signs of wear, rust, or damage at least twice a year.
- Lubricate Moving Parts: Use a silicone-based lubricant on the springs and moving parts to reduce friction and wear.
- Test the Door Balance: Periodically test the balance of your garage door. Disconnect the opener and manually lift the door halfway. If it doesn’t stay in place, the springs may need adjustment or replacement.
- Consult a Professional: If you’re unsure about the condition of your springs or the door’s operation, consider consulting a garage door technician.
When to Call a Professional
While many homeowners can successfully install garage door springs themselves, there are instances when calling a professional is advisable:
- Complex Systems: If your garage door has a complex system of springs and cables, it may be safer and more effective to hire a professional.
- Lack of Experience: If you’re unfamiliar with garage door mechanisms or feel uncomfortable handling heavy equipment, it’s better to seek professional assistance.
- Persistent Issues: If your garage door continues to have problems after you’ve installed new springs, a technician can diagnose underlying issues.
Conclusion
Installing garage door springs can be a rewarding DIY project, saving you money and improving your home’s functionality. However, it’s essential to prioritize safety and follow the correct procedures. By understanding the types of springs, using the right tools, and adhering to the step-by-step installation guide, you can successfully install garage door springs in your home. Regular maintenance will ensure your garage door continues to operate smoothly for years to come.


Leave a Reply