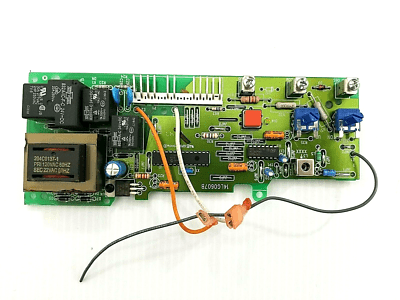
If your garage door opener has stopped working properly or is acting erratically, the issue may lie not with the motor or the remote, but with the circuit board inside. One of the most commonly replaced components for Liftmaster openers is the Liftmaster 41A5021 I Logic Board Garage Door Opener Circuit Board. Known for its reliability and compatibility with many Liftmaster models, this logic board serves as the brain of your garage door opener system.
In this guide, we’ll walk you through everything you need to know about the Liftmaster 41A5021-I logic board — what it does, signs it may need replacing, installation instructions, and answers to frequently asked questions.
Whether you’re a DIY enthusiast or just looking for more insight before calling a professional, this article is packed with useful information.
Read too: Mastering the Art of How to Open a Garage Door Safely and Efficiently
Understanding the Function of the Liftmaster 41A5021 I Logic Board Garage Door Opener Circuit Board
The logic board, often referred to as the circuit board or control board, is essentially the central processing unit of your garage door opener. It controls every function of the opener, from interpreting signals from your remote control and wall button to activating the motor and safety features.
The Liftmaster 41A5021 I Logic Board Garage Door Opener Circuit Board is designed for use in specific models of Liftmaster and Chamberlain garage door openers, typically those manufactured in the early 2000s. It is compatible with units featuring the Security+ rolling code technology and is responsible for processing wireless signals securely and effectively.
Signs You May Need to Replace Your Liftmaster 41A5021-I Logic Board
Just like any electronic component, the logic board can wear out or fail due to electrical surges, age, moisture, or manufacturing defects. Here are some common symptoms indicating a faulty logic board:
- The garage door opener is unresponsive to the remote or wall button.
- The opener makes clicking sounds but doesn’t operate.
- LED lights on the opener flash or behave abnormally.
- Intermittent operation (door opens halfway then stops).
- Garage door reverses unexpectedly or refuses to close.
- Burnt smell or visible damage on the board.
If you’re experiencing any of these issues and your other hardware (like remotes or safety sensors) is working fine, the logic board is likely the culprit.
Replacing the Liftmaster 41A5021 I Logic Board Garage Door Opener Circuit Board — Step-by-Step Instructions
Replacing your logic board may sound intimidating, but with a few basic tools and safety precautions, it’s a manageable task for most DIYers.
Tools and Supplies Needed
- Flathead and Phillips screwdrivers
- Socket wrench or nut driver
- Replacement Liftmaster 41A5021-I logic board
- Safety gloves
- Step ladder
1. Disconnect Power
Before starting, always unplug the garage door opener from the power outlet to avoid electric shock.
2. Open the Opener Housing
Using a screwdriver, remove the screws from the back panel or light lens cover of the opener to access the logic board.
3. Take Photos of Wire Connections
Before removing anything, take clear photos of how the wires are connected to the existing circuit board. This makes reassembly much easier.
4. Disconnect Wires and Antenna
Detach all the wire connectors, including those for the wall control, safety sensors, antenna wire, and motor harness.
5. Remove the Old Logic Board
Unscrew the mounting screws holding the logic board in place and gently remove the board from the housing.
6. Install the New Logic Board
Insert the new Liftmaster 41A5021 I Logic Board Garage Door Opener Circuit Board in the same orientation and position as the old one. Secure it with the screws.
7. Reconnect the Wires
Refer to your photos and the included manual to reconnect each wire to the correct terminal.
8. Close the Housing and Restore Power
Reattach the back panel or lens cover, then plug the unit back in.
9. Reprogram Remotes and Test
Because the logic board stores the memory for remotes and keypads, you’ll need to reprogram each device. Consult your opener’s manual for instructions.
Key Features of the Liftmaster 41A5021 I Logic Board Garage Door Opener Circuit Board
1. Security+ Rolling Code Technology
The logic board supports rolling code encryption, which changes the access code with each use to prevent code theft and hacking.
2. Compatibility
The 41A5021-I is compatible with many Liftmaster and Chamberlain chain- and screw-drive garage door openers produced in the early 2000s. It’s important to check your opener model before purchasing.
3. LED Diagnostic Feedback
The built-in LED on the logic board provides diagnostic codes that help identify issues with sensors, wiring, or the board itself.
4. Remote Learning Capability
The logic board features a “learn” button that makes pairing remotes and keypads quick and simple.
5. Durable Construction
Made with industrial-grade components, this circuit board is designed to last for years under normal conditions.
Maintaining Your Liftmaster Logic Board
After replacing or installing a new logic board, keep it functioning at peak performance with these simple maintenance tips:
- Surge Protection: Use a surge protector to prevent damage from electrical spikes.
- Dry Environment: Ensure the opener housing is sealed from moisture or pests.
- Regular Inspection: Check wires and connections annually for wear or corrosion.
- Software Updates: Some newer models may have firmware that can be updated via connected accessories — always check with Liftmaster.
Where to Buy the Liftmaster 41A5021 I Logic Board Garage Door Opener Circuit Board
You can purchase the 41A5021-I logic board through several reputable channels:
- Authorized Liftmaster Dealers
- Online Retailers (Amazon, eBay, Garage Door Supply Co.)
- Local Garage Door Service Companies
- Manufacturer Website (Liftmaster/Chamberlain)
Always verify the part number before purchase to ensure compatibility with your opener model.
Frequently Asked Questions
Q: Is the Liftmaster 41A5021-I compatible with my garage door opener?
A: This board is compatible with several Liftmaster and Chamberlain models. Check your opener’s model number and manual for confirmation.
Q: Do I need to hire a professional to replace the logic board?
A: Not necessarily. If you’re comfortable using basic tools and following safety precautions, you can replace the board yourself.
Q: What if my remotes don’t work after replacement?
A: You’ll need to reprogram all remotes using the “Learn” button on the new logic board.
Q: How long does a logic board typically last?
A: With proper care and no electrical surges, a logic board can last 10–15 years.
Conclusion: Is the Liftmaster 41A5021 I Logic Board Garage Door Opener Circuit Board Worth Replacing?
Absolutely. If your garage door opener’s core functions have failed but the motor and other parts are intact, replacing the Liftmaster 41A5021 I Logic Board Garage Door Opener Circuit Board is a cost-effective solution. It restores full operation without the need to replace the entire unit.
Instead of spending hundreds on a new opener, a logic board replacement offers an economical fix — often under $100 — and can add years of reliable service to your existing setup.
Be sure to purchase the correct board, follow installation instructions carefully, and reprogram your accessories for seamless performance.


Leave a Reply