Are you struggling to set the limits on your Liftmaster garage door opener? Dive into this comprehensive guide to understand the ins and outs of Liftmaster garage door opener setting limit and learn how to troubleshoot common issues effectively.
Understanding Liftmaster Garage Door Opener Setting Limits
Setting limit on your Liftmaster garage door opener is crucial for ensuring smooth and safe operation. The limits determine the door’s travel distance during opening and closing cycles, preventing it from hitting the floor or ceiling excessively. Here’s everything you need to know about Liftmaster garage door opener setting limits:
How Liftmaster Garage Door Opener Limits Work
Liftmaster garage door openers utilize limit switches to control the door’s travel distance. These switches, located on the opener’s motor unit, indicate when the door reaches its fully open and fully closed positions. By adjusting the limit settings, you can customize the door’s travel distance according to your preferences.
Read too: The Complete Guide to Tighten Chain On Garage Door Opener for Smooth Operation
Setting Limits on Your Liftmaster Garage Door Opener
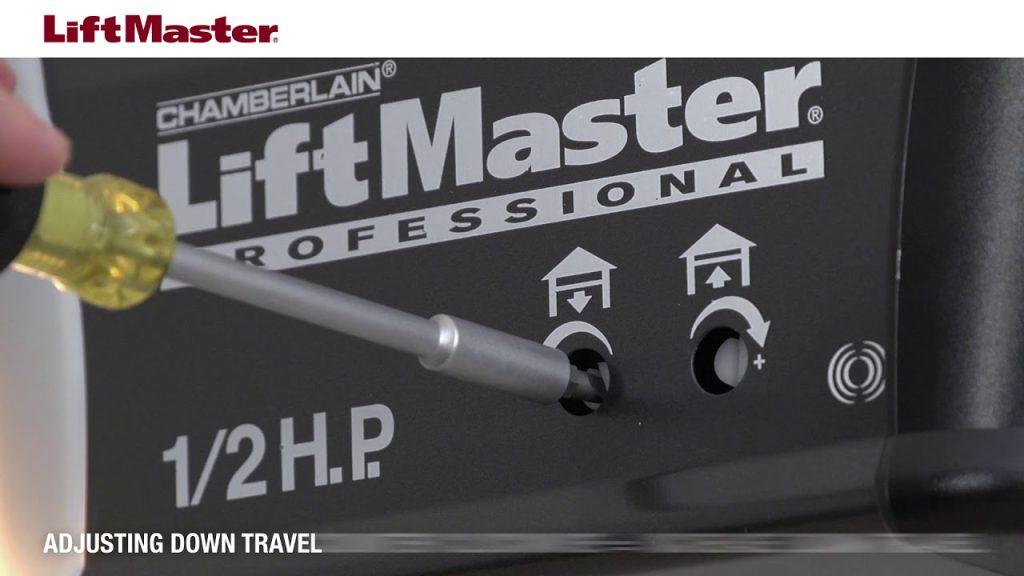
- Accessing the Adjustment Controls: Begin by locating the adjustment controls on your Liftmaster garage door opener. These controls are typically found on the motor unit near the limit switches.
- Testing the Door’s Movement: Before adjusting the limits, ensure that the garage door moves smoothly and without any obstructions. Manually open and close the door to confirm that it operates correctly.
- Adjusting the Open Limit: To adjust the open limit, locate the corresponding control dial or switch on the opener’s motor unit. Turn the control clockwise to increase the open limit or counterclockwise to decrease it. Test the door’s movement after making adjustments to ensure that it stops at the desired open position.
- Adjusting the Close Limit: Similarly, locate the control dial or switch for the close limit on the motor unit. Follow the same procedure to adjust the close limit, turning the control clockwise to increase the limit or counterclockwise to decrease it. Test the door’s movement to verify that it stops at the correct closed position.
- Fine-Tuning the Limits: After setting the limits, perform a final test to ensure that the door operates smoothly and stops at the desired positions. Make additional adjustments if necessary until the door functions optimally.
Troubleshooting Liftmaster Garage Door Opener Setting Limits
If you encounter issues while setting the limits on your Liftmaster garage door opener, consider the following troubleshooting steps:
- Check for any obstructions along the door’s travel path that may interfere with the limit switches.
- Inspect the limit switches for damage or misalignment, and adjust them if needed.
- Ensure that the garage door tracks are properly aligned and lubricated to facilitate smooth movement.
Conclusion
Mastering Liftmaster garage door opener setting limits is essential for maintaining optimal performance and safety. By following the guidelines outlined in this guide, you can effectively set and troubleshoot the limits on your Liftmaster garage door opener, ensuring smooth operation for years to come.
Leave a Reply