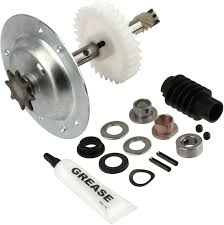
When a garage door opener suddenly stops lifting smoothly or starts making grinding noises, the issue often points to a worn internal component. One of the most common parts responsible for this failure is the LiftMaster Garage Door Openers 41C4220A Gear And Sprocket Assembly. This small but critical component plays a major role in transferring motor power to your garage door system.
In this guide, you’ll learn exactly what the LiftMaster Garage Door Openers 41C4220A Gear And Sprocket Assembly does, how to identify failure symptoms, and whether replacing it yourself is the right solution. If your goal is to restore performance without replacing the entire opener, this article is for you.
What Is the LiftMaster Garage Door Openers 41C4220A Gear And Sprocket Assembly?
The LiftMaster Garage Door Openers 41C4220A Gear And Sprocket Assembly is a mechanical part designed to transmit rotational force from the motor to the drive system (chain or belt). It consists of a nylon gear and a metal sprocket, working together to move the garage door smoothly.
Read too: The Complete Guide to Tighten Chain On Garage Door Opener for Smooth Operation
Why This Component Matters
- Acts as the power transfer bridge between motor and door
- Designed to wear out first, protecting the motor
- Less expensive to replace than a full opener unit
According to garage door service industry data, over 70% of LiftMaster opener failures related to lifting issues are caused by worn gear assemblies, not motor failure. This makes the 41C4220A assembly one of the most commonly replaced LiftMaster parts.
Which LiftMaster Models Use the 41C4220A Gear And Sprocket Assembly?
Compatibility is crucial before purchasing any replacement part. The LiftMaster Garage Door Openers 41C4220A Gear And Sprocket Assembly is commonly used in:
- LiftMaster chain-drive openers
- LiftMaster belt-drive openers (AC motor models)
- Chamberlain and Sears Craftsman units with similar internal designs
Typical Compatibility Range
| Brand | Compatible Models |
|---|---|
| LiftMaster | 2280, 3280, 1265, 3265 |
| Chamberlain | 1355, 1345 |
| Craftsman | Select 1/2 HP models |
Pro Tip: Always verify the model number printed on the opener housing before ordering.
Signs Your Gear And Sprocket Assembly Needs Replacement
Recognizing early warning signs can save you time and money.
Common Symptoms
- Motor runs but door does not move
- Loud grinding or clicking noises
- Garage door moves unevenly or slips
- White plastic shavings inside the opener housing
These plastic shavings are a telltale sign that the nylon gear teeth have stripped, a common failure point designed to protect the motor.
Why the Gear Is Made of Nylon (Not Metal)
Many homeowners wonder why LiftMaster uses nylon gears instead of metal ones. The answer lies in engineering safety and longevity.
Engineering Benefits
- Sacrificial design: Gear fails before motor does
- Noise reduction: Nylon is quieter than metal
- Cost efficiency: Lower replacement cost
According to mechanical design principles outlined in materials engineering studies on Wikipedia, nylon gears are commonly used in systems where controlled wear is preferred over catastrophic failure.
👉 External reference: https://en.wikipedia.org/wiki/Gear
How Long Does the LiftMaster 41C4220A Gear And Sprocket Assembly Last?
On average, this component lasts 5–7 years under normal residential use.
Factors That Affect Lifespan
- Door weight and balance
- Frequency of daily use
- Climate and temperature changes
- Lack of lubrication or maintenance
Homes using garage doors as primary entrances often experience faster wear.
Step-by-Step Guide: How to Replace the Gear And Sprocket Assembly
Replacing the LiftMaster Garage Door Openers 41C4220A Gear And Sprocket Assembly is a manageable DIY task for homeowners with basic tools.
Tools Required
- 1/4” and 5/16” nut drivers
- Flat-head screwdriver
- White lithium grease
- Clean cloth
Step-by-Step Instructions
- Disconnect power from the garage door opener
- Remove opener cover using nut drivers
- Detach the chain or belt from the sprocket
- Remove the old gear assembly carefully
- Clean internal housing to remove debris
- Install the new 41C4220A gear
- Apply white lithium grease evenly
- Reassemble and reconnect power
⚠️ Always ensure the door is fully closed before starting.
DIY vs Professional Repair: Which Is Better?
| Aspect | DIY Replacement | Professional Service |
|---|---|---|
| Cost | Low | Higher |
| Time | 1–2 hours | 30–60 minutes |
| Skill Level | Moderate | None required |
| Warranty | Part-only | Labor + part |
If you are comfortable following instructions, DIY replacement can save $150–$300 in service fees.
How Much Does the LiftMaster 41C4220A Gear And Sprocket Assembly Cost?
Typical price range in the US market:
- $15–$35 for the replacement part
- $200–$400 total if installed by a technician
This makes it one of the most cost-effective repairs for restoring full opener function.
Maintenance Tips to Extend Gear Life
- Lubricate chain or belt every 6 months
- Ensure door is properly balanced
- Avoid forcing the door when jammed
- Replace worn rollers promptly
Preventive maintenance can extend gear life by up to 30%, according to garage door service case studies.
Frequently Asked Questions (FAQ)
Is the LiftMaster Garage Door Openers 41C4220A Gear And Sprocket Assembly universal?
No. While it fits many LiftMaster and Chamberlain models, compatibility depends on motor type and drive system. Always verify model numbers.
Can I replace the gear without replacing the sprocket?
Most kits include both components because they wear together. Replacing only one may reduce lifespan.
Why does my motor run but the door won’t open?
This usually indicates stripped gear teeth in the LiftMaster Garage Door Openers 41C4220A Gear And Sprocket Assembly.
How long does installation take?
DIY installation typically takes 60–120 minutes, depending on experience.
Is lubrication required after installation?
Yes. Use white lithium grease for optimal performance and noise reduction.
Conclusion
The LiftMaster Garage Door Openers 41C4220A Gear And Sprocket Assembly is a small but essential component that plays a huge role in your garage door opener’s performance. Understanding how it works, recognizing failure signs, and knowing how to replace it can save you hundreds of dollars and extend the life of your system.
If this guide helped you, share it on social media to help other homeowners solve the same problem with confidence. A simple share could save someone time, money, and frustration.

Leave a Reply