If your garage door opener suddenly stops responding, flashes error lights, or opens and closes randomly, the issue may not be the motor—it could be the control board. Replacing the Logic Board For Craftsman 1/2 Hp Garage Door Opener is often more affordable than buying a new opener.
This complete guide explains symptoms of a failed logic board, compatibility tips, step-by-step replacement instructions, and when repair makes financial sense.
Read too: The Complete Guide to Tighten Chain On Garage Door Opener for Smooth Operation
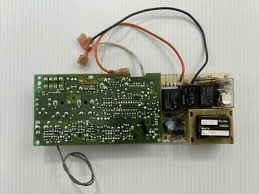
What Is the Logic Board For Craftsman 1/2 HP Garage Door Opener?
The Logic Board For Craftsman 1/2 Hp Garage Door Opener acts as the “brain” of the unit. It controls:
- Motor operation
- Remote signal processing
- Safety sensor communication
- Wall control inputs
- Limit settings
Most Craftsman openers were manufactured by Chamberlain Group under the Craftsman brand name.
Inside the motor housing, the logic board connects to:
- Power supply
- Travel limit switches
- Safety beams
- Radio receiver module
Without a functioning board, the opener cannot operate correctly.
Signs Your Craftsman Logic Board Is Failing
One of the most searched questions:
How do I know if my garage door logic board is bad?
Common symptoms include:
- Door won’t respond to remote or wall button
- Opener lights blink continuously
- Door reverses randomly
- Clicking sound without motor movement
- Burn marks or corrosion on board
Electrical surges and lightning strikes are frequent causes of board failure.
Can a Logic Board Be Replaced Instead of the Whole Opener?
Yes, in many cases.
Replacing a logic board typically costs:
- $80–$180 for the part
- $150–$300 if professionally installed
This is significantly cheaper than full opener replacement ($400–$800).
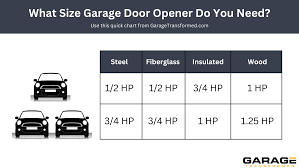
How To Identify the Correct Logic Board
Not all Craftsman 1/2 HP models use the same board.
Step 1: Locate Model Number
Check:
- Back of motor housing
- Owner’s manual
- Sticker near light cover
Common Craftsman models include:
- 139.53985DM
- 139.53615SR
- 139.53990
Step 2: Match Board Part Number
Remove light cover and inspect printed part number on board.
Matching part numbers ensures compatibility.
Step-by-Step Replacement Guide
If you’re comfortable with light electrical work, you can replace the logic board yourself.
Step 1: Disconnect Power
Unplug opener from outlet.
Confirm no power by testing wall button.
Safety first—always avoid live electrical contact.
Step 2: Remove Light Cover
- Unscrew lens cover
- Remove light bulb
- Unscrew protective housing
This exposes internal wiring and logic board.
Step 3: Document Wiring
Before disconnecting:
- Take clear photos of all wire connections
- Label wires if necessary
Incorrect reconnection can cause malfunction.
Step 4: Remove Old Logic Board
- Disconnect wiring harnesses
- Unscrew mounting screws
- Carefully lift board out
Avoid touching capacitor terminals.
Step 5: Install New Logic Board
- Align board with mounting points
- Secure with screws
- Reconnect wires exactly as photographed
Step 6: Restore Power & Test
Plug unit back in.
Test:
- Wall button
- Remote control
- Safety sensor alignment
- Travel limits
Reprogram remotes if necessary.
Why Logic Boards Fail
Several common causes:
- Power surges
- Lightning strikes
- Moisture exposure
- Age-related component wear
Electronic control boards are sensitive to voltage fluctuations. For general understanding of how electronic boards operate, you can review Wikipedia.
Pros and Cons of Replacing the Logic Board
Advantages
- Cost-effective repair
- Extends opener lifespan
- Faster than full replacement
- Maintains existing hardware
Disadvantages
- Older openers lack smart features
- Other components may fail later
- Warranty may not extend
When Should You Replace the Entire Opener Instead?
Consider full replacement if:
- Opener is over 15–20 years old
- Multiple components are failing
- Safety sensors are outdated
- You want smartphone connectivity
Newer openers offer:
- Rolling code encryption
- WiFi control
- Quieter DC motors
Common Troubleshooting Before Replacing Board
Before ordering a new board, check:
- Power outlet functionality
- Safety sensor alignment
- Remote battery condition
- Wall switch wiring
- Circuit breaker
Sometimes the problem is external, not the board itself.
Estimated Repair Cost Comparison
| Option | Cost Range |
|---|---|
| Replace logic board DIY | $80–$180 |
| Replace logic board pro | $250–$450 |
| Replace entire opener | $400–$800 |
Board replacement is often the most economical option.
Maintenance Tips After Replacement
To protect your new logic board:
- Install surge protector
- Keep motor housing dry
- Inspect wiring annually
- Clean dust buildup
Electrical surges are the leading cause of board failure.
FAQ: Logic Board For Craftsman 1/2 HP Garage Door Opener
1. Can I replace a Craftsman logic board myself?
Yes, if you are comfortable with basic electrical work and follow safety procedures.
2. How long does a logic board last?
Typically 10–15 years, depending on usage and power conditions.
3. Do I need to reprogram remotes after replacing the board?
Yes. Most replacements require remote reprogramming.
4. What causes blinking light errors?
Often sensor misalignment or board communication issues.
5. Is it worth repairing a 20-year-old opener?
Usually not. Full replacement may be more practical.
6. Can lightning damage the board?
Yes. Surge protection is recommended.
Final Thoughts
Replacing the Logic Board For Craftsman 1/2 Hp Garage Door Opener can restore full functionality at a fraction of the cost of a new unit. If your motor runs inconsistently, fails to respond, or shows electrical errors, a board replacement is often the solution.
However, if your opener is aging or outdated, upgrading to a newer model with enhanced safety and smart features may provide better long-term value.
If this guide helped you diagnose or plan your repair, consider sharing it on social media to help other homeowners fix their garage door openers efficiently and affordably.

Leave a Reply