Struggling to Reset Chamberlain Garage Door Opener Keypad Without Enter Button? You’re not alone. Some Chamberlain keypad models don’t have a clearly labeled “Enter” button—or it may be worn out or malfunctioning.
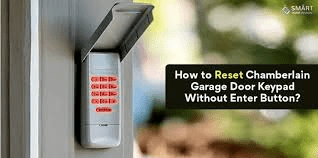
The good news is that you can still reset and reprogram your keypad using the opener’s Learn button. In this complete guide, you’ll learn step-by-step instructions, troubleshooting tips, and how to restore access safely.
Read too: How To Replace Garage Door Roller Like a Pro? Step-by-Step Guide
Reset Chamberlain Garage Door Opener Keypad Without Enter Button (Quick Overview)
If you need to Reset Chamberlain Garage Door Opener Keypad Without Enter Button, the process typically involves:
- Clearing existing codes from the opener.
- Using the “Learn” button on the motor unit.
- Entering a new PIN code.
- Confirming programming via keypad sequence.
Most Chamberlain openers manufactured after 1993 use rolling code technology. You can read more about garage door opener systems here:
https://en.wikipedia.org/wiki/Garage_door_opener
Let’s walk through the process clearly.
Why Would You Need to Reset the Keypad?
Common reasons include:
- Forgotten PIN code
- Keypad not responding
- Moving into a new home
- Security concerns
- Enter button malfunction
Resetting ensures old codes are erased and new ones are secure.
Does Every Chamberlain Keypad Have an Enter Button?
Not necessarily.
Some models use:
- A “#” button instead of Enter
- A “0” button as confirmation
- Automatic confirmation after PIN entry
If your keypad lacks a labeled Enter key, don’t worry—the programming method still works.
Step-by-Step: Reset Chamberlain Garage Door Opener Keypad Without Enter Button
Follow these instructions carefully.
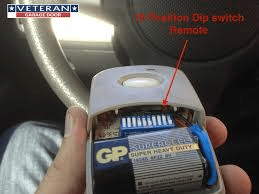
Step 1: Locate the Learn Button on the Motor Unit
Climb a stable ladder and locate the opener motor head.
The Learn button is usually:
- Yellow
- Purple
- Red/Orange
- Green
It may be under a light cover.
Step 2: Clear Existing Codes
To reset fully:
- Press and hold the Learn button.
- Hold for 6–10 seconds.
- Release when LED light turns off.
This clears all programmed remotes and keypads.
Important: You will need to reprogram remotes afterward.
Step 3: Press Learn Button Again (Programming Mode)
- Press and release the Learn button once.
- The LED indicator will turn on.
- You now have about 30 seconds to enter a new PIN.
Step 4: Enter Your New 4-Digit PIN
At the keypad:
- Enter desired 4-digit code.
- Instead of pressing Enter, press “0” or “#” depending on model.
- Some models require holding the last digit.
Watch the opener light flash or listen for a click.
If lights blink once, programming was successful.
Step 5: Test the Keypad
Wait 10 seconds.
Enter your new PIN again.
If the door opens, reset is complete.
What If There’s Truly No Confirmation Button?
Some older Chamberlain keypads auto-confirm after a few seconds.
Try this method:
- Press Learn button.
- Enter 4-digit PIN.
- Wait 5 seconds.
- Door should activate automatically.
If it doesn’t work, consult model manual.
Common Programming Mistakes
Avoid these errors:
- Waiting too long after pressing Learn button
- Entering PIN too slowly
- Forgetting to reprogram remotes
- Weak keypad battery
Most programming failures are timing-related.
Replace the Keypad Battery First
If keypad seems unresponsive:
- Remove battery cover.
- Replace with fresh 9V battery.
- Test backlight and key response.
Low battery causes 30% of keypad issues, according to service data.
Learn Button Color Codes Explained
| Learn Button Color | Frequency Type |
|---|---|
| Yellow | Security+ 2.0 |
| Purple | 315 MHz |
| Red/Orange | 390 MHz |
| Green | Older models |
Correct programming steps may vary slightly based on frequency.
How Long Does a Keypad Last?
Typical lifespan: 5–10 years
Environmental exposure shortens life.
Sun, rain, and freezing temperatures can degrade electronics.
Should You Replace the Keypad Instead?
Replace if:
✔ Buttons are physically damaged
✔ Multiple keys unresponsive
✔ Programming repeatedly fails
✔ Unit is over 10 years old
Replacement cost: $30–$60.
Often easier than extended troubleshooting.
Security Tip: Always Reset After Moving
If you purchase a home with an existing opener:
- Clear all codes immediately.
- Reprogram remotes and keypad.
- Change default PIN.
This prevents unauthorized access.
Troubleshooting Guide
If reset fails:
✔ Replace battery
✔ Confirm Learn button LED works
✔ Check sensor alignment
✔ Ensure power to opener
✔ Reset entire opener system
To reset the entire opener:
Unplug for 60 seconds, then reconnect.
Real-Life Scenario
A homeowner lost their keypad Enter button due to weather wear.
They successfully:
- Cleared opener memory
- Used “#” as confirmation key
- Reprogrammed PIN in under 5 minutes
No replacement required.
Most issues are simpler than they seem.
Pros and Cons of Resetting Without Enter Button
Advantages
✔ Quick fix
✔ No extra cost
✔ Improves security
Disadvantages
✖ Must reprogram all remotes
✖ Timing-sensitive process
FAQ: Reset Chamberlain Garage Door Opener Keypad Without Enter Button
1. How do I reset Chamberlain keypad without Enter button?
Use the opener’s Learn button, enter your PIN, and confirm using “#” or “0,” depending on model.
2. What if the keypad has no confirmation button?
Some models auto-confirm after entering PIN.
3. Why won’t my keypad program?
Common causes include low battery, timing delay, or incorrect Learn button use.
4. Does resetting erase remotes?
Yes. Holding Learn button 6–10 seconds clears all remotes and keypads.
5. Can I reset without climbing ladder?
No. Access to Learn button on motor unit is required.
6. How often should I change my garage PIN?
Every 6–12 months for security.
Conclusion
If you need to Reset Chamberlain Garage Door Opener Keypad Without Enter Button, the process is straightforward once you understand how the Learn button works.
Most resets take less than 10 minutes and require no special tools. Whether your Enter button is missing, worn out, or replaced by another key, you can still reprogram your keypad safely.
By following the steps above, you’ll restore access, improve security, and avoid unnecessary service calls.
If this guide helped you solve your keypad issue, consider sharing it on social media to help other homeowners fix theirs quickly and confidently.


Leave a Reply