If you’ve ever needed to program or reprogram a garage door opener remote or keypad, you’ve likely come across a mysterious feature called the “Learn” button. So, what is the Learn button on a garage door opener, and why is it such an essential part of your system?
Whether you’re a new homeowner trying to sync a remote, or you’re troubleshooting an unresponsive garage door, understanding how the Learn button works is crucial. In this detailed guide, we’ll break down what the Learn button on a garage door opener does, where to find it, how to use it, and the situations where it becomes useful.
Read too: How To Replace Garage Door Roller Like a Pro? Step-by-Step Guide
What Is The Learn Button On Garage Door Opener?
The Learn button is a built-in feature on nearly every modern garage door opener that allows you to pair remote controls, wireless keypads, or even smart home systems with your opener. It’s essentially the memory function of the garage door opener’s logic board, used to identify and store wireless signals.
When you press the Learn button, the opener enters programming mode, ready to receive signals from a remote or other wireless accessory. Think of it like pressing the “sync” button on a Bluetooth device—it tells the system to listen for new instructions.
Where Is the Learn Button Located?
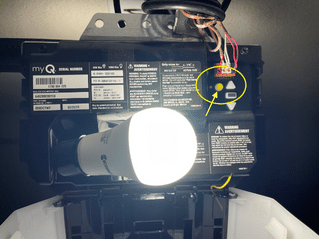
The location of the Learn button depends on the brand and model of your garage door opener, but it is typically found:
- On the back or side panel of the garage door opener motor unit, located on the ceiling of your garage
- Under a light cover or panel flap
- Near the LED indicator light on the opener housing
It is often color-coded. Common Learn button colors include:
- Yellow
- Purple
- Red/Orange
- Green
Each color can correspond to specific frequencies or compatible remotes, especially with brands like LiftMaster, Chamberlain, or Craftsman.
What Does the Learn Button Do?
The Learn button performs several key functions:
1. Programs New Remote Controls
You can pair new garage door remotes to your opener with the Learn button. Press the Learn button, then press the remote’s button within 30 seconds to sync.
2. Programs Keyless Entry Systems
Garage door keypads also use the Learn button for syncing. After pressing Learn, you enter a PIN on the keypad to complete pairing.
3. Erases Stored Devices
Holding the Learn button (usually for 6–10 seconds) erases all paired devices. This is useful if you’ve lost a remote or just moved into a new home.
4. Links Smart Accessories
Many smart garage door openers use the Learn button to pair Wi-Fi hubs, vehicle remotes (like HomeLink), and smart home systems.
How to Use the Learn Button: Step-by-Step
🧰 To Program a New Remote:
- Locate and press the Learn button once (don’t hold).
- A small LED near the button should light up (usually for 30 seconds).
- Within that time, press and hold the button on your remote.
- Release when the opener lights blink or you hear a click.
- Test the remote.
🔢 To Program a Keyless Entry (Wireless Keypad):
- Press the Learn button.
- Enter your desired 4-digit PIN on the keypad.
- Press and hold the “Enter” button.
- The lights will blink or click to confirm pairing.
🧹 To Erase All Remotes:
- Hold down the Learn button for 6–10 seconds.
- The LED will go out, indicating all codes have been erased.
- You’ll need to reprogram any remotes or keypads you still wish to use.
Common Issues with the Learn Button
Even though the Learn button is simple, a few common problems can prevent it from working properly:
❌ Remote Not Programming?
- Check the remote’s battery
- Make sure you’re within the 30-second programming window
- Ensure the Learn button color matches the remote’s compatibility
❌ Nothing Happens After Pressing Learn?
- Your opener’s logic board might be faulty
- The LED light near the Learn button might be burned out
- Power supply to the opener might be interrupted
❌ Learn Button Doesn’t Reset Devices?
- Be sure you hold the button long enough
- Try disconnecting the opener’s power, then retrying
Why Understanding the Learn Button Matters
Whether you’re upgrading your garage system or simply replacing a lost remote, knowing how to use the Learn button saves you time and money. Instead of hiring a technician for basic reprogramming, most homeowners can manage this themselves in just a few minutes.
Plus, for security-conscious users, using the Learn button to clear all previous remotes is essential when:
- Moving into a new home
- Renting or selling property
- Losing a garage door remote or key fob
Garage Door Opener Brands That Use the Learn Button
Most major garage door opener brands have integrated Learn buttons in their models, including:
- LiftMaster
- Chamberlain
- Craftsman
- Genie (though they may use a “Smart” or “Program” button instead)
- Linear
- Overhead Door
Despite some variations in terminology and placement, their function remains largely the same.
Learn Button Color Codes and Compatibility
Knowing the color of your Learn button can help determine what type of remotes or keypads are compatible. Here’s a quick breakdown (common with LiftMaster/Chamberlain):
| Learn Button Color | Frequency | Compatible Remote Series |
|---|---|---|
| Yellow | 390 MHz (Security+ 2.0) | 891LM, 893LM |
| Purple | 315 MHz (Security+) | 370LM |
| Red/Orange | 390 MHz | 971LM, 973LM |
| Green | 390 MHz | 81LM, 83LM |
Always check your opener’s manual or product website to verify remote compatibility before purchasing.
Additional Functions Beyond the Basics
Modern garage door openers have added more functionality to the Learn button, especially when integrated with smart systems:
📱 Smart Device Pairing
Apps like myQ® from LiftMaster or Chamberlain use the Learn button to pair your opener to a Wi-Fi hub for smartphone control.
🚗 Vehicle Integration
You can program HomeLink in newer cars by pressing the Learn button while holding the car’s garage control button.
🕹️ Diagnostic Use
Some newer models use the Learn button to help diagnose issues (e.g., by flashing an LED pattern).
Tips for Safely Using the Learn Button
- Keep remotes out of reach of children when programming.
- Always test the door’s auto-reverse feature after reprogramming remotes.
- For rental properties or shared garages, change codes often using the Learn button to ensure security.
Final Thoughts
So, what is the Learn button on a garage door opener? It’s your gateway to programming and customizing your entire garage door access system. Whether you’re syncing remotes, setting up wireless keypads, or erasing lost devices for safety, the Learn button is at the heart of these operations.
This little button holds a lot of power—and understanding how to use it can save you time, protect your home, and make your garage system more user-friendly. If you’re ever in doubt, consult your garage opener’s user manual or look up the model number online for tailored instructions.
Remember: the next time you hear “press the Learn button,” you’ll know exactly what to do.


Leave a Reply