If you’re troubleshooting an older garage door opener or setting up a new remote, you might be asking yourself: where are the dip switches on a garage door opener? This is a critical question for anyone dealing with garage door systems manufactured before rolling code technology became the standard.
Dip switches—short for Dual In-line Package switches—were once the primary method for syncing garage door openers with remotes. Understanding their location and how to configure them is essential for anyone with a legacy system, or even some universal remotes that still rely on dip switch codes for compatibility.
Read too: How to Perform a Chamberlain Garage Door Opener Code Change? Mastering Security
This guide will walk you through everything you need to know: where to find these switches, how they work, how to match them between the opener and the remote, and troubleshooting tips for common dip switch-related problems.
Where Are The Dip Switches On A Garage Door Opener? Find and Access Them Easily
What Are Dip Switches?
Dip switches are small, manual toggle switches found on circuit boards. On garage door openers, they’re used to set a code that syncs the opener to a remote control. Each switch can be set in an ON or OFF position, creating a binary code that must match on both devices.
Before modern “rolling code” systems that change codes with every use, dip switch systems provided a unique identifier for your garage door opener to avoid unauthorized access.
Where to Look: Typical Dip Switch Locations
If you’re wondering where are the dip switches on a garage door opener, the answer depends on your specific model and brand. However, most follow a similar design layout. Below are the most common locations:
1. Inside the Motor Housing
The most typical place to find the dip switches is under the main cover of the garage door opener unit. Here’s how to find them:
- Unplug the opener for safety.
- Use a screwdriver to remove the light cover or front panel.
- Look near the logic board or receiver board.
- The dip switches are usually lined up in a row and may be labeled “CODE” or “SWITCH.”
Brands like Chamberlain, LiftMaster, Genie, and Stanley often have their dip switches in this area.
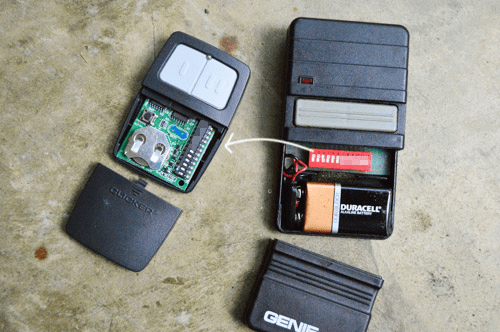
2. On the Remote Control
To complete the pairing process, the remote control also contains dip switches that must match the configuration inside the opener. These are usually found under the battery cover:
- Open the remote’s battery compartment.
- You’ll see a similar row of tiny switches.
- Use a small screwdriver or pencil tip to flip the switches up or down.
Matching both sets ensures the remote operates the garage door.
Dip Switch Locations by Brand
Here’s a quick reference for major brands to help you locate the dip switches:
- LiftMaster & Chamberlain (older models): Inside light cover on the main unit and inside remote casing.
- Genie: Behind the motor cover or in the wall-mounted receiver; remote switches under battery cover.
- Craftsman: Usually same location as LiftMaster due to shared manufacturing.
- Stanley: Inside opener’s housing, sometimes labeled as “code switch.”
Note: If your garage door opener was made after 1997, it likely uses rolling code technology and doesn’t have dip switches.
How Dip Switches Work: Binary Communication at Its Simplest
Dip switches use binary positions—up (ON) or down (OFF)—to create a unique code. With 9 to 12 switches, you can make hundreds of combinations, ensuring only remotes with a matching code can operate the opener.
Example:
If your opener has 10 dip switches:
- A configuration of: ON, OFF, OFF, ON, ON, OFF, OFF, OFF, ON, OFF
- Must match exactly on both the garage door opener and remote for proper functionality.
Programming a Remote Using Dip Switches
Now that you know where are the dip switches on a garage door opener, here’s how to program a remote:
Step-by-Step Guide:
- Open both the garage opener and remote.
- Locate the dip switches inside each.
- Set the same ON/OFF configuration on both devices using a small tool.
- Test the remote. If the door opens and closes, the pairing was successful.
- If not working, double-check switch alignment and positions.
Avoid guessing—dip switches must match exactly. Also, avoid setting your dip switches to common combinations (like all switches ON or OFF) for security reasons.
Safety and Security Considerations
One drawback of dip switch-based openers is security. Since the codes are static, anyone with a matching code can operate your door. Unlike modern rolling code systems, dip switch setups are more vulnerable to code-grabbing devices.
Tips to Increase Security:
- Use random dip switch combinations
- Avoid sharing your dip switch settings
- Upgrade to a rolling code system if possible
- Use a universal receiver that adds rolling code compatibility to older openers
Troubleshooting Dip Switch Problems
Even after locating where are the dip switches on a garage door opener, you might run into functionality issues. Here are some troubleshooting tips:
1. Remote Not Working?
- Double-check that both devices have matching dip switch settings.
- Inspect for dust, corrosion, or loose switches.
- Replace batteries in the remote.
2. Door Works Intermittently
- Signal interference from nearby electronics.
- Weak battery or misaligned switches.
- Try reprogramming or changing the dip switch code.
3. Door Opens with Multiple Remotes Accidentally
- Someone nearby may have the same dip switch code.
- Change your dip switch code to something more unique.
Upgrading Dip Switch Openers to Modern Standards
Still using a dip switch-based opener but want modern convenience and enhanced security? Good news: you don’t always need a full replacement.
Here’s how to modernize:
- Add a universal garage door receiver with rolling code support.
- Pair with modern remotes or smart home systems.
- Install a retrofit Wi-Fi controller compatible with older openers.
Brands like Chamberlain offer smart accessories that bridge the gap between old and new systems without requiring a full motor replacement.
Summary: Understanding and Locating Your Dip Switches
So, where are the dip switches on a garage door opener? Most often, you’ll find them inside the main motor unit and under the battery cover of your remote control. These small switches are the key to syncing remotes to older garage door systems.
By understanding how they work, where to find them, and how to program them, you can take full control of your garage door opener—even if it’s decades old. Whether you’re troubleshooting, programming a new remote, or upgrading your system, this foundational knowledge ensures your garage door works reliably and securely.


Leave a Reply