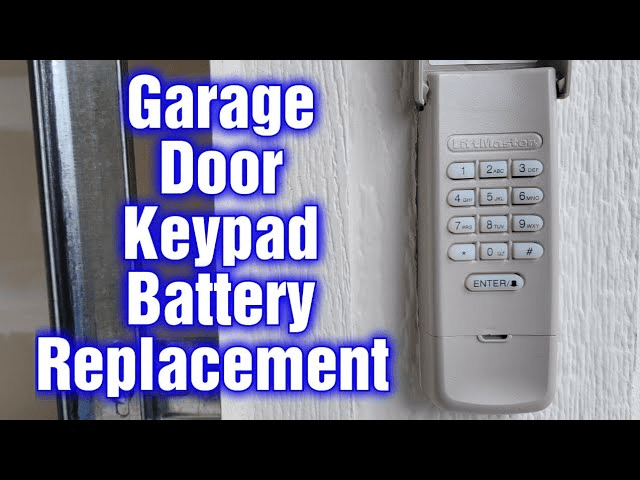
The LiftMaster garage door opener keypad offers unparalleled convenience, allowing you to access your garage with ease. However, like any electronic device, its battery will eventually need to be replaced. If you’ve found yourself asking, “How to change the battery in a LiftMaster garage door opener keypad?”, you’ve come to the right place.
This guide will walk you through the steps to replace the battery, provide tips to ensure proper functionality, and address common issues related to battery replacement.
Why Replacing the Battery is Essential
The keypad’s battery powers its wireless connection to the garage door opener. If the battery dies, you’ll lose the ability to open your garage door using the keypad. Keeping the battery fresh ensures uninterrupted access and prevents unexpected inconveniences.
Read too: The Complete Guide to Tighten Chain On Garage Door Opener for Smooth Operation
Tools and Materials Needed
Before starting, gather the following tools and materials:
- A replacement battery (typically a 9-volt or coin cell, depending on your model).
- A small screwdriver (if your keypad has screws).
- A clean, dry cloth for handling the battery.
How To Change Battery In Liftmaster Garage Door Opener Keypad
Follow these simple steps to replace the battery in your LiftMaster garage door opener keypad:
1: Locate the Keypad
Identify the keypad mounted near your garage door. It’s typically installed at eye level for easy access.
2: Open the Keypad Cover
Most LiftMaster keypads have a sliding or flip-up cover. Slide or lift the cover to reveal the keypad and battery compartment.
3: Access the Battery Compartment
The battery compartment is usually on the back of the keypad or beneath the keypad buttons.
- For back-mounted compartments: Detach the keypad from its wall mount by sliding it upward or removing screws.
- For front-access compartments: Look for a small latch or screw securing the battery cover.
4: Remove the Old Battery
- Gently remove the existing battery.
- Inspect the compartment for any signs of corrosion or dirt. Clean it with a dry cloth if necessary.
5: Insert the New Battery
- Insert the replacement battery, ensuring the positive (+) and negative (-) terminals align with the markings in the compartment.
- Secure the battery in place, making sure it fits snugly.
6: Close the Battery Compartment
Reattach the battery cover or keypad to its wall mount. Make sure it clicks securely into place.
7: Test the Keypad
Press any button on the keypad to verify that it lights up or responds. If the keypad doesn’t function, double-check the battery’s placement and terminal alignment.
Tips for Long-Lasting Performance
- Use Quality Batteries: Opt for reputable brands to ensure long-lasting performance.
- Check Compatibility: Confirm the replacement battery matches your keypad model.
- Regular Maintenance: Clean the keypad and battery contacts periodically to prevent dirt buildup.
- Store Spares: Keep extra batteries on hand to avoid emergencies.
Common Issues After Battery Replacement
If your keypad isn’t working after replacing the battery, consider these troubleshooting tips:
1. Keypad Doesn’t Light Up
- Check the battery’s orientation.
- Ensure the battery contacts are clean and corrosion-free.
2. Garage Door Doesn’t Respond
- Reprogram the keypad by following your user manual.
- Verify that the garage door opener is functioning correctly.
3. Short Battery Life
- Inspect for moisture or dirt in the battery compartment.
- Use fresh, high-quality batteries.
When to Call a Professional
While replacing the battery is a simple task, there may be instances where professional help is needed:
- If the keypad remains unresponsive after troubleshooting.
- If the keypad’s wiring or internal components appear damaged.
- If the battery compartment is corroded beyond cleaning.
Frequently Asked Questions
Q: How often should I replace the battery in my LiftMaster keypad?
A: Most batteries last 1–2 years, depending on usage. Replace the battery as soon as the keypad shows signs of low power, such as dim lighting or delayed response.
Q: Can I use rechargeable batteries?
A: Rechargeable batteries are not recommended as they may not provide consistent voltage levels required for optimal performance.
Q: Do I need to reprogram my keypad after changing the battery?
A: In most cases, reprogramming is unnecessary. However, if the keypad loses its connection, follow the reprogramming steps in your user manual.
Why Maintaining Your LiftMaster Keypad Matters
Your LiftMaster keypad is a critical component of your garage door system. Regularly replacing the battery ensures reliable operation and extends the keypad’s lifespan. By following the steps outlined above, you can easily keep your keypad functioning at its best.
Conclusion
Changing the battery in your LiftMaster garage door opener keypad is a straightforward process that ensures continued convenience and security. With just a few minutes of effort, you can restore your keypad to full functionality and avoid potential access issues.
By understanding how to change the battery in a LiftMaster garage door opener keypad, you’ll be well-equipped to maintain your garage door system for years to come.

Leave a Reply