How Do You Change Battery In Chamberlain Garage Door Opener? A garage door opener is an essential part of any home, providing convenience and security. Chamberlain garage door openers are among the most popular due to their reliability and advanced features. However, like any battery-powered device, the remote or backup battery will eventually need replacement. If your garage door opener is not responding as it should, a dead battery could be the issue.
In this guide, we will walk you through how do you change battery in Chamberlain garage door opener for both the remote and the backup battery. Whether you’re a homeowner or a DIY enthusiast, this step-by-step guide will ensure you can quickly and easily replace the battery without any hassle.
Read too: Door and Garage Door Companies: Choosing the Right Partner for Your Needs
Why Changing the Battery in Your Chamberlain Garage Door Opener is Important
Before we dive into the steps, let’s discuss why keeping your garage door opener’s battery fresh is crucial:
- Ensures Reliable Operation – A weak or dead battery can cause your remote or opener to function inconsistently or stop working altogether.
- Maintains Security – Your garage door is a primary entry point to your home. A working opener ensures that only authorized individuals can access it.
- Prevents Inconvenience – Avoid the frustration of being unable to open or close your garage door, especially during emergencies.
- Extends the Life of the Opener – Regular maintenance, including battery replacement, can prevent unnecessary strain on the system.
Now that we understand why battery replacement is necessary, let’s explore the step-by-step process.
How Do You Change Battery In Chamberlain Garage Door Opener?
Changing the battery in a Chamberlain garage door opener can refer to either the remote control battery or the backup battery inside the main unit. Below, we’ll cover both.
Changing the Battery in the Remote Control
The remote control is a key component of your garage door system. Over time, its battery will lose power, causing delayed responses or failure to open the garage door. Here’s how to replace it:
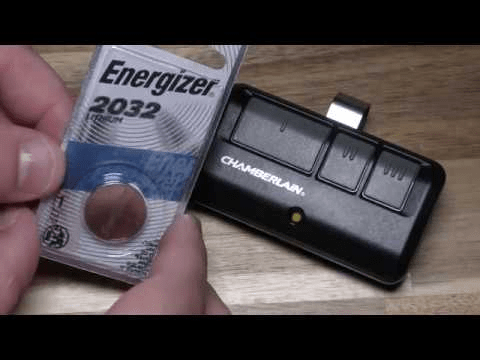
Step 1: Identify Your Remote Model
Before replacing the battery, check your remote model number, usually found on the back of the remote. Chamberlain remotes commonly use CR2032 or CR2016 coin-cell batteries.
Step 2: Open the Remote
- Locate the battery compartment on the back of the remote.
- Some models have a snap-off cover, while others may require a small Phillips screwdriver to remove screws.
- If your remote has a slide-off cover, gently push it to expose the battery.
Step 3: Remove the Old Battery
- Use a small flathead screwdriver or your fingernail to lift the old battery out.
- Dispose of the used battery properly according to local regulations.
Step 4: Insert the New Battery
- Place the new battery into the compartment, ensuring the positive (+) side faces up.
- Secure the battery in place.
Step 5: Close the Remote and Test
- Reattach the cover or screw it back in place.
- Test the remote by pressing the button to check if the garage door responds.
If your remote still doesn’t work after replacing the battery, try reprogramming it according to the Chamberlain user manual.
Changing the Backup Battery in the Chamberlain Garage Door Opener
Some Chamberlain garage door openers include a backup battery that allows the opener to function even during a power outage. This battery typically lasts 1-2 years before needing replacement.
Step 1: Locate the Backup Battery Compartment
- Unplug the garage door opener unit from the power outlet for safety.
- Look for the battery compartment on the opener itself. It’s usually on the side or back of the main unit.
Step 2: Open the Battery Cover
- Remove the battery compartment cover using a screwdriver if necessary.
Step 3: Remove the Old Battery
- Carefully disconnect the battery terminals.
- Remove the 12V rechargeable battery from its compartment.
Step 4: Install the New Battery
- Insert the new 12V Chamberlain-compatible battery in the same orientation as the old one.
- Reconnect the battery terminals securely.
Step 5: Close the Compartment and Restore Power
- Secure the battery cover.
- Plug the garage door opener back into the power outlet.
- The battery indicator light should turn green, indicating a successful installation.
Troubleshooting Battery Issues
If your Chamberlain garage door opener is still not functioning correctly after replacing the battery, consider these troubleshooting steps:
1. Check for Proper Battery Installation
Ensure the battery is inserted with the correct polarity (+/- sides facing the right direction).
2. Reprogram the Remote
Some Chamberlain remotes require reprogramming after a battery change. Follow these steps:
- Press and hold the “Learn” button on the garage door opener unit until the LED light blinks.
- Press the button on your remote to sync it with the opener.
3. Clean the Remote Contacts
If the remote still doesn’t work, open the battery compartment and check for dust or corrosion. Clean the contacts with a dry cloth or a cotton swab with rubbing alcohol.
4. Reset the Garage Door Opener
If the backup battery was changed but the unit isn’t working, try a reset:
- Unplug the opener, wait 10-15 seconds, and plug it back in.
- Test if the system functions normally.
5. Replace the Remote If Necessary
If your remote is old or damaged, a new one may be required. Chamberlain replacement remotes are available online or at home improvement stores.
Tips for Maintaining Your Chamberlain Garage Door Opener
To ensure your garage door opener works efficiently, follow these maintenance tips:
✔ Test the Battery Regularly – Check the remote and backup battery every few months to ensure they are functioning.
✔ Keep Spare Batteries Handy – Always have an extra CR2032 or CR2016 battery for your remote.
✔ Clean the Remote Periodically – Dirt and dust can affect the remote’s performance. Wipe it clean occasionally.
✔ Inspect the Garage Door Opener Unit – Look for signs of wear or damage, and address any issues promptly.
✔ Use Compatible Batteries – Always use Chamberlain-approved batteries to ensure compatibility and longevity.
Final Thoughts
Knowing how do you change battery in Chamberlain garage door opener is an essential skill that can save you time and frustration. Whether you’re replacing the battery in your remote control or the backup battery in the opener, the process is simple and only takes a few minutes.
By following the steps outlined in this guide, you can ensure that your garage door opener remains functional and reliable. Don’t wait until your garage door stops working—check your batteries regularly and replace them as needed to keep your home secure and convenient.
Leave a Reply