Your Genie garage door opener is a key part of your home’s security and convenience. However, like all electronic devices, it requires periodic maintenance to continue operating smoothly. One common task that homeowners often face is replacing the battery in the Genie garage door opener. Over time, the battery will lose its charge and need to be replaced to ensure your opener continues to work properly. Knowing how to open the Genie garage door opener to replace the battery is an essential skill that every Genie garage door opener owner should have.
In this article, we will walk you through the entire process of opening your Genie garage door opener and replacing the battery. Whether you’re doing this for the first time or need a refresher, this guide will provide clear, easy-to-follow instructions so you can complete the task safely and effectively.
Read too: Mastering Quantum Garage Door Opener Programming: A Comprehensive Guide
Why Is It Important to Replace the Battery in Your Genie Garage Door Opener?
Before we get into the specifics of how to open Genie garage door opener to replace battery, it’s important to understand why this maintenance task is necessary. The battery in your garage door opener ensures that the system has backup power in case of a power outage. It also provides power to the remote control sensors, which allow you to operate the door from a distance.
A dead or weak battery can result in a malfunctioning opener, which could lead to delays in opening or closing your garage door, or in some cases, a complete failure to operate. By regularly replacing the battery, you can prevent these issues and keep your garage door opener running smoothly.
How To Open Genie Garage Door Opener To Replace Battery: Step-by-Step Guide
Now that you understand why replacing the battery is so important, let’s dive into how to open Genie garage door opener to replace battery. The process is relatively simple, but it’s essential to follow the correct steps to avoid damaging the system or your battery.
Step 1: Gather the Necessary Tools
Before you start the process of opening your Genie garage door opener to replace the battery, you will need to gather a few tools and materials:
- Replacement battery (make sure it’s compatible with your Genie opener model; usually a 12-volt battery)
- Screwdriver (typically a flathead or Phillips, depending on the model)
- Step ladder (if needed to reach the opener unit)
- Cloth or gloves (for handling the battery and opener parts)
Ensure that the new battery you purchase is the correct size and model for your specific Genie opener. You can find this information in the owner’s manual or on the manufacturer’s website.
Step 2: Turn Off the Power
Safety is crucial when working with any electrical device, including your garage door opener. Before you begin, you should always turn off the power to your Genie garage door opener to avoid any electrical hazards.
- Unplug the Garage Door Opener
Locate the power cord for the Genie opener, and unplug it from the electrical outlet. This will ensure that no power is running to the unit while you work on it. - Turn Off the Wall Switch
In some cases, the wall switch or control panel might still have power running to it. If possible, turn off the wall switch to avoid any unexpected activation of the door while you are replacing the battery.
Step 3: Locate the Battery Compartment
The next step is to locate the battery compartment in your Genie garage door opener. Depending on the model, the battery may be located in different places. Here are the general guidelines:
- Battery Compartment Location
On most Genie garage door openers, the battery compartment is located on the front or side of the motor unit. If you can’t see it immediately, refer to your owner’s manual for the exact location. It’s often marked with a small door or panel that can be opened with a screwdriver. - Remove the Cover
Once you’ve located the compartment, use a screwdriver to remove the cover. The screws are usually small, so be sure to keep them in a safe place to avoid losing them.
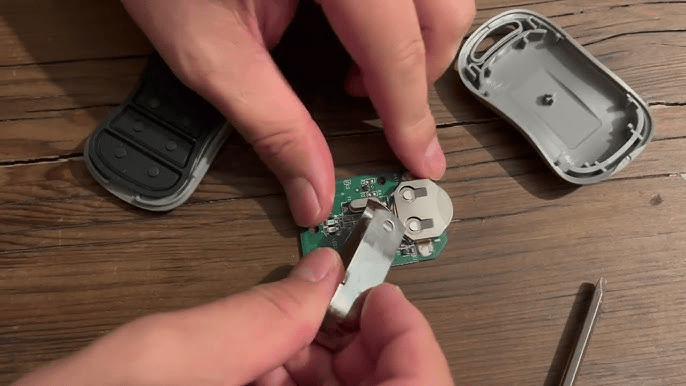
Step 4: Remove the Old Battery
With the battery compartment exposed, you can now proceed to remove the old battery. Be sure to handle the battery carefully to avoid any leakage or potential damage.
- Disconnect the Battery
The battery is typically connected to the opener with two wires—one red and one black. Use your screwdriver or pliers to gently disconnect the wires from the old battery. Make a note of which wire is connected to which terminal for the new battery. - Remove the Old Battery
Once the wires are disconnected, you should be able to easily remove the old battery from the compartment. Set the old battery aside for proper disposal.
Step 5: Install the New Battery
Now that the old battery is removed, it’s time to install the new one. This part is straightforward, but it’s important to make sure the new battery is installed correctly to avoid any issues.
- Place the New Battery
Place the new battery into the compartment, ensuring it fits securely in the designated space. The battery should be positioned in the same way as the old one to ensure proper contact with the terminals. - Reconnect the Wires
Connect the red wire to the positive terminal and the black wire to the negative terminal on the new battery. Tighten the connections to ensure they are secure but be careful not to overtighten, as this could damage the terminals. - Secure the Battery
Once the wires are connected, make sure the battery is properly seated and secure in the compartment. You can gently shake the opener to check if the battery moves or shifts—if it does, you may need to adjust it to ensure it’s tightly in place.
Step 6: Replace the Cover and Reconnect Power
With the new battery installed, the final steps are to replace the cover and reconnect the power.
- Reattach the Battery Compartment Cover
Carefully place the cover back over the battery compartment and use the screwdriver to reattach it with the screws you removed earlier. - Plug In the Opener
Plug the Genie garage door opener back into the electrical outlet, and turn on the wall switch or control panel. The opener should now be powered on, and the new battery should be ready to go. - Test the Garage Door Opener
Finally, test the opener by using the wall switch or remote to open and close the garage door. If everything is working correctly, the new battery should provide the necessary power for the opener to function smoothly.
Tips for Maintaining Your Genie Garage Door Opener Battery
To keep your Genie garage door opener running smoothly, here are a few additional tips to help you maintain the battery:
- Check the Battery Regularly
Even though your opener should last for years, it’s a good idea to check the battery every 6-12 months to ensure it’s still functioning properly. If you notice any signs of corrosion or leakage, replace the battery immediately. - Keep the Opener Clean
Dust and debris can affect the performance of the opener. Wipe down the unit regularly to keep it clean and free from dirt. - Avoid Overloading the Opener
While Genie garage door openers are designed to handle heavy loads, avoid using the opener for tasks it wasn’t designed for, as this can strain the motor and affect battery performance.
Conclusion
Replacing the battery in your Genie garage door opener is an essential maintenance task that ensures the continued smooth operation of your opener. By following the steps outlined in this guide on how to open Genie garage door opener to replace battery, you can complete the task safely and efficiently.
By regularly checking and replacing the battery, you can avoid interruptions in service and ensure that your garage door opener remains a reliable part of your home’s security system. If you’re ever in doubt or need assistance, consult the Genie owner’s manual or contact a professional for support.
Leave a Reply