When it comes to home maintenance, even the smallest tasks like changing a light bulb can seem daunting—especially if it’s on your garage door opener. If you’re a homeowner wondering how to remove light cover on LiftMaster garage door opener, you’re not alone. This step is essential when you need to replace the bulb, clean the cover, or perform general maintenance. Fortunately, it’s easier than it seems, and this detailed guide will walk you through everything you need to know.
In this article, we’ll not only show you how to remove the light cover on your LiftMaster garage door opener, but also explain why it’s important, what tools you may need, and what precautions to take. Let’s make this simple home improvement task something you can do confidently.
Read too: Mastering Quantum Garage Door Opener Programming: A Comprehensive Guide
Why You Might Need to Remove the Light Cover on a LiftMaster Garage Door Opener
Most LiftMaster garage door openers come with a built-in light to illuminate your garage space when the door is opened or closed. Over time, the light bulb may burn out, or the light cover may collect dust and cobwebs, reducing visibility. Removing the cover allows you to:
- Replace a dead or flickering light bulb
- Clean accumulated dust or bugs inside the cover
- Access internal wiring for repairs or upgrades
- Upgrade to a brighter or more energy-efficient bulb
Knowing how to remove the light cover on a LiftMaster garage door opener is a basic but valuable skill that can save you from calling a technician for a simple fix.
Tools You May Need Before Starting
Before jumping into the removal process, it’s wise to gather a few essential tools. While some LiftMaster models allow you to remove the light cover by hand, others may require a screwdriver.
Here are the tools you might need:
- Flathead or Phillips screwdriver (depending on model)
- Step ladder or sturdy stool to reach the opener
- Work gloves to protect your hands from dust or sharp edges
- Dust cloth or vacuum to clean the inside of the light cover
- Replacement light bulb if you plan to change the bulb
Pro tip: Before you begin, make sure to unplug the opener or turn off the circuit breaker to avoid any electrical mishaps.
How To Remove Light Cover On LiftMaster Garage Door Opener Safely and Effectively
Step 1: Ensure Power is Off
Safety first! Disconnect the power source to the garage door opener. You can either unplug it from the ceiling outlet or switch off the breaker from the main panel. This ensures you won’t accidentally trigger the door mechanism or get shocked while working.
Step 2: Position Your Ladder Properly
Place a stable ladder or step stool beneath the garage door opener. Make sure it’s on a flat surface and stable before climbing. Always follow ladder safety practices to avoid falls.
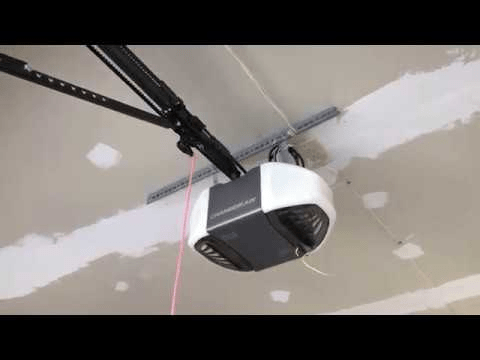
Step 3: Locate the Light Cover
Most LiftMaster openers have a snap-on or screw-on light cover. The cover is typically located on one or both sides of the unit. Depending on your model, you might have to remove one or two covers.
Step 4: Determine the Attachment Mechanism
- Snap-On Covers: These can usually be removed by gently squeezing and pulling outward. Look for small tabs or notches on the side of the cover. Apply light pressure to release the tab and pull the cover off slowly.
- Screw-On Covers: If your cover has screws, use the appropriate screwdriver to remove them. Typically, two screws hold the cover in place. Place the screws in a safe spot so you don’t lose them.
Step 5: Remove the Light Cover
Once detached, carefully pull the light cover away from the unit. If it feels stuck, do not force it. Instead, inspect for additional tabs or screws you might have missed. A gentle wiggle can also help loosen stubborn covers.
Cleaning and Maintenance After Removing the Light Cover
Now that you’ve successfully removed the light cover from your LiftMaster garage door opener, this is the perfect opportunity to perform some light maintenance:
- Clean the Light Cover: Use a damp cloth or mild cleaner to wipe the inside and outside of the cover. Make sure it’s completely dry before reinstalling.
- Replace the Bulb: If your old bulb is burnt out or dim, replace it with a compatible bulb. LiftMaster units typically use standard LED or incandescent bulbs up to 60 watts. Avoid compact fluorescent bulbs, which may interfere with the opener’s radio frequency.
- Inspect for Damage: Look at the wiring and socket for any signs of wear or corrosion. If anything seems off, consult a professional before proceeding.
Reinstalling the Light Cover
Once your maintenance tasks are complete, reinstall the light cover by reversing the steps:
- Align the cover with the slots or holes on the garage door opener.
- For snap-on models, press gently until you hear it click into place.
- For screw-on models, reinsert the screws and tighten them securely.
Restore the power to the opener and test the new light by opening or closing the garage door or pressing the light button on your remote or wall unit.
Troubleshooting Common Issues When Removing a Light Cover
If you run into problems when trying to remove the light cover, here are a few tips:
- Cover Won’t Budge: Don’t force it. Check for hidden screws or additional locking tabs.
- Cover is Cracked or Broken: Replacement covers are available online or through LiftMaster’s support.
- Bulb Won’t Light Up After Replacement: Double-check the bulb type and ensure it’s screwed in properly. Also, inspect the socket for corrosion or loose wiring.
Tips for Long-Term Maintenance
- Clean your light cover every 3–6 months to prevent buildup.
- Use LED bulbs for longer-lasting, energy-efficient lighting.
- Keep a small toolkit nearby in your garage for minor repairs and maintenance.
- Label your garage’s breaker switch so you can quickly turn it off when needed.
Understanding how to remove light cover on LiftMaster garage door opener not only simplifies routine maintenance but also enhances the safety and functionality of your garage system. Taking a few minutes to do this yourself can save time and money in the long run.
Conclusion: Take Charge of Your Garage Lighting Today
Removing the light cover on your LiftMaster garage door opener might seem like a small task, but it’s one that empowers you as a homeowner. From improving visibility to extending the life of your opener, this simple maintenance step makes a big impact. Now that you know how to remove light cover on LiftMaster garage door opener, you can tackle this project with confidence and keep your garage in top shape.
Whether you’re replacing a bulb, cleaning the cover, or checking for damage, regular attention to your opener’s lighting system is a smart move. So grab your ladder and screwdriver, and light up your garage the right way!


Leave a Reply