Programming your Chamberlain Garage Door Opener using Dip switches may seem daunting, but it’s actually a straightforward process once you understand the basics. If you have an older model of the Chamberlain opener or have recently lost your remote and need to reprogram it, you’ll likely need to use the Dip switch method. This article will walk you through exactly how to program Chamberlain Garage Door Opener with Dip switches, providing you with a simple and detailed guide that will make the setup process easy to follow.
In this guide, we’ll explain what Dip switches are, why they’re necessary for programming your Chamberlain garage door opener, and step-by-step instructions on how to set everything up. By the end, you’ll be able to program your opener with ease and enjoy seamless operation.
Read too: How to Perform a Chamberlain Garage Door Opener Code Change? Mastering Security
Understanding Dip Switches and Their Role in Programming
Before diving into the programming steps, it’s important to understand what Dip switches are and how they function. Dip switches are small physical switches found on older garage door opener models. These switches are typically located on both the remote control and the garage door opener unit. They are used to set the communication code between the remote and the opener.
Each Dip switch has two positions: ON and OFF. The combination of ON and OFF settings is unique to each opener and remote, creating a distinct access code that allows the opener to recognize the remote and function properly.
Over time, Chamberlain has moved away from Dip switches in favor of more modern technology like rolling codes, but many older models still rely on Dip switches to pair the remote with the opener.
Why Do You Need to Program the Chamberlain Garage Door Opener With Dip Switches?
Programming your Chamberlain Garage Door Opener with Dip switches is essential for ensuring that your remote control works with your opener. When you purchase a new remote or replace an old one, you may need to set the correct combination of ON and OFF switches on both the opener and the remote to synchronize them.
Additionally, if you’ve recently changed your garage door opener’s battery or reset the system for any reason, the Dip switch settings may have been lost, and you’ll need to reprogram it to restore proper functionality.
How To Program Chamberlain Garage Door Opener With Dip Switches: Step-by-Step Guide
Now that we have a basic understanding of Dip switches, let’s dive into the step-by-step process for programming your Chamberlain Garage Door Opener with Dip switches.
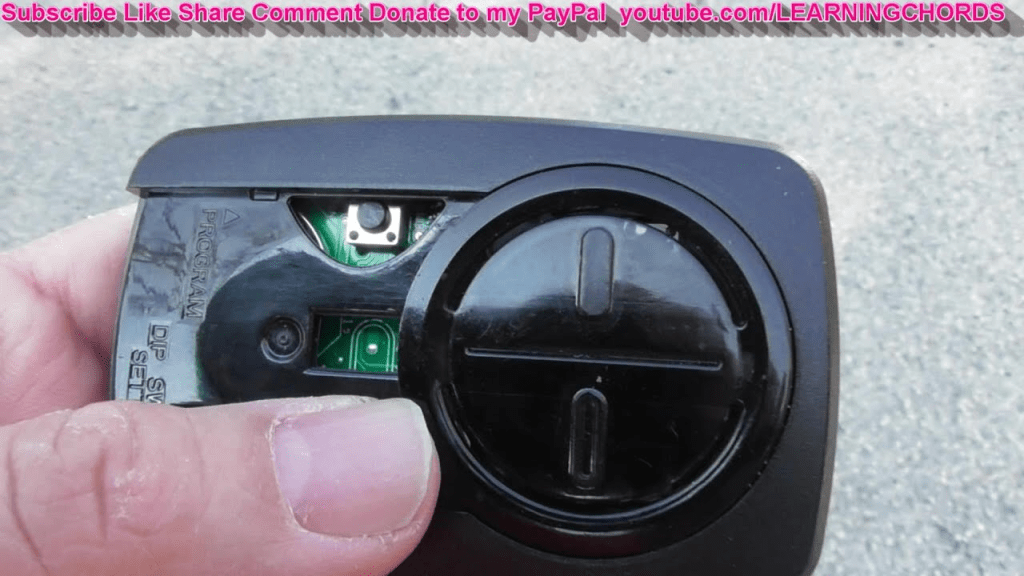
Step 1: Locate the Dip Switches on the Chamberlain Opener
The first step is to locate the Dip switches on your Chamberlain garage door opener. This is typically done by accessing the motor unit, which is often mounted on the ceiling of your garage.
- Turn off the power to the garage door opener to ensure safety while you’re working on the system.
- Locate the opener’s control panel. The Dip switches are usually found on a small panel inside the unit.
- Open the compartment where the Dip switches are housed. It may be necessary to remove a small cover or panel to access them.
Step 2: Note the Current Dip Switch Settings
Before adjusting the Dip switches, it’s important to take note of the current settings. This is helpful in case you want to revert back to the original settings or troubleshoot any problems later.
- Look at the current ON/OFF configuration of the Dip switches inside the opener unit.
- Write down the pattern or take a picture of the setup to make sure you can restore it if necessary.
Step 3: Set the Dip Switches on Your Remote
Next, you’ll need to set the Dip switches on your Chamberlain remote to match the settings on your opener. Typically, this is done by opening the remote and exposing the Dip switches.
- Open the remote control by removing the cover. You may need a small screwdriver or your fingers to do this.
- Set the switches on the remote to match the ON/OFF pattern you’ve noted from the opener’s settings.
- Each Dip switch in the remote will correspond to one on the opener unit, so ensure that the switches are configured identically.
- If the remote uses a 9-switch system, the switches must match one by one in terms of their ON or OFF position.
- Once you’ve set the remote, close the cover of the remote to keep the switches in place.
Step 4: Set the Dip Switches on the Opener Unit
Now that the remote is configured, you’ll need to program the Chamberlain Garage Door Opener by setting the switches on the opener unit to match the remote.
- Flip the switches on the opener unit to match the pattern you set on the remote.
- Ensure that the switches are flipped in the exact same ON/OFF pattern.
- Take your time to avoid missing any switches.
Step 5: Test the Remote
Once both the Chamberlain opener and the remote have their Dip switches set to the same configuration, it’s time to test the connection.
- Restore power to the opener by turning it back on.
- Press the button on your remote control.
- Check the garage door to see if it responds by opening or closing. If it does, the programming was successful!
If the door doesn’t respond, check that the switches on both the remote and the opener are properly aligned. You can try reprogramming the opener by resetting the settings and ensuring the ON/OFF configurations are correct.
Step 6: Program Additional Remotes (If Necessary)
If you have more than one remote to program, repeat the steps above for each remote. Chamberlain garage door openers can typically store multiple remotes, so you can sync as many as needed.
Troubleshooting Tips
While programming your Chamberlain Garage Door Opener with Dip switches is usually simple, there are a few common issues that can arise. Here are some troubleshooting tips to help you if things don’t go as planned:
- Remote not working after programming: Double-check that the switches on both the remote and the opener match exactly. Even a slight difference in configuration can cause the opener to not respond.
- The opener doesn’t recognize the remote: Ensure that the opener has power and the switches are correctly configured. You may also want to check the batteries in your remote.
- Remote not responsive after setting switches: If the remote still doesn’t work, try resetting the Dip switches back to their original configuration and then programming again.
When Should You Use Dip Switches for Programming?
You’ll generally only need to use Dip switches if you have an older Chamberlain opener or if you’ve replaced or lost your remote and are using a new one. Modern systems often use rolling codes or other technology that doesn’t require Dip switches.
If you have a newer Chamberlain garage door opener model, check if it uses rolling codes or learn buttons for programming. These systems are more secure and easier to use.
Conclusion: How To Program Chamberlain Garage Door Opener With Dip Switches
In conclusion, learning how to program Chamberlain garage door opener with Dip switches is an essential skill for homeowners with older models. By following the steps outlined in this guide, you can easily synchronize your Chamberlain remote with your opener and enjoy convenient control of your garage door. Whether you’re replacing a lost remote or reprogramming after a reset, the Dip switch method is a tried-and-true approach that ensures reliable operation.
By following this simple process, you can restore functionality to your Chamberlain Garage Door Opener and enjoy smooth operation once again.

Leave a Reply