When installing or repairing a garage door opener system, one crucial yet often overlooked aspect is selecting the wire type to use for garage door opener sensor connections. While the sensor itself may seem straightforward, the wire you choose plays a significant role in the performance, longevity, and safety of the entire system.
Whether you’re a DIY enthusiast, a homeowner looking to save on service costs, or a professional seeking clarification, this guide covers everything you need to know about garage door opener sensor wiring—from wire gauge and insulation to routing, installation tips, and common mistakes.
Read too: No Power to Genie Garage Door Opener – Resolving the Issue with Ease: Troubleshooting Guide
Understanding the Wire Type To Use For Garage Door Opener Sensor
Garage door sensors—often referred to as safety eyes—are a standard feature in modern garage door systems. They detect objects in the path of the closing door, preventing accidents and damage. For them to work properly, they must be connected to the opener with appropriate wiring.
The wire type to use for garage door opener sensor should be durable, low-voltage, and resistant to environmental wear and tear. It must also maintain a strong signal transmission over potentially long cable runs.
Let’s explore the specific types of wire you should consider.
1. Recommended Wire Gauge and Type
The most common and recommended wire type for garage door opener sensors is:
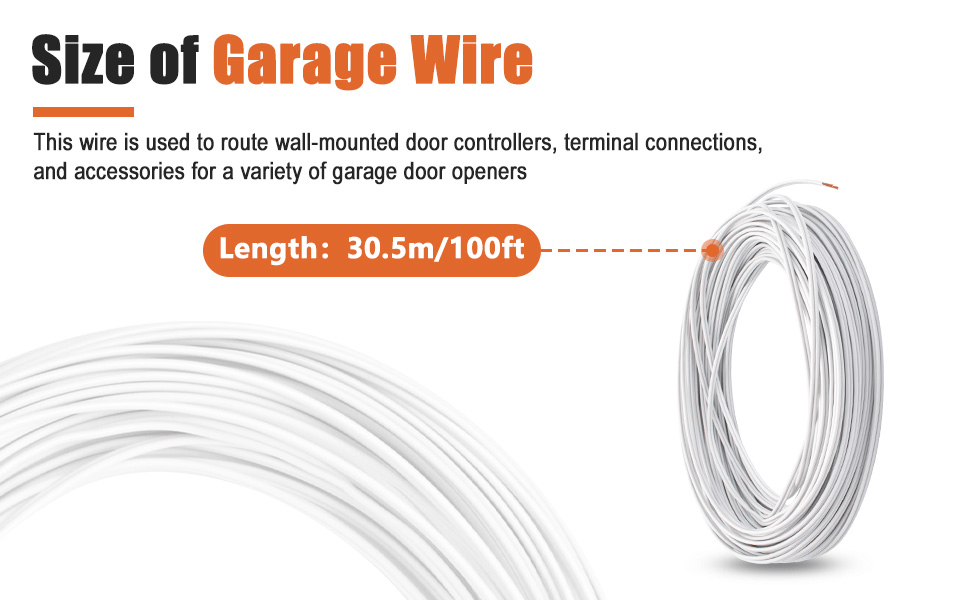
- 22 AWG (American Wire Gauge)
- Stranded or solid copper
- 2-conductor or 4-conductor wire (depending on model requirements)
- Low-voltage thermostat wire or bell wire
Why 22 AWG?
- It’s thick enough to carry the small amount of current required for garage door sensors.
- It offers a good balance of flexibility and durability for short- to medium-distance runs.
- It minimizes signal loss even if the cable has to travel 20–30 feet from the sensor to the opener.
2. Solid vs. Stranded Wire
Choosing between solid and stranded wire depends on your specific application needs:
Solid Wire:
- Better for permanent installations
- Less flexible, but easier to insert into terminals
- More rigid, so may break with frequent movement
Stranded Wire:
- Highly flexible
- Great for tight spaces or when the wire needs to bend around corners
- Requires proper termination (e.g., ferrules) to avoid fraying at ends
For most DIY garage door sensor installations, solid 22 AWG 2-conductor wire is sufficient. However, in colder climates or where bending is necessary, stranded wire may perform better over time.
3. Indoor vs. Outdoor Rated Wire
Garage environments vary. If your garage is insulated and protected, indoor wire types may be fine. However, for garages with high moisture, temperature fluctuations, or exposed installations, outdoor-rated wire is essential.
Look for:
- UV-resistant insulation
- Weatherproof jackets
- Temperature rating of -20°F to +140°F
Using the wrong wire in a harsh environment can lead to cracking insulation, shorts, or signal degradation over time.
4. Shielded vs. Unshielded Wire
For most residential garage door sensors, unshielded wire is sufficient. However, if your garage is near a high-interference environment (heavy machinery, RF signals, or long parallel runs with power lines), a shielded wire may help reduce electrical noise and signal loss.
- Shielded wire has a protective metallic layer that prevents EMI (electromagnetic interference)
- It may be more expensive but can offer increased stability in noisy electrical environments
5. Wire Color Coding and Identification
Garage door opener sensor wiring usually involves simple polarity: one wire is positive, and one is negative. Using color-coded wire pairs helps avoid confusion during installation and future maintenance.
Common wire colors:
- Red and White
- Black and White
- Brown and Blue (thermostat wires)
Label both ends of your wires, especially if you use generic non-color-coded cables.
6. Common Wire Types Used for Sensors
Here are specific types of cable that are widely used and available for garage door opener sensors:
A. Thermostat Wire (22/2 or 22/4)
- Commonly used in HVAC systems
- Suitable for low-voltage sensors
- Available in solid and stranded
- Affordable and easy to find at any hardware store
B. Bell Wire
- Often used in doorbells and garage installations
- Available in 18 or 22 gauge
- Strong enough for low-voltage uses
C. Speaker Wire (Not Recommended)
- While it might be tempting to use speaker wire in a pinch, it often lacks proper insulation or color-coding, and it’s not rated for permanent installations.
7. Installation Best Practices
Knowing the right wire type to use for garage door opener sensor is only half the battle. Installation technique plays a huge role in functionality and safety.
Tips:
- Secure the wire along the wall or ceiling using cable clips or conduit
- Avoid sharp bends or staples that pinch the insulation
- Keep wire away from high-voltage power cables
- Leave slack at the ends for future adjustments
- Use cable conduits for added protection in exposed or moist areas
8. Connecting the Wire to the Sensor and Opener
Once your wire is run, connect it properly to avoid future issues:
- Strip the ends cleanly using a wire stripper
- Match polarity: if your opener manual identifies terminals as “white” and “black,” follow suit
- Use terminal screws or push connectors as required
- Test the system after connecting to ensure sensor lights are steady and the door reverses when something obstructs it
9. Troubleshooting Sensor Wire Issues
If your garage door isn’t closing and the sensor lights are off or blinking, wiring may be the culprit.
Common issues include:
- Loose wire connections
- Broken or cut wires (usually from accidental snags or rodent damage)
- Corrosion in humid environments
- Short circuits from pinched insulation
Use a multimeter to check for continuity in your sensor wire. If there’s no continuity, the wire may be broken internally.
10. Upgrading or Replacing Sensor Wiring
If you’re replacing old wires, consider the following steps:
- Choose a high-quality thermostat wire with a durable jacket
- Remove the old wiring carefully, noting the path and anchoring points
- Install the new wire using better securing methods (conduit, clips, etc.)
- Test functionality before finalizing cable routing
Upgrading to a higher-grade wire type can improve reliability and reduce long-term maintenance needs.
11. Code and Safety Considerations
While garage door sensor wiring is low-voltage and not usually subject to strict building codes, basic safety practices still apply:
- Do not run low-voltage wire in the same conduit as high-voltage lines
- Use UL-rated wire where possible
- Follow manufacturer specifications for distance limits (most sensors are rated for 30 ft max wire run)
- Never leave exposed copper wire
12. Where to Buy the Right Wire Type
You can find suitable garage door sensor wire types at:
- Home improvement stores (Lowe’s, Home Depot, Menards)
- Electrical supply shops
- Online retailers (Amazon, eBay, specialty sites)
Look for wire labeled:
- “22/2 thermostat wire”
- “Bell wire”
- “Low-voltage signal wire”
Make sure the product lists the features you need: UV resistance, weatherproof, proper gauge, and copper material.
Conclusion
Selecting the correct wire type to use for garage door opener sensor is essential for a reliable, safe, and smooth-functioning garage door system. From choosing the right gauge and insulation to ensuring proper installation and avoiding interference, your attention to detail will pay off in fewer breakdowns and safer operation.
To recap:
- 22 AWG solid copper wire is the most recommended option
- Thermostat wire is widely used and affordable
- Always route and secure the wire properly to prevent damage
- Test connections and sensor functionality before closing up
Whether you’re installing new sensors or replacing damaged wiring, using the right wire type helps your garage door system operate efficiently for years to come.
If you’re unsure about the technical aspects, consult your garage door opener’s manual or ask a certified electrician for guidance.

Leave a Reply